jc-dotfiles – A collection of configuration files for UNIX/Linux systems

The jc-dotfiles repository houses James Cherti’s dotfiles and configuration scripts:

  • Shell Configuration (.bashrc, .profile, and .bash_profile): Optimized Bash shell settings for efficient command execution and interactive sessions.
  • Terminal Multiplexer (.tmux.conf): Configuration for Tmux, enhancing terminal session management and productivity.
  • Readline configuration (.inputrc): Inputrc configuration that also allows using Alt-h, Alt-j, Alt-k, and Alt-l as a way to move the cursor.
  • Other: .gitconfig (with support for difftastic), ranger, .ignore, .wcalcrc, mpv, picom, feh, and various scripts and configuration files for managing system settings, aliases, and more.

Here are additional dotfiles and configuration files maintained by the same author:

  • jc-dotfiles @GitHub: A collection of UNIX/Linux configuration files. You can either install them directly or use them as inspiration your own dotfiles.
  • bash-stdops @GitHub: A collection of Bash helper shell scripts.
  • jc-gnome-settings: GNOME customizations that can be applied programmatically.
  • jc-firefox-settings @GitHub: Provides the user.js file, which holds settings to customize the Firefox web browser to enhance the user experience and security.
  • jc-gentoo-portage @GitHub: Provides configuration files for customizing Gentoo Linux Portage, including package management, USE flags, and system-wide settings.
  • jc-xfce-settings: GNOME customizations that can be applied programmatically.
  • watch-xfce-xfconf: A command-line tool that can be used to configure XFCE 4 programmatically using the xfconf-query commands displayed when XFCE 4 settings are modified.

Installation

Here’s how to install James Cherti’s dotfiles:

  1. Clone the Repository:

    git clone https://github.com/jamescherti/jc-dotfiles
  2. Navigate to the jc-dotfiles directory:

    cd jc-dotfiles
  3. Install:

    ./install.sh

Usage

.bashrc

  • Tmux/fzf auto complete: Pressing Ctrl-n calls a custom Bash autocomplete function that captures the current tmux scrollback buffer, extracts unique word-like tokens, and presents them via fzf for interactive fuzzy selection. The selected word is then inserted inline at the current cursor position using a readline binding.

  • The .bashrc file can be extended by adding configurations to ~/.bashrc.local.

  • The o alias calls a function that provides a cross-platform way to open files or URLs using the appropriate command for the system. This function opens files or URLs using the appropriate command (xdg-open on Linux, open on macOS, and start on Windows). If more than 7 arguments are passed, the user is prompted for confirmation before proceeding. Example usage:

    o file1.jpg file2.png file3.jpeg
  • Customizations in .bashrc to add to ~/.profile.local:

    # Use trash-rm as a safer alternative to rm by moving files to the trash instead
    # of deleting them permanently.
    #
    # JC_TRASH_CLI=1 replaces the standard 'rm' command with a wrapper function
    # that:
    # - Provides a detailed summary of all specified files and directories,
    #   including total size and file count.
    # - Prompts the user for confirmation before proceeding with the deletion.
    # - Moves files to the trash using 'trash-put' instead of permanently deleting
    #   them with 'rm'.
    # - Reports the current size of the trash in megabytes after each deletion.
    # - Optionally wraps 'trash-empty' with an interactive prompt before purging the
    #   trash.
    #
    # This setup is only activated for non-root users when 'trash-put' is available
    # and 'JC_TRASH_CLI' is set to a non-zero value.
    #
    JC_TRASH_CLI=1
    
    # Enable Emacs integration for vterm and EAT, configuring shell-side support for
    # features such as prompt tracking and message passing
    JC_EMACS_INTEGRATION=1  # Default: 0
    
    # Display the current Git branch in the shell prompt (PS1)
    JC_PS1_GIT_BRANCH=1  # Default: 0
    
    # Display the count of unread mails in the shell prompt (PS1)
    JC_PS1_MAILDIR=1  # Default: 0
    
    # Directory containing the mail (e.g., to "$HOME/Mail")
    JC_PS1_MAILDIR_PATH="$HOME/Mail"
    
    # Automatically restore the last working directory from the previous
    # interactive Bash session.
    JC_RESTORE_LAST_DIR=1  # Default: 0
    
    # Enable support for the fasd command-line utility, which provides fast access
    # to frequently used files and directories.
    JC_FASD=0  # Default: 0

License

Distributed under terms of the MIT license.

Copyright (C) 2004-2026 James Cherti.

Permission is hereby granted, free of charge, to any person obtaining a copy of this software and associated documentation files (the “Software”), to deal in the Software without restriction, including without limitation the rights to use, copy, modify, merge, publish, distribute, sublicense, and/or sell copies of the Software, and to permit persons to whom the Software is furnished to do so, subject to the following conditions:

The above copyright notice and this permission notice shall be included in all copies or substantial portions of the Software.

THE SOFTWARE IS PROVIDED “AS IS”, WITHOUT WARRANTY OF ANY KIND, EXPRESS OR IMPLIED, INCLUDING BUT NOT LIMITED TO THE WARRANTIES OF MERCHANTABILITY, FITNESS FOR A PARTICULAR PURPOSE AND NONINFRINGEMENT. IN NO EVENT SHALL THE AUTHORS OR COPYRIGHT HOLDERS BE LIABLE FOR ANY CLAIM, DAMAGES OR OTHER LIABILITY, WHETHER IN AN ACTION OF CONTRACT, TORT OR OTHERWISE, ARISING FROM, OUT OF OR IN CONNECTION WITH THE SOFTWARE OR THE USE OR OTHER DEALINGS IN THE SOFTWARE.

Links

Related articles:

bash-stdops – A collection of useful Bash Shell Scripts

The jamescherti/bash-stdops project is a collection of helpful Bash scripts that simplify various operations, including file searching, text replacement, and content modification.

I use these scripts in conjunction with text editors like Emacs and Vim to automate tasks, including managing Tmux sessions, replacing text across a Git repository, securely copying and pasting from the clipboard by prompting the user before executing commands in Tmux, fix permissions, among other operations.

The bash-stdops Script Collection Overview

Files, Paths, and Strings

  • walk: Recursively lists files from the specified directory.
  • walk-run: Executes a command on all files.
  • sre: Replaces occurrences of a specified string or regular expression pattern, with support for case-insensitive matching and regular expressions.
  • git-sre: Executes sre at the root of a Git repository to replace text within files.
  • path-tr, path-uppercase, path-lowercase: Processes a file path to convert the filename to uppercase or lowercase.
  • autoperm: Sets appropriate permissions for files or directories (e.g., 755 for directories).
  • path-is: Prints the path and exits with status 0 if the file is binary or text.

Git

  • git-dcommit: Automates the process of adding, reviewing, and committing changes in Git.
  • git-squash: Squashes new Git commits between the current branch and a specified branch.

SSH

  • esa: Manages the SSH agent, including starting, stopping, adding keys, and executing commands.
  • sshwait: Waits for an SSH server to become available on a specified host.

Tmux

  • tmux-cbpaste: Pastes clipboard content into the current tmux window with user confirmation.
  • tmux-run: Executes a command in a new tmux window. If inside tmux, it adds a new window to the current session; otherwise, it creates a window in the first available tmux session.
  • tmux-session: Attaches to an existing tmux session or creates a new one if it doesn’t exist.

X11/Wayland

  • xocrshot: Captures a screenshot, performs OCR on it, displays the extracted text, and copies it to the clipboard.

Misc

  • haide: Uses AIDE to monitor the file integrity of the user’s home directory.
  • cbcopy, cbpaste, cbwatch: Manages clipboard content by copying, pasting, or monitoring for changes.
  • outonerror: Redirects the command output to stderr only if the command fails.
  • over: Displays a notification once a command completes execution.
  • largs: Executes a command for each line of input from stdin, replacing {} with the line.

Conclusion

The jamescherti/bash-stdops scripts provide a variety of tasks, including file manipulation, Git management, and SSH automation, improving efficiency and usability.

Ansible: ansible-role-tuned, an Ansible role which configures tuned

License

The ansible-role-tuned Ansible playbook manages the installation, configuration, and activation of the tuned service.

Tuned is a dynamic adaptive system tuning tool used in Linux environments to optimize performance by adjusting various system settings dynamically. It provides pre-defined profiles that target specific use cases, such as high throughput, low latency, and energy saving, and automatically applies these configurations based on system activity.

For high traffic servers, using Tuned is beneficial as it can enhance network throughput and responsiveness by adjusting parameters like CPU frequency scaling, I/O scheduling, and network stack settings. This optimization results in improved server performance, reduced latency, and better handling of high loads, ultimately leading to a more efficient and reliable infrastructure for handling significant network traffic.

Features

  • Install tuned and configure it using the Ansible variables: tuned_daemon, tuned_dynamic_tuning, tuned_sleep_interval, tuned_update_interval, and tuned_recommend_command.
  • Activate the specified tuned profile using the tuned_profile variable. (When the tuned_profile is not set, the role installs only tuned.)
  • Supports Debian/Ubuntu and RedHat family based operating systems.

Usage

Example Playbook

Here is an example of how to use ansible-role-tuned after installing it in the roles/tuned directory:

- hosts: SERVER
  roles:
    - {role: tuned,
       tuned_profile: "throughput-performance"}

Author and license

Copyright (C) 2020-2026 James Cherti.

Distributed under terms of the MIT license.

Links

Running Large Language Models locally with Ollama (compatible with Linux, macOS, and Windows)

Running Large Language Models on your machine can enhance your projects, but the setup is often complex. Ollama simplifies this by packaging everything needed to run a Large Language Model. Here’s a concise guide on using Ollama to run LLMs locally.

Requirements

  • CPU: A modern x86-64 CPU with AVX2 support is recommended. AVX512 can further improve inference performance for some workloads. (If your CPU does not support AVX, see Ollama Issue #2187: Support GPU runners on CPUs without AVX.)
  • RAM: A minimum of 16GB is recommended for a decent experience when running models with 7 billion parameters.
  • Disk Space: A practical minimum of 40GB of disk space is advisable.
  • GPU: While a GPU is not mandatory, it is recommended for enhanced performance in model inference. Refer to the list of GPUs that are compatible with Ollama. Approximate VRAM requirements for quantized models are roughly 4-6 GB for 7B models, 8-12 GB for 13B models, and substantially more for larger models such as 30B or 70B variants. Actual requirements vary depending on quantization level, context window size, and how much of the model is offloaded to the GPU.
  • NVIDIA GPUs: Ollama relies on CUDA for NVIDIA GPU acceleration (You can find the instructions to install CUDA on Debian here). CPU-only inference is also supported, and macOS systems use Apple’s Metal backend for GPU acceleration.

Step 1: Install Ollama

Download and install Ollama for Linux using:

curl -fsSL https://ollama.com/install.sh | shCode language: plaintext (plaintext)

Step 2: Download a Large Language Model

Download a specific large language model using the Ollama command:

ollama pull gemma2:2bCode language: plaintext (plaintext)

The command above downloads the Gemma2 model by Google DeepMind. You can find other models by visiting the Ollama Library.

(At the time of writing, downloading gemma2:2b retrieves a quantized variant such as gemma2:2b-instruct-q4_0, indicating that it retrieves a quantized version of the 2-billion-parameter model specifically optimized for instruction-following tasks like chatbots. This quantization process reduces the model’s numerical precision from floating-point representations such as FP16 or BF16 into lower-bit integer formats such as 4-bit quantization q4_0. This reduces memory usage and improves inference speed, at the cost of a modest reduction in model quality.)

Step 3: Chat with the model

Run the large language model:

ollama run gemma2:2bCode language: plaintext (plaintext)

This launches an interactive REPL where you can interact with the model.

Step 4: Install Open WebUI (web interface)

Open WebUI offers a user-friendly interface for interacting with Large Language Models downloaded via Ollama. It enables users to run and customize models without requiring extensive programming knowledge.

It can be installed using pip within a Python virtual environment:

mkdir -p ~/.python-venv/open-webui
python -m venv ~/.python-venv/open-webui
source ~/.python-venv/open-webui/bin/activate
pip install open-webuiCode language: plaintext (plaintext)

NOTE: Alternatively, Open WebUI can also be installed using Docker.

Finally, execute the following command to start the Open WebUI server:

~/.python-venv/open-webui/bin/open-webui serveCode language: plaintext (plaintext)

You will also have to execute Ollama as a server simultaneously with Open WebUI:

ollama serve

NOTE: On Linux installations, Ollama is commonly started manually using ollama serve. On macOS and Windows desktop installations, the Ollama background service is typically started automatically.

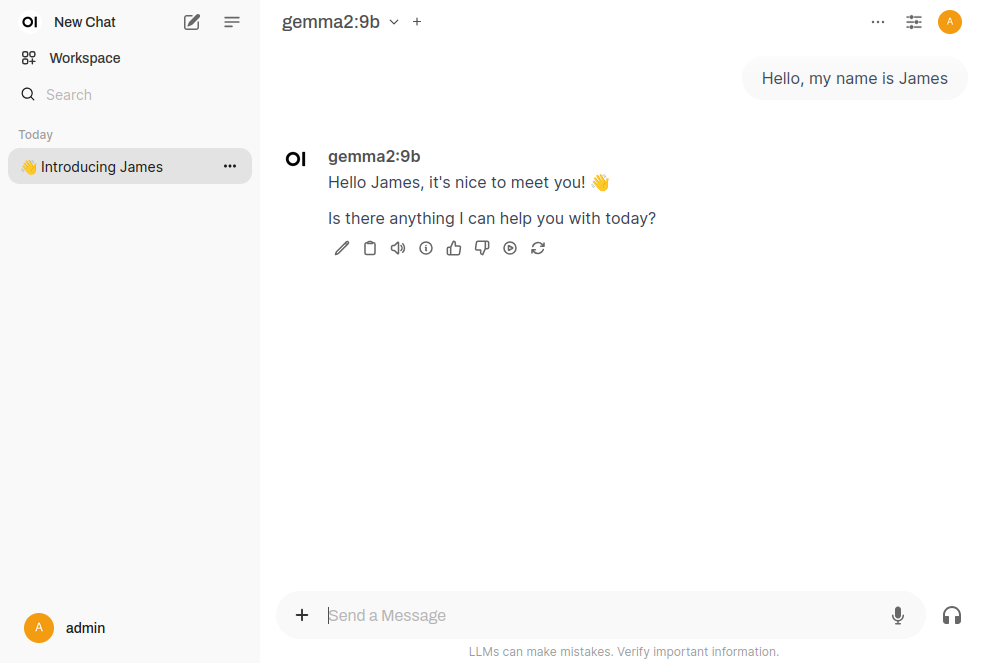
After initiating both the Open WebUI and Ollama server processes, the web application binds to localhost. Open your web browser and navigate to http://localhost:8080 to access the interface. During your initial visit, the system will prompt you to register an administrator account. Once authenticated, you can select your downloaded models, such as gemma2:2b, from the workspace dropdown menu and initiate a chat session directly within your browser.

When starting a new conversation in Open WebUI, a “Model not selected” message may appear, preventing input. This behavior is expected because Open WebUI acts as a central hub for potentially dozens of different Large Language Models and requires an explicit model selection before starting a conversation. To resolve this, locate the dropdown menu at the top center of the chat interface, often labeled “Select a model.”

Frequently Asked Questions

Troubleshooting: Open WebUI: You are sending unauthenticated requests to the HF Hub. Please set a HF_TOKEN

While running Open WebUI or pulling certain models, you might see the following warning in your terminal:

Warning: You are sending unauthenticated requests to the HF Hub.
Please set a HF_TOKEN to enable higher rate limits and faster downloads.Code language: plaintext (plaintext)

This warning appears because the system is attempting to interact with the Hugging Face API anonymously, which falls under a lower rate limit tier. To fix this, you need to provide a Hugging Face access token via an environment variable.

Here is how to generate and apply the token:

  • Go to https://huggingface.co and log into your account.
  • Navigate to your account settings and click on “Access Tokens”.
  • Click “Create new token”, give it a descriptive name, select the “Read” role, and generate it.
  • Copy the newly created token string.
  • Export this token as an environment variable in your terminal session before starting your server.

You can apply the token directly in the terminal before running the web interface:

export HF_TOKEN='your_huggingface_token_here'
~/.python-venv/open-webui/bin/open-webui serveCode language: Bash (bash)

To make this change permanent, append the export HF_TOKEN='your_huggingface_token_here' line to your shell configuration file, such as ~/.bashrc, and reload your shell.

Troubleshooting: Open WebUI High GPU and/or CPU Usage and Follow-Up Auto-Generation

If you notice that your GPU and/or CPU is constantly pinned at 100%, even after the model has finished answering your prompt, it may be caused by Open WebUI running background tasks.

By default, Open WebUI often tries to anticipate your next move by automatically generating follow-up questions or summarizing your chat for the sidebar title. While helpful, these auto-generation features can place a significant, continuous strain on your system resources, especially if you are running models strictly on your CPU.

To alleviate this, you can:

  • Disable Background Tasks: Go to Settings -> General and toggle off Title Auto-Generation, Follow-Up Auto-Generation, Chat Tags Auto-Generation.
  • Force Single-Tasking: Prevent Ollama from splitting its focus by setting export OLLAMA_NUM_PARALLEL=1 as an environment variable. This ensures requests queue up rather than processing simultaneously and slowing down.
  • Limit Memory Usage: If you have low VRAM, set export OLLAMA_MAX_LOADED_MODELS=1. This prevents Ollama from trying to hold multiple models in your GPU memory at the same time.
  • Check for Ghost Requests: Run export OLLAMA_DEBUG=1 before starting ollama serve. Watch the terminal logs to see if Open WebUI is sending unexpected requests (like embeddings or pings) that are keeping the LLM active.
  • Manual Model Unloading: If GPU memory remains allocated after a chat completes, set export OLLAMA_KEEP_ALIVE=0 to force the model to unload immediately after each response. Note that this increases latency because the model must reload for every request.

The model cuts off mid-sentence or mid-thought

Increasing the token limit allows the model the logical breathing room required to complete its internal reasoning process and deliver a final, coherent answer.

When working with reasoning models, the model essentially writes two responses: a hidden thought chain and the visible answer. If the token limit is too low, the model consumes its entire budget on the thinking phase, leaving no room for the actual solution.

Option 1: Increase the Max Tokens (Permanent Fix)

  1. In Open WebUI, click the Control Sliders icon at the top right of your chat window.
  2. Click on Settings.
  3. Go to Advanced Parameters.
  4. Look for max_tokens.
  5. It is likely set to a default like 1024 or 2048. Increase this number significantly, such as to 4096 or 8192.
  6. Click Save and try your prompt again.

Option 2: The Continue Response Button (Quick Fix)
If a model ever cuts off mid-sentence or mid-thought in Open WebUI, you don’t necessarily have to start over. You can usually just click the Continue Response button at the bottom of the chat, and the model will pick up typing exactly where it left off, finishing its thought process and moving on to your answer.

Pro-Tip for Reasoning Models: If you are asking a complex coding or configuration question, reasoning models will go down massive rabbit holes. If you don’t want to wait 2 minutes for an answer, you can add “Keep your reasoning brief” to the end of your prompt!

Conclusion

With Ollama, you can quickly run Large Language Models (LLMs) locally and integrate them into your projects. Additionally, Open WebUI provides a user-friendly interface for interacting with these models, making it easier to customize and deploy them without extensive programming knowledge.

Links

Making ‘cron’ notify the user about a failed command by redirecting its output to stderr only when it fails (non-zero exit code)

Monitoring the success or failure of cron jobs can be challenging, especially when multiple jobs cause cron to send emails even when they don’t fail. A more effective approach to handling cron job errors is to use a Bash script that directs the output to stderr only if the job fails, causing cron to notify the user about the error only when the script fails.

Script overview

The script provided below ensures that any command passed to it will redirect its output to a temporary file. If the command fails (i.e., returns a non-zero exit code), the script sends the content of the temporary file to stderr, which causes cron to notify the user.

Here is the complete script to be installed in /usr/local/bin/outonerror:

#!/usr/bin/env bash
# Description:
# Redirect the command's output to stderr only if the command fails (non-zero
# exit code). No output is shown when the command succeeds.
#
# Author: James Cherti
# License: MIT
# URL: https://www.jamescherti.com/cron-email-output-failed-commands-only/

set -euf -o pipefail

if [[ "$#" -eq 0 ]]; then
  echo "Usage: $0 <command> [args...]" >&2
  exit 1
fi

cleanup() {
  if [[ "$OUTPUT_TMP" != "" ]] && [[ -f "$OUTPUT_TMP" ]]; then
    rm -f "$OUTPUT_TMP"
  fi

  OUTPUT_TMP=""
}

OUTPUT_TMP=$(mktemp --suffix=.outonerror)
trap 'cleanup' INT TERM EXIT

ERRNO=0
"$@" >"$OUTPUT_TMP" 2>&1 || ERRNO="$?"
if [[ "$ERRNO" -ne 0 ]]; then
  cat "$OUTPUT_TMP" >&2
  echo "$0: '$*' exited with status $ERRNO" >&2
fi

cleanup
exit "$ERRNO"
Code language: Bash (bash)

To use this script with a cron job, save it as /usr/local/bin/outonerror and make it executable by runnning:

chmod +x /usr/local/bin/outonerrorCode language: plaintext (plaintext)

Integration with Cron

Cron sends an email by default whenever a job produces output, whether standard output or error output. This is typically configured through the MAILTO environment variable in the crontab file. If MAILTO is not set, cron sends emails to the user account under which the cron job runs. Cron will only be able to send emails if the mail transfer agent (e.g., Postfix, Exim, Sendmail) is configured properly.

Here is how to schedule the cron job to use the outonerror script:

MAILTO="[email protected]"
* * * * * /usr/local/bin/outonerror your_command_hereCode language: plaintext (plaintext)

With this setup, the cron job will execute your_command_here and only send an email if it fails, thanks to cron’s default behavior of emailing stderr output to the user.

Conclusion

This script is a simple yet effective solution for improving cron jobs by ensuring that the user is notified only when something goes wrong. It reduces unnecessary notifications for successful executions and provides clear error messages when failures occur.

Ansible: Installing and configuring Gitolite using Ansible for secure Git repository management

License

The ansible-role-gitolite Ansible role automates the installation and configuration of Gitolite, a Git repository management system. It facilitates the setup of Gitolite on remote servers, including user access control and repository creation, ensuring a consistent and reproducible deployment.

Requirements

  • Operating system: Debian-based (e.g., Ubuntu, Mint), RedHat-based (e.g., CentOS, Fedora), or Arch Linux

Author and License

Copyright (C) 2024-2026 James Cherti.

Distributed under terms of the MIT license.

Links

Ansible: Reintegrating /etc/rc.local in Linux systems that use Systemd as their init system

For years, /etc/rc.local has been a staple in Linux administration, providing a straightforward means to execute scripts or commands automatically upon system startup. However, with the transition to newer init systems like systemd, the /etc/rc.local script is no longer executed at boot time.

Ansible tasks that restore the /etc/rc.local script

The following Ansible tasks will create and configure /etc/rc.local and also ensure its execution by Systemd at boot time.

---
# Description: Reintegrate /etc/rc.local in Linux systems that use Systemd 
#              as their init system.
# Author: James Cherti
# License: MIT
# URL: https://www.jamescherti.com/ansible-config-etc-rc-local-linux-systemd/

- name: Check if /etc/rc.local exists
  stat:
    path: "/etc/rc.local"
  register: etc_rc_local_file

- name: Create the file /etc/rc.local should it not already exist
  copy:
    dest: /etc/rc.local
    owner: root
    group: root
    mode: 0750
    content: |
      #!/usr/bin/env bash
  when: not etc_rc_local_file.stat.exists

- name: Create the systemd service rc-local.service
  register: rc_local
  copy:
    dest: /etc/systemd/system/rc-local.service
    owner: root
    group: root
    mode: 0644
    content: |
      [Unit]
      Description=/etc/rc.local compatibility

      [Service]
      Type=oneshot
      ExecStart=/etc/rc.local
      TimeoutSec=0
      RemainAfterExit=yes
      SysVStartPriority=99

      [Install]
      WantedBy=multi-user.target

- name: Reload systemd daemon
  systemd:
    daemon_reload: yes
  when: rc_local.changed|bool

- name: Enable rc-local.service
  systemd:
    name: rc-local
    enabled: true
Code language: YAML (yaml)

Emulating Cherry MX Blue Mechanical Keyboard Sounds on Linux

License

For those nostalgic for the era of tactile and auditory feedback from typing on a physical keyboard, Cherrybuckle can be utilized on Linux as a Cherry MX Blue Mechanical Keyboard Simulator.

Cherrybuckle runs as a background process and plays back the sound of each key pressed and released on your keyboard.

Cherry MX Blue

To temporarily silence Cherrybuckle, for example, to enter secrets, press Scroll Lock twice (but be aware that those Scroll Lock events are delivered to the application); do the same to unmute. The keycode for muting can be changed with the ‘-m’ option. Use keycode 0 to disable the mute function.

Links

Building

GNU/Linux

Dependencies

Dependencies: libalure, libopenal, libx11, libxtst.

The dependencies can be installed on a Debian or Ubuntu system using the following commands:

$ sudo apt-get install build-essential git
$ sudo apt-get install libalure-dev libx11-dev libxtst-dev pkg-config
Building on GNU/Linux
Option 1: X11 (Recommended)

This is the preferred method for building it on GNU/Linux:

$ make
$ ./cherrybuckle

This only works with X11/Xorg and does not yet support Wayland.

Option 2: Libinput

The default Linux build relies on X11 for capturing events. If you intend to use it on the Linux console or Wayland display server, you can configure it to read events from the raw input devices located in /dev/input. Keep in mind that this will require special permissions to access the devices. To make it use libinput, build with the following command:

$ make libinput=1

MacOS

You can compile it on macOS using the following commands:

$ brew install alure pkg-config
$ git clone https://github.com/jamescherti/cherrybuckle
$ cd cherrybuckle
$ sed -i '' 's/-Wall -Werror/-Wall/' Makefile
$ make
$ ./cherrybuckle

Note that you need superuser privileges to create the event tap on Mac OS X. Also give your terminal Accessibility rights: system preferences -> security -> privacy -> accessibility.

If you want to use Cherrybuckle while doing normal work, add an & behind the command.

$ sudo ./cherrybuckle &

Windows

The Windows version of Cherrybuckle is currently broken. It appears that switching from FreeLut to Alure caused the issue. There seems to be an issue with ‘alureCreateBufferFromFile()’ being called from another thread in the key capture callback. Assistance would be greatly appreciated.

Usage

usage: ./cherrybuckle [options]

options:

  -b, --bucklespring        use Bucklespring sounds instead
  -d, --device=DEVICE       use OpenAL audio device DEVICE
  -f, --fallback-sound      use a fallback sound for unknown keys
  -g, --gain=GAIN           set playback gain [0..100]
  -m, --mute-keycode=CODE   use CODE as mute key (default 0x46 for scroll lock)
  -M, --mute                start the program muted
  -c, --no-click            don't play a sound on mouse click
  -k, --no-keyboard         don't play a sound on keyboard press
  -h, --help                show help
  -l, --list-devices        list available OpenAL audio devices
  -p, --audio-path=PATH     load .wav files from directory PATH
  -s, --stereo-width=WIDTH  set stereo width [0..100]
  -v, --verbose             increase verbosity / debugging

OpenAL notes

Cherrybuckle uses the OpenAL library for mixing samples and providing a realistic 3D audio playback. This section contains some tips and tricks for properly tuning OpenAL for Cherrybuckle.

The default OpenAL settings can cause a slight delay in playback. Edit or create the OpenAL configuration file ~/.alsoftrc and add the following options:

 period_size = 32
 periods = 4

If you are using headphones, enabling the head-related-transfer functions in OpenAL for a better 3D sound:

 hrtf = true

When starting an OpenAL application, the internal sound card is selected for output, and you might not be able to change the device using pavucontrol. The option to select an alternate device is present, but choosing the device has no effect. To solve this, add the following option to the OpenAL configuration file:

 allow-moves = true

Authors

  • Ico Doornekamp (Original author)
  • nofal (Cherry MX sounds)
  • James Cherti (The maintainer of cherrybuckle, which includes the version maintained by Ico Doornekamp and the pull request by nofal)
  • Egor
  • Ico Doornekamp
  • Jakub Wilk
  • Peter Hofmann
  • Marco Trevisan
  • Marco Trevisan
  • Member1221
  • mirabilos
  • Alex Bertram
  • Alexander Willner
  • Anjan Momi
  • Anton Karmanov
  • Clipsey
  • Dominik George
  • Emanuel Haupt
  • Jan Chren (rindeal)
  • Jan Chren
  • Jeroen Knoops
  • Jeroen Knoops
  • Nisker
  • Peter Tonoli
  • Sebastian Morr
  • Stephen Gelman
  • Vladislav Khvostov
  • jeromenerf
  • qu1gl3s
  • rabin-io
  • somini
  • tensorknower69
  • tnagorra

Creating and Restoring a Gzip Compressed Disk Image with dd on UNIX/Linux

Creating and restoring disk images are essential tasks for developers, system administrators, and users who want to safeguard their data or replicate systems efficiently. One useful tool for this purpose is dd, which allows for low-level copying of data. In this article, we will explore how to clone and restore a partition from a compressed disk image in a UNIX/Linux operating system.

IMPORTANT: There is a risk of data loss if a mistake is made. The dd command can be dangerous if not used carefully. Specifying the wrong input or output device can result in data loss. Users should exercise caution and double-check their commands before executing them.

Cloning a Partition into a Compressed Disk Image

To clone a partition into a compressed disk image, you can use the dd and gzip commands:

dd if=/dev/SOURCE conv=sync bs=64K | gzip --stdout > /path/to/file.gzCode language: plaintext (plaintext)

This command copies the content of the block device /dev/SOURCE to the compressed file /path/to/file.gz, 64 kilobytes at a time.

Restoring a Partition from a Compressed Disk Image

To restore a partition from a file containing a compressed disk image, use the following command:

gunzip --stdout /path/to/file.gz | dd of=/dev/DESTINATION bs=64K
Code language: plaintext (plaintext)

This command decompresses the content of the compressed file located at /path/to/file.gz and copies it to the block device /dev/DESTINATION, 64 kilobytes at a time.

More information about the dd command options

Here are additional details about the dd command options:

  • The status=progress option makes dd display transfer statistics progressively.
  • The conv=noerror option instructs dd to persist despite encountering errors. However, ignoring errors might result in data corruption in the copied image. The image could be incomplete or corrupted, especially if errors occur in critical parts of the data.
  • The conv=sync option tells dd to fill any empty space in a data block with zeros. This is specifically useful when you are trying to recover data from a failing hard drive using the conv=noerror option. When a hard drive has a bad sector that cannot be read, conv=sync steps in and replaces that unreadable chunk of data with zeros.
  • Finally, the bs=64K option instructs dd to read or write up to the specified bytes at a time (in this case, 64 kilobytes). The default value is 512 bytes, which is relatively small. It is advisable to consider using 64K or even the larger 128K. However, it’s important to note that while a larger block size speeds up the transfer, a smaller block size enhances transfer reliability.

Ensuring Data Integrity

Although the dd command automatically verifies that the input and output block sizes match during each block copy operation, it is prudent to further confirm the integrity of the copied data after completing the dd operation.

To achieve this, follow these steps:

Generate the md5sum of the source block device:

dd if=/dev/SOURCE conv=sync bs=64K | md5sumCode language: plaintext (plaintext)

Next, generate the md5sum of the gzip-compressed file:

gunzip --stdout /path/to/file.gz | md5sumCode language: plaintext (plaintext)

Ensure that the two md5sum fingerprints are equal. This additional verification step adds an extra layer of assurance regarding the accuracy and integrity of the copied data.

Gentoo: How to Speed Up emerge ‐‐sync

Synchronizing with the Gentoo Portage ebuild repository using emerge --sync can be slow when utilizing the rsync protocol. However, an effective solution exists that can greatly improve the synchronization speed: Configuring emerge --sync to synchronize using Git instead.

In this article, we will explore how to set up emerge to synchronize from the official Gentoo ebuild Git repository and save valuable time during the synchronizing process.

Step 1: Install Git using the following command:

sudo emerge -a dev-vcs/gitCode language: plaintext (plaintext)

Step 2: Remove any file from the directory /etc/portage/repos.conf/ that configures the emerge command to use rsync.

Step 3: Create the file /etc/portage/repos.conf/gentoo.conf containing:

[DEFAULT]
main-repo = gentoo

[gentoo]

# The sync-depth=1 option speeds up initial pull by fetching 
# only the latest Git commit and its immediate ancestors, 
# reducing the amount of downloaded Git history.
sync-depth = 1

sync-type = git
auto-sync = yes
location = /var/db/repos/gentoo
sync-git-verify-commit-signature = yes
sync-openpgp-key-path = /usr/share/openpgp-keys/gentoo-release.asc
sync-uri = https://github.com/gentoo-mirror/gentoo.gitCode language: plaintext (plaintext)

Step 4: Finally, run the following command to synchronize with the Gentoo ebuild repository using Git:

sudo emerge --sync

The initial download of the entire Git repository will cause the first emerge --sync command to take some time. However, subsequent synchronizations will be significantly quicker, taking only a few seconds.

Using Git can be a great way to speed up synchronization with the Gentoo ebuild repository. By following the steps outlined in this article, you can clone the Portage repository to your local machine and keep it up-to-date with the latest changes using Git. This can save you a lot of time when syncing your local repository.

Arch Linux: Preserving the kernel modules of the currently running kernel during and after an upgrade

One potential issue when upgrading the Arch Linux kernel is that the modules of the currently running kernel may be deleted. This can lead to a number of problems, including unexpected behavior, system crashes, or the inability to mount certain file systems (e.g. the kernel fails to mount a vfat file system due to the unavailability of the vfat kernel module).

The Arch Linux package linux-keep-modules (also available on AUR: linux-keep-modules @AUR), written by James Cherti, provides a solution to ensure that the modules of the currently running Linux kernel remain available until the operating system is restarted. Additionally, after a system restart, the script automatically removes any unnecessary kernel modules that might have been left behind by previous upgrades (e.g. the kernel modules that are not owned by any Arch Linux package and are not required by the currently running kernel).

The linux-keep-modules package keeps your system running smoothly and maintains stability even during major Linux kernel upgrades.

Make and install the linux-keep-modules package

Clone the repository and change the current directory to ‘archlinux-linux-keep-modules/’:

$ git clone https://github.com/jamescherti/archlinux-linux-keep-modules.git
$ cd archlinux-linux-keep-modules/Code language: plaintext (plaintext)

Use makepkg to make linux-keep-modules package:

$ makepkg -fCode language: plaintext (plaintext)

Install the linux-keep-modules package:

$ sudo pacman -U linux-keep-modules-*-any.pkg.tar.*Code language: plaintext (plaintext)

Finally, enable the cleanup-linux-modules service:

$ sudo systemctl enable cleanup-linux-modulesCode language: plaintext (plaintext)

(The cleanup-linux-modules service will delete the Linux kernel modules that are not owned by any a package at boot time)

The linux-keep-modules Arch Linux package offers a solution to preserve kernel modules during and after upgrades, ensuring that the necessary modules for the currently running kernel remain present in the system even after the kernel is upgraded. This solution keeps your system running smoothly and maintains stability even during major upgrades.

Links related to the pacman package linux-keep-modules

Helper script to upgrade Arch Linux

In this article, we will be sharing a Python script, written by James Cherti, that can be used to upgrade Arch Linux. It is designed to make the process of upgrading the Arch Linux system as easy and efficient as possible.

The helper script to upgrade Arch Linux can:

  • Delete the ‘/var/lib/pacman/db.lck’ when pacman is not running,
  • upgrade archlinux-keyring,
  • upgrade specific packages,
  • download packages,
  • upgrade all packages,
  • remove from the cache the pacman packages that are no longer installed.

The script provides a variety of options and is perfect for those who want to automate the process of upgrading their Arch Linux system (e.g. execute it from cron) and ensure that their system is always up to date.

Requirements: psutil
Python script name: archlinux-update.py

#!/usr/bin/env python
# Author: James Cherti
# License: MIT
# URL: https://www.jamescherti.com/script-update-arch-linux/
"""Helper script to upgrade Arch Linux."""

import argparse
import logging
import os
import re
import subprocess
import sys
import time

import psutil


class ArchUpgrade:
    """Upgrade Arch Linux."""

    def __init__(self, no_refresh: bool):
        self._download_package_db = no_refresh
        self._keyring_and_pacman_upgraded = False
        self._delete_pacman_db_lck()

    @staticmethod
    def _delete_pacman_db_lck():
        """Delete '/var/lib/pacman/db.lck' when pacman is not running."""
        pacman_running = False
        for pid in psutil.pids():
            try:
                process = psutil.Process(pid)
                if process.name() == "pacman":
                    pacman_running = True
                    break
            except psutil.Error:
                pass

        if pacman_running:
            print("Error: pacman is already running.", file=sys.stderr)
            sys.exit(1)

        lockfile = "/var/lib/pacman/db.lck"
        if os.path.isfile(lockfile):
            os.unlink(lockfile)

    def upgrade_specific_packages(self, package_list: list) -> list:
        """Upgrade the packages that are in 'package_list'."""
        outdated_packages = self._outdated_packages(package_list)
        if outdated_packages:
            cmd = ["pacman", "--noconfirm", "-S"] + outdated_packages
            self.run(cmd)

        return outdated_packages

    def _outdated_packages(self, package_list: list) -> list:
        """Return the 'package_list' packages that are outdated."""
        outdated_packages = []
        try:
            output = subprocess.check_output(["pacman", "-Qu"])
        except subprocess.CalledProcessError:
            output = b""

        for line in output.splitlines():
            line = line.strip()
            pkg_match = re.match(r"^([^\s]*)\s", line.decode())
            if not pkg_match:
                continue

            pkg_name = pkg_match.group(1)
            if pkg_name in package_list:
                outdated_packages += [pkg_name]

        return outdated_packages

    @staticmethod
    def upgrade_all_packages():
        """Upgrade all packages."""
        ArchUpgrade.run(["pacman", "--noconfirm", "-Su"])

    def download_all_packages(self):
        """Download all packages."""
        self.download_package_db()
        self.run(["pacman", "--noconfirm", "-Suw"])

    def download_package_db(self):
        """Download the package database."""
        if self._download_package_db:
            return

        print("[INFO] Download the package database...")
        ArchUpgrade.run(["pacman", "--noconfirm", "-Sy"])
        self._download_package_db = True

    def upgrade_keyring_and_pacman(self):
        self.download_package_db()

        if not self._keyring_and_pacman_upgraded:
            self.upgrade_specific_packages(["archlinux-keyring"])
            self._keyring_and_pacman_upgraded = True

    def clean_package_cache(self):
        """Remove packages that are no longer installed from the cache."""
        self.run(["pacman", "--noconfirm", "-Scc"])

    @staticmethod
    def run(cmd, *args, print_command=True, **kwargs):
        """Execute the command 'cmd'."""
        if print_command:
            print()
            print("[RUN] " + subprocess.list2cmdline(cmd))

        subprocess.check_call(
            cmd,
            *args,
            **kwargs,
        )

    def wait_download_package_db(self):
        """Wait until the package database is downloaded."""
        successful = False
        minutes = 60
        hours = 60 * 60
        seconds_between_tests = 15 * minutes
        for _ in range(int((10 * hours) / seconds_between_tests)):
            try:
                self.download_package_db()
            except subprocess.CalledProcessError:
                minutes = int(seconds_between_tests / 60)
                print(
                    f"[INFO] Waiting {minutes} minutes before downloading "
                    "the package database...",
                    file=sys.stderr,
                )
                time.sleep(seconds_between_tests)
                continue
            else:
                successful = True
                break

        if not successful:
            print("Error: failed to download the package database...",
                  file=sys.stderr)
            sys.exit(1)


def parse_args():
    """Parse the command-line arguments."""
    usage = "%(prog)s [--option] [args]"
    parser = argparse.ArgumentParser(description=__doc__.splitlines()[0],
                                     usage=usage)
    parser.add_argument("packages",
                        metavar="N",
                        nargs="*",
                        help="Upgrade specific packages.")

    parser.add_argument(
        "-u",
        "--upgrade-packages",
        default=False,
        action="store_true",
        required=False,
        help="Upgrade all packages.",
    )

    parser.add_argument(
        "-d",
        "--download-packages",
        default=False,
        action="store_true",
        required=False,
        help="Download the packages that need to be upgraded.",
    )

    parser.add_argument(
        "-c",
        "--clean",
        default=False,
        action="store_true",
        required=False,
        help=("Remove packages that are no longer installed from "
              "the cache."),
    )

    parser.add_argument(
        "-n",
        "--no-refresh",
        default=False,
        action="store_true",
        required=False,
        help=("Do not download the package database (pacman -Sy)."),
    )

    parser.add_argument(
        "-w",
        "--wait-refresh",
        default=False,
        action="store_true",
        required=False,
        help=("Wait for a successful download of the package database "
              "(pacman -Sy)."),
    )

    return parser.parse_args()


def command_line_interface():
    """The command-line interface."""
    logging.basicConfig(level=logging.INFO, stream=sys.stdout,
                        format="%(asctime)s %(name)s: %(message)s")

    if os.getuid() != 0:
        print("Error: you cannot perform this operation unless you are root.",
              file=sys.stderr)
        sys.exit(1)

    nothing_to_do = True
    args = parse_args()
    upgrade = ArchUpgrade(no_refresh=args.no_refresh)

    if args.wait_refresh:
        upgrade.wait_download_package_db()
        nothing_to_do = False

    if args.packages:
        print("[INFO] Upgrade the packages:", ", ".join(args.packages))
        upgrade.upgrade_keyring_and_pacman()
        if not upgrade.upgrade_specific_packages(args.packages):
            print()
            print("[INFO] The following packages are already up-to-date:",
                  ", ".join(args.packages))
        nothing_to_do = False

    if args.download_packages:
        print("[INFO] Download all packages...")
        upgrade.download_all_packages()
        nothing_to_do = False

    if args.upgrade_packages:
        print("[INFO] Upgrade all packages...")
        upgrade.upgrade_keyring_and_pacman()
        upgrade.upgrade_all_packages()

        nothing_to_do = False

    if args.clean:
        print("[INFO] Remove packages that are no longer installed "
              "from the cache...")
        upgrade.clean_package_cache()
        nothing_to_do = False

    if nothing_to_do:
        print("Nothing to do.")
        print()

    sys.exit(0)


def main():
    try:
        command_line_interface()
    except subprocess.CalledProcessError as err:
        print(f"[ERROR] Error {err.returncode} returned by the command: "
              f"{subprocess.list2cmdline(err.cmd)}",
              file=sys.stderr)
        sys.exit(1)


if __name__ == '__main__':
    main()Code language: Python (python)

A tool to Execute a Command in a new Tmux Window

The Python script tmux-run.py allows executing a command in a new tmux window. A tmux window is similar to a tab in other software.

If the script is executed from within a tmux session, it creates a tmux window in the same tmux session. However, if the script is executed from outside of a tmux session, it creates a new tmux window in the first available tmux session.

(Requirement: libtmux)

The Python script: tmux-run.py

#!/usr/bin/env python
# License: MIT
# Author: James Cherti
# URL: https://www.jamescherti.com/python-script-run-command-new-tmux-window/
"""Execute a command in a new tmux window.

This script allows executing a command in a new tmux window (a tmux window is
similar to a tab in other software).

- If it is executed from within a tmux session, it creates a tmux window
in the same tmux session.
- However, if the script is executed from outside of a tmux
session, it creates a new tmux window in the first available tmux session.

"""

import os
import shlex
import shutil
import sys

import libtmux


SCRIPT_NAME = os.path.basename(sys.argv[0])


def parse_args():
    if len(sys.argv) < 2:
        print(f"Usage: {SCRIPT_NAME} <command> [args...]",
              file=sys.stderr)
        sys.exit(1)

    args = sys.argv[1:]
    args[0] = shutil.which(args[0])
    if args[0] is None:
        print(f"{SCRIPT_NAME}: no {args[0]} in "
              f"({os.environ.get('PATH', '')})", file=sys.stderr)
        sys.exit(1)

    return args


def get_tmux_session():
    tmux_server = libtmux.Server()
    if not tmux_server.sessions:
        print(f"{SCRIPT_NAME}: the tmux session was not found",
              file=sys.stderr)
        sys.exit(1)

    tmux_session_id = os.environ["TMUX"].split(",")[-1]
    if tmux_session_id:
        try:
            return tmux_server.sessions.get(id=f"${tmux_session_id}")
        except Exception:  # pylint: disable=broad-except
            pass

    return tmux_server.sessions[0]


def run_in_tmux_window():
    try:
        command_args = parse_args()
        tmux_session = get_tmux_session()
        command_str = shlex.join(command_args)
        tmux_session.new_window(attach=True, window_shell=command_str)
    except libtmux.exc.LibTmuxException as err:
        print(f"Error: {err}.", file=sys.stderr)
        sys.exit(1)


if __name__ == '__main__':
    run_in_tmux_window()


Code language: Python (python)

Gentoo Linux and Genkernel: Unlocking a LUKS Encrypted LVM Root Partition at Boot Time using a Key File stored on an External USB Drive

Gentoo can be configured to use a key file stored on an external USB drive to unlock a LUKS encrypted LVM root partition.

We will explore in this article the general steps involved in configuring Gentoo to use an external USB drive as a key file to unlock a LUKS encrypted LVM root partition.

Note: The kernel boot parameters demonstrated in this guide (crypt_root, root_keydev, root_key, and dolvm) are specific to an initramfs generated by genkernel. If your system uses a different initramfs generator (e.g., Dracut), the required kernel parameters will differ.

1. Create a key file on the USB stick and add it to the LUKS encrypted partition

Generate a key file on a mounted ext4 or vfat partition of a USB stick, which will be used by initramfs to unlock the LUKS partition:

dd if=/dev/urandom of=/PATH/TO/USBSTICK/keyfile bs=1024 count=4Code language: plaintext (plaintext)

Ensure that the partition on the USB drive has a label, as the initramfs will use this label to find where the key file is located.

Afterward, add the key file to the LUKS partition to enable decryption of the partition using that key file:

cryptsetup luksAddKey /dev/PART1 /PATH/TO/USBSTICK/keyfile

In this example, “/dev/PART1” is the partition where the LUKS encryption is enabled, and “/PATH/TO/USBSTICK/keyfile” is the location of the keyfile.

2 – Find the UUID of the encrypted partition and the label of the USB drive

Use the lsblk command to find the UUID of the encrypted partition and the label of the USB drive:

lsblk -o +UUID,LABEL

3. Configure the boot loader (such as Systemd-boot, GRUB, Syslinux…)

Add to the boot loader configuration the following initramfs kernel parameters:

  • crypt_root=UUID=A1111111-A1AA-11A1-AAAA-111AA11A1111
  • root=/dev/LVMVOLUME/root
  • root_keydev=/dev/disk/by-label/LABELNAME
  • root_key=keyfile

Here is an example for Systemd-boot:

options dolvm crypt_root=UUID=A1111111-A1AA-11A1-AAAA-111AA11A1111 root=/dev/LVMVOLUME/root root_keydev=/dev/disk/by-label/LABELNAME root_key=keyfileCode language: plaintext (plaintext)

To ensure proper setup:

  • Customize the initramfs options for LVMVOLUME, LABELNAME, and UUID=A1111111-A1AA-11A1-AAAA-111AA11A1111 to match your specific case.
  • Verify that the ext4 or vfat partition of the USB drive that is labeled “LABELNAME” contains a file named “keyfile”.
  • Make sure that the modules “dm_mod” and “usb_storage” are included in the initramfs.

This method offers a convenient way to unlock a LUKS encrypted root LVM partition. The implementation process is well-documented, making it a suitable choice for those looking to secure their Gentoo Linux systems.

How to make Vim edit/diff files from outside of Vim? (e.g. from a shell like Bash, Zsh, Fish..)

License

The vim-client command-line tools vim-client-edit, vim-client-diff and the Python module vim_client will allow you to connect to a Vim server and make it:

  • Edit files or directories in new tabs,
  • Compare files (similar to vimdiff),
  • Evaluate expressions and return their result,
  • Send commands to Vim.

It will allow you, for example, to make Vim edit or diff files from outside of Vim (e.g. from a shell like Bash, Zsh, etc.).

License

Copyright (C) 2022-2026 James Cherti.

Distributed under terms of the MIT license.

Requirements

  • Python >= 3.0
  • The Vim editor (‘vim’ or ‘gvim’ in $PATH. Vim must be compiled with |+clientserver|, which is the case of most Vim distributions, because the Python module vim_client uses command-line arguments vim --remote-*)

Installation

sudo pip install vim-client

The ‘vim-client-*’ command-line tools

Edit a file in the current window/tab:

vim-client-edit file1

Edit multiple files/directories in separate tabs:

vim-client-edit --tab file1 file2 file3

Edit multiple files/directories in stacked horizontal splits:

vim-client-edit --split file1 file2

Edit multiple files/directories in side-by-side vertical splits (To open vertical splits on the right of the current window, use the Vim option set splitright):

vim-client-edit --vsplit file1 file2

Edit and compare up to eight files in a new tab:

vim-client-diff --tab file1 file2

Recommendations

Add aliases to ~/.bashrc

It is recommended to add the following aliases to your ~/.bashrc:

alias gvim='vim-client-edit --tab'
alias vim='vim-client-edit --tab'
alias vi='vim-client-edit --tab'
alias vimdiff='vim-client-diff --tab'

Start diff mode with vertical splits (vim-client-diff)

Add the following line to your ~/.vimrc:

set diffopt+=vertical

Create desktop launchers

File: /usr/local/share/applications/vim-client-edit.desktop

[Desktop Entry]
Name=vim-client-edit
GenericName=Vim Client Edit
Comment=Vim Client Edit
Exec=vim-client-edit --tab %F
Terminal=false
Type=Application
Keywords=Text;editor;
Icon=gvim
Categories=Utility;TextEditor;
StartupNotify=false
MimeType=text/english;text/plain;text/x-makefile;text/x-c++hdr;text/x-c++src;text/x-chdr;text/x-csrc;text/x-java;text/x-moc;text/x-pascal;text/x-tcl;text/x-tex;application/x-shellscript;text/x-c;text/x-c++;

File: /usr/local/share/applications/vim-client-diff.desktop

[Desktop Entry]
Name=vim-client-diff
GenericName=Vim Client Diff
Comment=Vim Client Diff
Exec=vim-client-diff --tab %F
Terminal=false
Type=Application
Keywords=Text;editor;
Icon=gvim
Categories=Utility;TextEditor;
StartupNotify=false
MimeType=text/english;text/plain;text/x-makefile;text/x-c++hdr;text/x-c++src;text/x-chdr;text/x-csrc;text/x-java;text/x-moc;text/x-pascal;text/x-tcl;text/x-tex;application/x-shellscript;text/x-c;text/x-c++;

Links