A Shell Script that Configures the GNOME Desktop Programmatically

License

The jc-gnome-settings repository provides the jc-gnome-settings.sh script, which holds James Cherti’s settings to customize the GNOME desktop environment, including window management, notifications, desktop behavior, keyboard settings, and more, to enhance the user experience.

Requirements

  • gsettings

Usage

  1. Clone the repository:

    git clone https://github.com/jamescherti/jc-gnome-settings
  2. Navigate to the repository directory:

    cd jc-gnome-settings
  3. Run the script to configure GNOME:

    ./jc-gnome-settings.sh

Author and License

The jc-gnome-settings tool has been written by James Cherti and is distributed under terms of the MIT license.

Links

Other project by the same author:

  • jc-dotfiles @GitHub: A collection of UNIX/Linux configuration files. You can either install them directly or use them as inspiration your own dotfiles.
  • bash-stdops @GitHub: A collection of Bash helper shell scripts.
  • jc-firefox-settings @GitHub: Provides the user.js file, which holds settings to customize the Firefox web browser to enhance the user experience and security.
  • jc-gentoo-portage @GitHub: Provides configuration files for customizing Gentoo Linux Portage, including package management, USE flags, and system-wide settings.
  • jc-xfce-settings: GNOME customizations that can be applied programmatically.
  • watch-xfce-xfconf: A command-line tool that can be used to configure XFCE 4 programmatically using the xfconf-query commands displayed when XFCE 4 settings are modified.

A Shell Script that Automates XFCE Desktop Configuration

License

The jc-xfce-settings project provides the jc-xfce-settings.sh script, which holds James Cherti’s settings to customize the XFCE desktop environment, including window management, notifications, desktop behavior, keyboard settings, and more, to enhance the user experience.

(The jc-xfce-settings.sh script was created with the help of watch-xfce-xfconf)

Requirements

  • The XFCE Desktop Environment,
  • and xfconf-query utility that is part of XFCE.

Usage

  1. Clone the repository:

    git clone https://github.com/jamescherti/jc-xfce-settings
  2. Navigate to the repository directory:

    cd jc-xfce-settings
  3. Run the script to configure XFCE:

    ./jc-xfce-settings.sh

Features

  • Title Bar Customization: Simplifies button layout for easier window management.
  • Font and Display Settings: Enables anti-aliasing, hinting, and configures RGBA rendering.
  • File Manager (Thunar): Optimizes behavior for thumbnailing, single-click navigation, and directory-specific settings.
  • Keyboard Tweaks: Adjusts key repeat delay and rate for a smoother typing experience.
  • Notifications: Sets notification theme, position, and timeout duration.
  • Desktop Behavior: Disables unnecessary desktop icons and menus for a cleaner workspace.
  • Session Management: Disables session saving for a faster logout experience.
  • Window Management: Configures snapping, shadow effects, focus behavior, and workspace interactions.
  • Compositor Settings: Adjusts transparency and disables unneeded effects.

Author and License

The jc-xfce-settings tool has been written by James Cherti and is distributed under terms of the MIT license.

Links

Other project by the same author:

  • jc-dotfiles @GitHub: A collection of UNIX/Linux configuration files. You can either install them directly or use them as inspiration your own dotfiles.
  • bash-stdops @GitHub: A collection of Bash helper shell scripts.
  • jc-gnome-settings: GNOME customizations that can be applied programmatically.
  • jc-firefox-settings @GitHub: Provides the user.js file, which holds settings to customize the Firefox web browser to enhance the user experience and security.
  • jc-gentoo-portage @GitHub: Provides configuration files for customizing Gentoo Linux Portage, including package management, USE flags, and system-wide settings.

update-iptables – A low-level Linux firewall for advanced users

License: GPL v3

The update-iptables script implements a firewall for managing network traffic and routing.

It supports a modular configuration model through drop-in scripts located in /etc/update-iptables.d/. Each file is a shell script executed sequentially during firewall initialization.

This low-level firewall script is intended for Linux system administrators who require precise control over packet states, network address translation, and custom routing chains. Rules are defined directly through iptables without the abstraction layers commonly introduced by modern firewall management tools.

If this low-level firewall proves useful, please support the project by ⭐ starring update-iptables on GitHub, helping more developers discover it.

Requirements

  • bash
  • iptables (iptables, ip6tables, and iptables-save)
  • Optional: diff and cmp

Installation

Install update-iptables system-wide with the following commands:

git clone https://github.com/jamescherti/update-iptables
cd update-iptables
sudo ./install.sh

Enable the firewall service at boot:

systemctl enable update-iptables

Usage

By default, update-iptables blocks all traffic, including input, output, and forwarding, except for connections on the loopback interface.

Adding Custom Rules

Custom rules can be added by creating a .rules script in the /etc/update-iptables.d/ directory. Files in this directory are sourced sequentially during firewall initialization, allowing modular and organized rule management.

Create a new file in /etc/update-iptables.d/ with a descriptive name, ending with .rules. For example:

sudo nano /etc/update-iptables.d/10-my-rules.rules

Add your iptables commands in the file. For example:

# Set the default policy of the INPUT, OUTPUT, and FORWARD chains to DROP. This
# establishes a default-deny firewall policy for both IPv4 and IPv6.
ui_set_drop_policy

# Drop any traffic with an INVALID state match and TCP packets with illogical
# flag combinations, such as SYN and FIN or SYN and RST being set
# simultaneously.
ui_drop_invalid

# Accept traffic belonging to already established connections or packets related
# to them. This rule ensures that once a connection has been permitted by a
# specific rule, all subsequent packets for that session are processed quickly
# and efficiently without re-evaluating the entire rule set.
#
# (Add UI_FORWARD if the system is acting as a router, gateway, or host for
# virtual machines and containers, such as Docker, libvirt, that require network
# access.)
ui_allow_established UI_INPUT UI_OUTPUT

# Allow all legitimate internal traffic on the 'lo' interface,
# which is required for local applications and services to communicate.
# This function also drops packets on non-loopback interfaces that spoof loopback
# IP addresses (127.0.0.0/8 and ::1/128) to protect the system from
# external manipulation and network pollution.
ui_allow_loopback

# Accept all incoming ICMP echo requests, also known as pings. Only the first
# packet will count as new, the others will be handled by the RELATED,
# ESTABLISHED rule. Since the computer is not a router, no other ICMP with
# state NEW needs to be allowed.
ui_input_allow_ping

# Permit outbound network traffic for a specific list of local system users.
# (Usernames that do not exist on the host are silently ignored.)
ui_allow_output_users systemd-timesync sockd proxy root alpm

# SSH
iptables -A UI_INPUT -p tcp --dport 22 -m conntrack --ctstate NEW,ESTABLISHED -j ACCEPT

Reload the firewall to apply the new rules:

sudo systemctl restart update-iptables

The new rule will be integrated automatically, respecting the modular structure of the firewall.

Features

  • Low-level iptables control: Defines firewall rules directly using iptables and ip6tables without intermediate management layers.

  • Modular configuration: Supports drop-in rule scripts located in /etc/update-iptables.d/. Files with the .rules extension are sourced sequentially, allowing incremental and organized firewall configuration.

  • Stateful firewall rules: Uses connection tracking (conntrack) to manage NEW, ESTABLISHED, RELATED, and INVALID packet states.

  • IPv4 and IPv6 support: Applies rules consistently to both iptables and ip6tables.

  • Custom rule chains: Introduces dedicated chains (UI_INPUT, UI_OUTPUT, UI_FORWARD, UI_PREROUTING, UI_POSTROUTING) to isolate managed rules from system chains.

  • Per-user network policies: Allows outgoing traffic to be restricted or permitted based on the Unix user ID using the owner module.

  • Secure default policy: Uses restrictive default policies (DROP) until rules are successfully applied.

  • Automatic rule validation and rollback behavior: In case of failure during execution, all policies are locked down to DROP to avoid leaving the system in an insecure state.

  • Packet logging support: Optional logging chains record packets passing through firewall chains with rate limiting.

  • Spoofing and malformed packet protection: Drops packets with invalid connection states, suspicious TCP flag combinations, and spoofed source addresses.

  • Localhost protection rules: Ensures correct handling of loopback traffic while preventing spoofed loopback packets from external interfaces.

  • Rule diff inspection: Saves firewall rules before and after execution and optionally displays a diff when changes occur.

  • Verbose execution mode: Displays executed iptables commands when verbose mode is enabled.

  • Safe rule flushing: Supports cooperative flushing of managed chains or full firewall reset through command-line options.

License

Copyright (C) 2012-2026 James Cherti

This program is free software: you can redistribute it and/or modify it under the terms of the GNU General Public License as published by the Free Software Foundation, either version 3 of the License, or (at your option) any later version.

This program is distributed in the hope that it will be useful, but WITHOUT ANY WARRANTY; without even the implied warranty of MERCHANTABILITY or FITNESS FOR A PARTICULAR PURPOSE. See the GNU General Public License for more details.

You should have received a copy of the GNU General Public License along with this program.

Links

The Importance of Backups: Why Failing to Create or Test Them Leads to Regret

Data loss is an inevitable reality in the digital age. It is not a matter of “if,” but “when.” Whether you’re managing critical infrastructure for a large enterprise or simply storing personal documents, photos, and legal files on your own computer, the risk of data loss is ever-present. Despite this, many people and organizations fail to prioritize backups until it is too late.

Throughout my career as an IT specialist, I have witnessed this problem repeatedly. The pattern is always the same: individuals and companies lose data, panic ensues, and attempts are made to recover what could have been easily protected with minimal cost and effort.

Data loss

On a daily basis, I encounter numerous instances of data loss across various sectors. Companies pay for bare-metal servers or cloud compute instances to run their production workloads, but when these systems crash, experience filesystem corruption, or are compromised by security breaches, the response is typically one of outrage. Support tickets are submitted with complaints that their data is lost, with no backups, no snapshots, and no contingency plan in place.

This issue is not exclusive to large enterprises. Consider personal devices. How many individuals store years of important tax records, legal documents, irreplaceable family photos, or critical work files on their laptops, with no backup strategy whatsoever? Hardware failure, malware attacks, accidental deletion, theft, and simple human error can result in irreversible data loss in an instant.

Some of the cases I handled…

The cases I handled professionally can be truly staggering. For example, I worked with a client paying tens of thousands of dollars per month for a bare-metal server to host highly sensitive data, yet they had no backup strategy in place. When hardware failure inevitably occurred, the result was outrage, threats of legal action, and attempts to assign blame. Unfortunately, without a backup policy, disaster recovery plan, and monitoring system in place, these situations are often beyond repair.

In this particular instance, I worked closely with the client to establish a comprehensive backup procedure. This involved selecting an appropriate backup solution adapted to their infrastructure, setting up regular backups, and ensuring the backups were stored securely and off-site. Additionally, we implemented a monitoring system to alert the client to any potential issues before they became critical. The result is now a much more resilient system, where data loss is no longer a risk, and the client has a clear disaster recovery plan in place.

To make matters worse, I’ve witnessed scenarios where the financial cost of data loss has reached tens of thousands of dollars per day. This is not a matter of insufficient resources. It’s a matter of misplaced priorities and negligence. For a fraction of the cost of their monthly expenses, these individuals and organizations could have secured a robust backup solution that would have prevented the catastrophe.

The reality is simple: backups are inexpensive. Data loss, on the other hand, is costly, stressful, and often irreversible. The barriers to implementing reliable, automated backup solutions today are negligible. Whether you choose cloud storage, external drives, remote servers, the tools are readily available, and there is no excuse for neglecting to protect your data.

Restores have to be tested

It is a common misconception that having a backup in place means data is secure, simply because a tool reports, “Your backups were successful.” However, the true test of a backup’s reliability occurs when it is needed most, during a restore attempt. This is when many realize that despite the “successful” alert, the backup may be incomplete, corrupted, or otherwise unusable.

It is concerning that many individuals in technical roles lack the necessary expertise to properly set up and manage infrastructure within an organization. While foundational knowledge is readily available through online resources, there is a tendency for some to set up systems with minimal effort, a few clicks, and the system is presumed to be functioning. However, the true measure of proficiency in IT infrastructure lies not in the ability to configure a system, but in the ability to resolve issues when things inevitably fail.

Conclusion

If you are reading this, I encourage you to take a moment to assess your backup strategy. If you do not have one, create one today. If you already have a backup system in place, ensure that it is functioning correctly. Whether you are managing a business with critical client data or simply safeguarding personal files on your laptop, the importance of backups cannot be overstated.

Feel free to share your own experiences with data loss, lessons learned, or helpful backup solutions in the comments.

Pathaction, a universal Makefile for your entire filesystem: Run rule-driven commands on any file or directory

License: GPL v3

The pathaction tool is a flexible command-line utility for running commands on files and directories. Pass a file path as an argument, and the tool handles the rest, whether you are working with code, media, or configurations.

Think of pathaction like a Makefile for any file or directory in the filesystem. It uses a .pathaction.yaml file to determine which command to run, and you can use Jinja2 templating to make those commands dynamic. You can also use tags to define multiple actions for the exact same file type. For example, you can set up one tag to run a script, another to debug it, and a third to run a linter.

This tool is built for software engineers who manage multiple projects across diverse environments. It eliminates the cognitive load of switching between different build tools, environment configurations, and deployment methods. Run a single unified command on any file and trust that it gets handled correctly.

If this tool helps your workflow, please show your support by ⭐ starring pathaction on GitHub and sharing it on your website, blog, Mastodon, Reddit, X, LinkedIn, or other social media platforms to help more Git users discover its benefits.

Example

You can execute a file with the following commands:

pathaction -t main file.py

Or:

pathaction -t edit another-file.jpg

The -t option specifies the tag, allowing you to apply a tagged rule.

Here is an example of what a .pathaction.yaml rule-set file looks like:

---
actions:
  - path_match: "*.py"
    tags: main
    command:
      - "python"
      - "{{ file }}"

  - path_match: "*.jpg"
    tags:
      - edit
      - show
    command: "gimp {{ file|quote }}"

There are many ways to match paths, including using regular expressions and MIME types. See below for more details.

Editor Plugins

Installation

Here is how to install pathaction using pip:

pip install --user pathaction

The pip command above will install the pathaction executable in the directory ~/.local/bin/.

(Python requirements: jinja2, schema, PyYAML.)

Optional Dependencies

The pathaction CLI offers optional dependencies that extend its functionality. These extras can be installed according to environment requirements.

  • Colored Terminal Output (colors): Installs colorama to provide consistent cross-platform ANSI color support. This enhances the readability of standard output and error messages.

    pip install "pathaction[colors]"
  • Custom Process Title (proctitle): Installs setproctitle to rename the running process from python to pathaction. This simplifies identification in system monitoring tools such as top, htop, and ps.

    pip install "pathaction[proctitle]"

To install both extras at once, use a comma-separated list:

pip install "pathaction[colors,proctitle]"

Getting Started

1. Authorize your working directory

By default, pathaction does not read rule-set files from arbitrary directories for security reasons. The allowed directories must be explicitly permitted. To allow pathaction to load rules from your projects folder and its subdirectories, run:

pathaction --allow-dir ~/projects

2. Create a rule-set file

Navigate to your project root and create a .pathaction.yaml file (e.g., ~/projects/my-app/.pathaction.yaml). Here is a basic example to run Python files:

---
actions:
  - path_match: "*.py"
    tags: main
    command:
      - "python"
      - "{{ file }}"

3. Execute the file

Now, instead of manually invoking the Python interpreter, you can pass the file directly to pathaction. It will read the rule, match the .py extension, and execute the command.

pathaction ~/projects/my-app/dir1/dir2/file.py

Because the default tag is main, pathaction automatically targets the block we just defined.

You can also specify the tag:

pathaction -t main ~/projects/my-app/dir1/dir2/file.py

Comprehensive Examples

The real value of pathaction comes from defining complex, multi-tag workflows across different file types. Here are detailed examples of how to configure .pathaction.yaml for various scenarios.

Example 1: Full Python and Bash Workflow

Instead of memorizing different tools and their command-line arguments, you can define them as actions.

---
actions:
  # Execute the Python script
  - path_match: "*.py"
    tags: main
    command:
      - "python"
      - "{{ file }}"

  # Run tests
  - path_match: "*.py"
    tags: test
    command: "pytest -v {{ file|quote }}"

  # Type checking
  - path_match: "*.py"
    tags: typecheck
    command: "mypy {{ file|quote }}"

  # Execute Bash shell scripts
  - path_match: "*.sh"
    tags:
      - main
    command: "bash {{ file|quote }}"

You can invoke these specific actions by passing the -t (tag) flag:

pathaction -t typecheck src/utils.py
pathaction -t test src/test_utils.py

Example 2: Managing Infrastructure with Ansible

You can set up rules to apply Ansible playbooks directly.

---
actions:
  - path_match: "*playbook.yml"
    tags: main
    command: "ansible-playbook -i inventory.ini {{ file|quote }}"

Example 3: C/C++ Compilation and Execution

You can use pathaction to compile files on the fly and put the output binary in the correct directory.

---
actions:
  # Compile C++ source code
  - path_match: "*.cpp"
    tags: build
    cwd: "{{ file|dirname }}"
    command: "g++ -Wall -O2 {{ file|quote }} -o {{ file|basename|replace('.cpp', '') }}"

  # Run the compiled binary
  - path_match: "*.cpp"
    tags: run
    cwd: "{{ file|dirname }}"
    command: "./{{ file|basename|replace('.cpp', '') }}"

Command-Line Arguments

The pathaction utility accepts several arguments to control execution behavior:

  • -t, --tag: Execute the action associated with this tag (default is main).
  • -b, --confirm-before: Prompt for confirmation before executing the defined action.
  • -a, --confirm-after: Ask the user if they want to execute the action again after it finishes (respects the confirm_after_timeout configuration).
  • -l, --list: List all the .pathaction.yaml configuration files that apply to the given file path. Useful for debugging rule resolution.
  • -d, --allow-dir: Permanently allow pathaction to execute rules from the provided directory and its subdirectories.
  • --disallow-dir: Revoke access and remove a specific directory from your allowed list.
  • --list-allowed-dirs: Print a list of all permanently allowed directories.

Configuration Guide (.pathaction.yaml)

The rule-sets cascade hierarchically. When you execute a file, pathaction looks for .pathaction.yaml in the file’s current directory, and then walks up the filesystem tree (parent directories) to find and merge all other .pathaction.yaml files. This loading behavior is similar to that of a .gitignore file. In case of conflicting rules or configurations, priority is given to the rule set that is located in the directory closest to the specified file.

Each rule defined in the rule-set file must include at least the matching rule and the command.

Match Methods

You can target files using various matching strategies. Every match method also has a corresponding _exclude variant (e.g., path_match_exclude) to explicitly ignore files that would otherwise match.

  • path_match: Standard glob pattern matching (e.g., *.py).
  • path_match_case: Case-sensitive glob pattern matching.
  • path_regex: Regular expression path matching (case-insensitive by default).
  • path_regex_case: Case-sensitive regular expression matching.
  • mimetype: Strict MIME type matching (e.g., text/x-python).
  • mimetype_match: Glob pattern matching for MIME types (e.g., text/*).
  • mimetype_regex: Regular expression matching for MIME types.

Action Configuration

An action block can include the following optional attributes:

  • tags: A string or list of strings indicating the tag names.
  • comment: An informative string describing what the action does.
  • timeout: An integer specifying the maximum execution time in seconds.
  • cwd: The current working directory for the command.
  • stdout: Redirect the standard output of the command to the specified file path.
  • stderr: Redirect the standard error of the command to the specified file path. (If both stdout and stderr point to the exact same file path, they are combined).
  • shell: Boolean indicating if the command should be executed within a shell environment.
  • command / list_commands: The command string/array to execute. These two are mutually exclusive.

Global Options

You can define an options block at the root of your .pathaction.yaml to specify execution defaults:

  • shell_path: The absolute path to the shell executable used when shell: true (defaults to the user’s login shell).
  • verbose: Enable verbose logging.
  • debug: Enable debug mode.
  • timeout: A global timeout constraint in seconds.
  • confirm_after_timeout: The timeout in seconds when waiting for user input during a --confirm-after prompt.
  • last: If set to true, pathaction stops loading configurations from higher parent directories.

Jinja2 Variables and Filters

Jinja2 Variables

Variable Description
{{ file }} Replaced with the full absolute path to the targeted file.
{{ cwd }} Refers to the current working directory of the matched action.
{{ env }} Represents the operating system environment variables (dictionary).
{{ pathsep }} Denotes the path separator (e.g., / on Linux, \ on Windows).

Jinja2 Filters

  • quote: Escapes a string for use as a shell argument by wrapping it in single quotes and escaping internal single quotes. This prevents shell injection vulnerabilities. Example: "/home/user/my file.txt" | quote evaluates to '/home/user/my file.txt'.
  • basename: Extracts the trailing filename or leaf component of a filesystem path. Example: "/home/user/src/main.py" | basename evaluates to "main.py".
  • dirname: Returns the parent directory portion of a filesystem path. Example: "/home/user/src/main.py" | dirname evaluates to "/home/user/src".
  • file_only_dirname: Returns the parent directory if the path is a file, or returns the path itself if it is already a directory.
  • realpath: Resolves all symbolic links, relative segments (like ..), and duplicate separators to return the canonical absolute path. Example: "/usr/bin/../local/bin/python" | realpath evaluates to "/usr/local/bin/python".
  • abspath: Converts a relative path into an absolute path by prefixing it with the current working directory. Example: "src/main.py" | abspath evaluates to "/home/user/project/src/main.py".
  • relpath: Computes the relative path between two directories.
  • joinpath: Combines one or more path segments using the system filesystem separator. Example: "/var/log" | joinpath("nginx", "error.log") evaluates to "/var/log/nginx/error.log".
  • joincmd: Converts an array of command-line tokens into a single properly escaped shell command string. Example: ["grep", "-i", "error log"] | joincmd evaluates to 'grep -i "error log"'.
  • splitcmd: Parses a raw shell command string into an array of distinct arguments while honoring quotation rules and escape sequences. Example: "git commit -m 'initial release'" | splitcmd evaluates to ["git", "commit", "-m", "initial release"].
  • expanduser: Replaces a leading tilde notation (~ or ~user) with the absolute path of the corresponding user home directory. Example: "~/config/tmux.conf" | expanduser evaluates to "/home/user/config/tmux.conf".
  • expandvars: Substitutes environment variables within a string matching $VARIABLE or ${VARIABLE} with their current active system values. Example: "$HOME/.config" | expandvars evaluates to "/home/user/.config".
  • shebang: Inspects a file and extracts the first line directly if it begins with an executable script prefix (#!). Example: "/home/user/script.sh" | shebang evaluates to "#!/usr/bin/env bash".
  • shebang_list: Extracts the shebang line from a file, discards the initial #! marker, and parses the remaining contents into a clean token array. Example: "/home/user/script.sh" | shebang_list evaluates to ["/usr/bin/env", "bash"].
  • shebang_quote: Extracts the shebang line from a file, strips the #! marker, and returns the runtime interpreter directive as a safely balanced, shell-quoted string. Example: "/home/user/script.sh" | shebang_quote evaluates to "/usr/bin/env bash".
  • which: Searches the system environment variable PATH to locate the absolute path of an executable binary. Raises an error if the binary cannot be found. Example: "emacs" | which evaluates to "/usr/bin/emacs".
  • startswith: Evaluates to true if the string starts with the given prefix.
  • endswith: Evaluates to true if the string ends with the given suffix.

Frequently Asked Questions

Does pathaction walk the filesystem from the current directory to the top in search of .pathaction.yaml ruleset files?

Pathaction walks from the directory containing the file passed to it and merges .pathaction.yaml rules from all allowed parent directories.

There is a security measure by default: loading rules is allowed only in directories that have been explicitly permitted using pathaction --allow-dir ~/dir/projects/, which enables access to ~/dir/projects/ and all its subdirectories. If the entire home directory is allowed with pathaction --allow-dir ~/, rules can be loaded from any directory within the home directory.

What are the differences between make and pathaction?

The make tool centers on targets and dependency tracking, making it good for compiling software based on file timestamps. In contrast, the pathaction tool acts as a universal file execution router. Passing a file path directly to Pathaction determines the correct command to run based on defined file extensions or patterns.

While make relies on project-specific files with strict syntax, Pathaction uses YAML files that cascade hierarchically across your filesystem. Much like how Git handles ignore files, Pathaction loads and merges all .pathaction.yaml rule-set files found in parent directories. This allows you to define rules in your home directory that can be overridden by specific settings within individual project folders.

For example, a Python script in ~/project_a can be routed to a local virtual environment, while a Python script in ~/project_a/project_b can trigger a Docker execution simply by defining different .pathaction.yaml files in those directories. Pathaction loads and merges all .pathaction.yaml ruleset files found in parent directories. This means that any rule in ~/project_a/project_b/.pathaction.yaml that does not match a file falls back to the rules defined in ~/project_a/.pathaction.yaml, similar to how Git handles .gitignore files.

What is the difference between Pathaction and a command such as find | xargs?

It is very different from find | xargs. The pathaction tool functions like a customizable, developer-focused xdg-open. It acts as the intelligent router that receives each file path and automatically determines the correct command to execute based on your defined rules. Just as xdg-open relies on rigid system MIME types to launch GUI applications, Pathaction uses your hierarchical .pathaction.yaml configurations and Jinja2 templating to dynamically run commands.

How is pathaction different from a shebang?

Shebangs are fine for basic execution, but they have limitations that Pathaction was built to address.

A shebang only defines how to execute a script. It cannot tell your system how to lint, format, debug, or test files. With pathaction, you can use tags. Passing pathaction -t main file.py executes it, while passing pathaction -t test file.py can run it through pytest.

How is pathaction different from xdg-open?

File associations such as xdg-open apply globally. Pathaction uses cascading YAML files similar to how Git handles .gitignore files. A Python script in ~/project_a can be routed to a local virtual environment, while a Python script in ~/project_a/project_b can trigger a Docker execution simply by defining different .pathaction.yaml files in those directories. Pathaction loads and merges all .pathaction.yaml ruleset files found in parent directories. This means that any rule in ~/project_a/project_b/.pathaction.yaml that does not match a file falls back to the rules defined in ~/project_a/.pathaction.yaml.

In addition to that, Pathaction uses Jinja2 templating, allowing you to dynamically build complex shell commands based on the file name, its parent directory, or environment variables.

How does the author use pathaction?

The author’s .pathaction.yaml rules function as a universal bridge across distinct software environments.

  • For Python, Bash, C, C++, and related languages, rules are defined to install dependencies, build projects, execute binaries, run test suites, and launch debuggers.
  • For Ansible, rules automatically upload playbooks to remote servers, execute them, and validate their results.
  • For Emacs, rules integrate file-based actions directly with editor workflows, enabling evaluation, compilation, or linting based on context.
  • For Vim, rules provide similar editor integration, allowing files to trigger build, run, or formatting actions without manual command construction.

Pathaction operates as an IDE-like action layer for the filesystem. Instead of embedding logic inside each editor or build system, actions are described declaratively and applied uniformly across tools.

The primary advantage is cognitive simplicity. There is no need to memorize complex command-line flags or tool-specific invocation patterns. A file is passed to Pathaction with a semantic tag such as main, install, or debug, and the corresponding rule determines how the operation is executed.

License

Copyright (c) 2021-2026 James Cherti

This program is free software: you can redistribute it and/or modify it under the terms of the GNU General Public License as published by the Free Software Foundation, either version 3 of the License, or (at your option) any later version.

This program is distributed in the hope that it will be useful, but WITHOUT ANY WARRANTY; without even the implied warranty of MERCHANTABILITY or FITNESS FOR A PARTICULAR PURPOSE. See the GNU General Public License for more details.

You should have received a copy of the GNU General Public License along with this program. If not, see https://www.gnu.org/licenses/.

Links

Plugins for editors:

  • pathaction.el (Emacs package): Executing the pathaction command-line tool directly from Emacs.
  • vim-pathaction (Vim plugin): Executing the pathaction command-line tool directly from Vim.

13 Useful GNOME Shell Extensions for a Better Desktop Experience (Available in the official Debian repositories or on the GNOME Extensions website for other distributions)

GNOME Shell offers a clean and modern UI, but it often lacks functionality desired by power users and those coming from other desktop environments.

GNOME Shell extensions provide a way to restore or add features to your desktop. In this article, you’ll explore some of the most useful GNOME Shell extensions available directly from the official Debian repositories via apt (available in Debian Bookworm and newer).

For users running distributions other than Debian, this article provides a link to the GNOME Shell Extensions page for each extension, allowing installation on any supported distribution.

Extension Management

The GNOME Shell Extension Prefs tool offers a graphical interface for enabling, disabling, and configuring GNOME Shell extensions. It can be installed using the following command:

sudo apt install gnome-shell-extension-prefs

After installation, GNOME Shell extensions can be enabled and configured using the gnome-extensions-app command.

Productivity

gnome-shell-extension-caffeine

The Caffeine extension prevents the system from locking the screen or entering suspend mode while it is active or when an application switches to fullscreen mode. This extension is useful during presentations, video playback, or gaming sessions, where uninterrupted screen activity is required.

To install it on a Debian-based system, execute the following command:

sudo apt install gnome-shell-extension-caffeine

System Monitoring

gnome-shell-extension-system-monitor

The system-monitor extension displays CPU, memory, network, and other metrics in real time on the top bar. Useful for developers, system administrators, and performance-conscious users.

To install it on a Debian-based system, execute the following command:

sudo apt install gnome-shell-extension-system-monitor

gnome-shell-extension-impatience

The Impatience extension decreases the duration of animations in GNOME Shell, resulting in a more responsive user interface.

To install it on a Debian-based system, execute the following command:

sudo apt install gnome-shell-extension-impatience

Panel and Dash Customization

gnome-shell-extension-dash-to-panel

The Dash To Panel extension integrates the top panel and dash into a unified taskbar, emulating the interface conventions commonly found in Windows and KDE environments.

To install it on a Debian-based system, execute the following command:

sudo apt install gnome-shell-extension-dash-to-panel

gnome-shell-extension-dashtodock

The Dash To Dock extension moves the dash out of the Activities view and docks it on the screen. Ideal for users preferring a macOS-style dock or persistent application launcher.

To install it on a Debian-based system, execute the following command:

sudo apt install gnome-shell-extension-dashtodock

gnome-shell-extension-hide-activities

The Hide Activities Button extension removes the “Activities” button from the top bar. It is useful for cleaner interfaces.

To install it on a Debian-based system, execute the following command:

sudo apt install gnome-shell-extension-hide-activities

gnome-shell-extension-top-icons-plus

The TopIcons Plus extension restores support for tray icons (i.e., systray) by displaying them in the top panel.

To install it on a Debian-based system, execute the following command:

sudo apt install gnome-shell-extension-top-icons-plus

UI Clean-Up and Space Saving

gnome-shell-extension-pixelsaver

The Pixelsaver extension integrates window title bars into the top panel for maximized windows, saving vertical space.

To install it on a Debian-based system, execute the following command:

sudo apt install gnome-shell-extension-pixelsaver

gnome-shell-extension-no-annoyance

The NoAnnoyance extension disables “Window is ready” notifications, which can be distracting and interrupt focus when multitasking across multiple applications.

To install it on a Debian-based system, execute the following command:

sudo apt install gnome-shell-extension-no-annoyance

gnome-shell-extension-autohidetopbar

The Hide Top Bar extension automatically hides the top bar, helping reduce visual clutter and maximize vertical screen space.

To install it on a Debian-based system, execute the following command:

sudo apt install gnome-shell-extension-autohidetopbar

Menus and Application Launching

gnome-shell-extension-arc-menu

The ArcMenu extension replaces the default application overview with a highly customizable start menu. Suitable for users preferring hierarchical or categorized navigation.

To install it on a Debian-based system, execute the following command:

sudo apt install gnome-shell-extension-arc-menu

Desktop Icon Support

gnome-shell-extension-desktop-icons-ng

The Desktop Icons NG extension restores desktop icon support (files, folders, and shortcuts), which was removed in newer GNOME versions. Supports drag-and-drop and right-click menus.

To install it on a Debian-based system, execute the following command:

sudo apt install gnome-shell-extension-desktop-icons-ng

Conclusion

These GNOME Shell extensions enable the transformation of GNOME into an efficient and personalized environment. All GNOME Shell extensions mentioned in this article are available through the official Debian repositories.

Additional GNOME Shell extensions, not included in the Debian repositories, can be found on the official GNOME Shell Extensions website.

Installing Arch Linux onto a separate partition from an existing Debian-based distribution (Ubuntu, Debian, Linux Mint…), without using the Arch Linux installation media

Installing Arch Linux typically begins with booting from official installation media. However, it is also possible to bootstrap an Arch Linux installation from within a running Debian-based system (Ubuntu, Debian, Linux Mint, etc.). This method is advantageous in environments where rebooting into live media is impractical or when remote installation is desired.

This article outlines a workflow for installing Arch Linux from a Debian-based system using pacman, pacstrap, arch-chroot, and pacman-key.

Prerequisites

Ensure your Debian system has the necessary tools to begin the installation process:

apt-get install arch-install-scripts pacman-package-manager archlinux-keyring makepkgCode language: plaintext (plaintext)

This command installs the Arch Linux bootstrap tools, makepkg, the pacman package manager, and required keyrings.

Configure the pacman keyring

Initialize the pacman keyring:

pacman-key --initCode language: plaintext (plaintext)

Install the latest Arch Linux keyring using pacman without resolving dependencies (to avoid conflicts with Debian packages):

pacman -S --nodeps archlinux-keyringCode language: plaintext (plaintext)

Replace the outdated Debian’s pacman keyrings with Arch’s:

cp /usr/share/pacman/keyrings/* /usr/share/keyrings/Code language: plaintext (plaintext)

Delete the archlinux-keyring pacman package:

pacman -Rsc archlinux-keyringCode language: plaintext (plaintext)

Populate the keyring again:

pacman-key --populate archlinuxCode language: plaintext (plaintext)

Configure pacman

Modify the /etc/pacman.d/mirrorlist file to include a valid Arch Linux mirror:

Server = http://mirror.csclub.uwaterloo.ca/archlinux/$repo/os/$archCode language: plaintext (plaintext)

Next, create the /etc/pacman.conf file with the following configuration:

[options]
HoldPkg = pacman glibc
Architecture = auto
CheckSpace
ParallelDownloads = 5
SigLevel = Required DatabaseOptional

[core]
Include = /etc/pacman.d/mirrorlist

[extra]
Include = /etc/pacman.d/mirrorlist

# [community]
# Include = /etc/pacman.d/mirrorlistCode language: plaintext (plaintext)

Prepare the installation target

Assuming you have an existing partition or logical volume prepared (e.g., /dev/vg1/arch), mount it:

mount /dev/vg1/arch arch

mkdir -p /mnt/arch/boot
mount -o bind /boot /mnt/arch/bootCode language: plaintext (plaintext)

Install the base system

Use pacstrap to install the base Arch system:

pacstrap /mnt/arch base sudo nanoCode language: plaintext (plaintext)

This command installs a minimal yet functional base system.

Chroot into the new environment

Finally, change root into the newly installed Arch system:

arch-chroot /mnt/archCode language: plaintext (plaintext)

From this point, you may proceed with system configuration as per a standard Arch Linux installation (e.g., locale, hostname, users, packages, bootloader, etc.).

Follow the official Arch Linux installation guide.

Conclusion

Bootstrapping Arch Linux from a Debian system is an efficient method to deploy Arch without the need for traditional installation media. This workflow is suited for advanced users managing systems remotely or automating deployments.

Related links

Linux: Setting the default GDM login monitor in a multi-monitor setup using GNOME display settings

If you’re using a multi-monitor setup with GDM (GNOME Display Manager) and the login screen consistently appears on the wrong monitor, this article presents a tested solution that can be applied either manually or automated, ensuring that the GDM monitor configuration matches that of your primary user setup.

The issue

Consider the following scenario: You have two monitors connected to an Nvidia graphics card, and despite setting the primary monitor correctly in GNOME, the GDM login screen still appears on the secondary monitor. Even if the secondary monitor is turned off, GDM continues to display the login prompt there, as it defaults to the wrong monitor. Additionally, the screen resolution and refresh rate are not configured as desired. For instance, if you have a 144Hz display and GDM uses a different refresh rate, you may experience annoying black flickering when logging in, as the refresh rate changes mid-session.

The solution

The login screen configuration for GDM can be influenced by copying the monitor layout from your GNOME user session.

This is done by copying the ~/.config/monitors.xml file from your user configuration to GDM’s configuration directory.

Step 1: Configure your display using GNOME

First, configure your display layout as desired using GNOME’s display settings:

gnome-control-center displayCode language: plaintext (plaintext)

Step 2: Copy the resulting monitor configuration to GDM’s configuration directory

Copy the resulting monitor configuration ~/.config/monitors.xml to legacy GDM’s configuration directory and to the new location (/etc/xdg/monitors.xml):

# Legacy location
sudo mkdir -p ~gdm/.config/
sudo install -o root -m 644 ~/.config/monitors.xml ~gdm/.config/

# New location
sudo install -o root -m 644 ~/.config/monitors.xml /etc/xdg/monitors.xmlCode language: Bash (bash)

(the shell will automatically interpret ~gdm as the home directory of the gdm user)

Step 3: Restart GDM

Restart GDM with the following command:

sudo systemctl restart gdmCode language: plaintext (plaintext)

How to automatically copy monitors.xml to the GDM configuration directory?

The copying of the monitors.xml file can be automated by defining a systemd service override for the GDM service.

First, create the following directory using:

sudo mkdir -p /etc/systemd/system/gdm.service.d/Code language: plaintext (plaintext)

Then, create the file /etc/systemd/system/gdm.service.d/override.conf with the following contents:

[Service]
ExecStartPre=/usr/bin/env bash -c 'FILE=/home/YOUR_USER/.config/monitors.xml && test -f "$$FILE" && install -d -o gdm -g gdm ~gdm/.config && install -o gdm -g gdm -m 644 "$$FILE" ~gdm/.config/monitors.xml && install -o root -g root -m 644 "$$FILE" /etc/xdg/monitors.xml || true'Code language: plaintext (plaintext)

Ensure to:

  • Replace YOUR_USER with your actual desktop user name.

Conclusion

Copying the GNOME display settings to the GDM configuration directory ensures that GDM adopts the same monitor layout as your GNOME session, causing the login screen to appear on your preferred monitor.

Configuring Linux on a ThinkPad T420s Laptop (Debian, Ubuntu, Linux Mint…)

ThinkPad T420s laptops, despite their age, remain reliable for web browsing, word processing, and various other tasks. Linux can breathe new life into such dated computers, allowing them to perform efficiently.

I configured one of these laptops for my son, and he is now able to do his homework using it. With proper configuration, ThinkPad laptops can achieve optimal performance and power management. This article provides a guide to configuring X11/Xorg, kernel parameters, firmware, fan control, and power management settings to optimize the ThinkPad t420s for modern use.

Some instructions in this article are specific to Debian/Ubuntu-based distributions, but they can easily be adapted to other distributions such as Red Hat, Fedora, Arch Linux, Gentoo, and others.

X11/Xorg

To ensure proper functionality of Intel graphics and avoid visual tearing, use the kernel’s built-in modesetting driver.

Create the configuration file /etc/X11/xorg.conf.d/30-intel.conf:

Section "Device"
  Identifier "Device0"
  Driver "modesetting"
  Option "TearFree" "True"
EndSection
Code language: plaintext (plaintext)

IMPORTANT: Ensure that the integrated graphics are set as the default video card in the ThinkPad BIOS.

Kernel parameters

On a Debian/Ubuntu based distribution, kernel parameters can be appended to the kernel command line in the bootloader configuration, typically in /etc/default/grub (for GRUB users):

GRUB_CMDLINE_LINUX_DEFAULT="quiet splash"Code language: plaintext (plaintext)

Here are some GRUB_CMDLINE_LINUX_DEFAULT parameters that may be useful:

  • If you experience issues with the backlight control (increasing and decreasing brightness), add the following kernel parameter: acpi_backlight=native
  • If you experience system freezes, try adding the following kernel parameter: i915.enable_dc=0 i915.enable_fbc=0

After modifying this file, update GRUB with:

sudo update-grubCode language: plaintext (plaintext)

Fan control

Without software to control the fan, it may run at maximum speed. To enable fan control, create the file /etc/modprobe.d/thinkpad_acpi.conf:

options thinkpad_acpi fan_control=1Code language: plaintext (plaintext)

After that, install zcfan. On a Debian/Ubuntu based distribution:

sudo apt-get install lm-sensors zcfanCode language: plaintext (plaintext)

(An alternative to zcfan is thinkfan, which requires slightly more configuration. The advantage of zcfan is that it functions out of the box.)

Packages

Ensure that the required firmwares are installed. On Debian- and Ubuntu-based distributions, install the following packages:

sudo apt install firmware-atheros firmware-realtek firmware-brcm80211Code language: plaintext (plaintext)

It is also recommended to install essential packages for hardware encoding and decoding, including intel-microcode for the latest processor updates, which improve system stability and performance:

sudo apt-get install intel-microcode i965-va-driverCode language: plaintext (plaintext)

TLP

TLP is a power management tool that optimizes battery life. Install and configure it as follows:

sudo apt install tlpCode language: plaintext (plaintext)

Create the configuration file /etc/tlp.d/00-base.conf:

DEVICES_TO_DISABLE_ON_BAT="bluetooth wwan"
DEVICES_TO_ENABLE_ON_STARTUP="wifi"
DEVICES_TO_DISABLE_ON_LAN_CONNECT="wifi wwan"

TLP_DEFAULT_MODE=BAT

CPU_SCALING_GOVERNOR_ON_AC=performance
CPU_SCALING_GOVERNOR_ON_BAT=schedutil

# PCIe Active State Power Management (ASPM):
PCIE_ASPM_ON_AC=performance
PCIE_ASPM_ON_BAT=default

# Runtime Power Management for PCIe bus devices: 
# on=disable, auto=enable.
# Default: on (AC), auto (BAT)
RUNTIME_PM_ON_AC=on
RUNTIME_PM_ON_BAT=auto

# Battery Care -- Charge thresholds
# Charging starts when the charge level is below the
# START_CHARGE_THRESH value when the charger is connected. It
# stops when the STOP_CHARGE_THRESH value is reached.
START_CHARGE_THRESH_BAT0=80
STOP_CHARGE_THRESH_BAT0=90

# Sound card power saving
SOUND_POWER_SAVE_ON_AC=0
SOUND_POWER_SAVE_ON_BAT=1

# Wi-Fi power saving
WIFI_PWR_ON_AC=off
WIFI_PWR_ON_BAT=on
Code language: Python (python)

Conclusion

The ThinkPad T420s, though older models, remain reliable machines for everyday tasks. With the right configuration, these laptops can be revitalized, making them well-suited for modern use.

jc-dotfiles – A collection of configuration files for UNIX/Linux systems

The jc-dotfiles repository houses James Cherti’s dotfiles and configuration scripts:

  • Shell Configuration (.bashrc, .profile, and .bash_profile): Optimized Bash shell settings for efficient command execution and interactive sessions.
  • Terminal Multiplexer (.tmux.conf): Configuration for Tmux, enhancing terminal session management and productivity.
  • Readline configuration (.inputrc): Inputrc configuration that also allows using Alt-h, Alt-j, Alt-k, and Alt-l as a way to move the cursor.
  • Other: .gitconfig (with support for difftastic), ranger, .fdignore, .wcalcrc, mpv, picom, feh, and various scripts and configuration files for managing system settings, aliases, and more.

Here are additional dotfiles and configuration files maintained by the same author:

  • jc-dotfiles @GitHub: A collection of UNIX/Linux configuration files. You can either install them directly or use them as inspiration your own dotfiles.
  • bash-stdops @GitHub: A collection of Bash helper shell scripts.
  • jc-gnome-settings: GNOME customizations that can be applied programmatically.
  • jc-firefox-settings @GitHub: Provides the user.js file, which holds settings to customize the Firefox web browser to enhance the user experience and security.
  • jc-gentoo-portage @GitHub: Provides configuration files for customizing Gentoo Linux Portage, including package management, USE flags, and system-wide settings.
  • jc-xfce-settings: GNOME customizations that can be applied programmatically.
  • watch-xfce-xfconf: A command-line tool that can be used to configure XFCE 4 programmatically using the xfconf-query commands displayed when XFCE 4 settings are modified.

Installation

Here’s how to install James Cherti’s dotfiles:

  1. Clone the Repository:

    git clone https://github.com/jamescherti/jc-dotfiles
  2. Navigate to the jc-dotfiles directory:

    cd jc-dotfiles
  3. Install:

    ./install.sh

Usage

.bashrc

  • Tmux/fzf auto complete: Pressing Ctrl-n calls a custom Bash autocomplete function that captures the current tmux scrollback buffer, extracts unique word-like tokens, and presents them via fzf for interactive fuzzy selection. The selected word is then inserted inline at the current cursor position using a readline binding.

  • The .bashrc file can be extended by adding configurations to ~/.bashrc.local.

  • The o alias calls a function that provides a cross-platform way to open files or URLs using the appropriate command for the system. This function opens files or URLs using the appropriate command (xdg-open on Linux, open on macOS, and start on Windows). If more than 7 arguments are passed, the user is prompted for confirmation before proceeding. Example usage:

    o file1.jpg file2.png file3.jpeg
  • Customizations in .bashrc to add to ~/.profile.local:

    # Use trash-rm as a safer alternative to rm by moving files to the trash instead
    # of deleting them permanently.
    #
    # JC_TRASH_CLI=1 replaces the standard 'rm' command with a wrapper function
    # that:
    # - Provides a detailed summary of all specified files and directories,
    #   including total size and file count.
    # - Prompts the user for confirmation before proceeding with the deletion.
    # - Moves files to the trash using 'trash-put' instead of permanently deleting
    #   them with 'rm'.
    # - Reports the current size of the trash in megabytes after each deletion.
    # - Optionally wraps 'trash-empty' with an interactive prompt before purging the
    #   trash.
    #
    # This setup is only activated for non-root users when 'trash-put' is available
    # and 'JC_TRASH_CLI' is set to a non-zero value.
    #
    JC_TRASH_CLI=1
    
    # Enable Emacs integration for vterm and EAT, configuring shell-side support for
    # features such as prompt tracking and message passing
    JC_EMACS_INTEGRATION=1  # Default: 0
    
    # Display the current Git branch in the shell prompt (PS1)
    JC_PS1_GIT_BRANCH=1  # Default: 0
    
    # Display the count of unread mails in the shell prompt (PS1)
    JC_PS1_MAILDIR=1  # Default: 0
    
    # Directory containing the mail (e.g., to "$HOME/Mail")
    JC_PS1_MAILDIR_PATH="$HOME/Mail"
    
    # Automatically restore the last working directory from the previous
    # interactive Bash session.
    JC_RESTORE_LAST_DIR=1  # Default: 0
    
    # Enable support for the fasd command-line utility, which provides fast access
    # to frequently used files and directories.
    JC_FASD=0  # Default: 0

License

Distributed under terms of the MIT license.

Copyright (C) 2004-2026 James Cherti.

Permission is hereby granted, free of charge, to any person obtaining a copy of this software and associated documentation files (the “Software”), to deal in the Software without restriction, including without limitation the rights to use, copy, modify, merge, publish, distribute, sublicense, and/or sell copies of the Software, and to permit persons to whom the Software is furnished to do so, subject to the following conditions:

The above copyright notice and this permission notice shall be included in all copies or substantial portions of the Software.

THE SOFTWARE IS PROVIDED “AS IS”, WITHOUT WARRANTY OF ANY KIND, EXPRESS OR IMPLIED, INCLUDING BUT NOT LIMITED TO THE WARRANTIES OF MERCHANTABILITY, FITNESS FOR A PARTICULAR PURPOSE AND NONINFRINGEMENT. IN NO EVENT SHALL THE AUTHORS OR COPYRIGHT HOLDERS BE LIABLE FOR ANY CLAIM, DAMAGES OR OTHER LIABILITY, WHETHER IN AN ACTION OF CONTRACT, TORT OR OTHERWISE, ARISING FROM, OUT OF OR IN CONNECTION WITH THE SOFTWARE OR THE USE OR OTHER DEALINGS IN THE SOFTWARE.

Links

Related articles:

Running Large Language Models locally with Ollama (compatible with Linux, macOS, and Windows)

Running Large Language Models on your machine can enhance your projects, but the setup is often complex. Ollama simplifies this by packaging everything needed to run a Large Language Model. Here’s a concise guide on using Ollama to run LLMs locally.

Requirements

  • CPU: A modern x86-64 CPU with AVX2 support is recommended. AVX512 can further improve inference performance for some workloads. (If your CPU does not support AVX, see Ollama Issue #2187: Support GPU runners on CPUs without AVX.)
  • RAM: A minimum of 16GB is recommended for a decent experience when running models with 7 billion parameters.
  • Disk Space: A practical minimum of 40GB of disk space is advisable.
  • GPU: While a GPU is not mandatory, it is recommended for enhanced performance in model inference. Refer to the list of GPUs that are compatible with Ollama. Approximate VRAM requirements for quantized models are roughly 4-6 GB for 7B models, 8-12 GB for 13B models, and substantially more for larger models such as 30B or 70B variants. Actual requirements vary depending on quantization level, context window size, and how much of the model is offloaded to the GPU.
  • NVIDIA GPUs: Ollama relies on CUDA for NVIDIA GPU acceleration (You can find the instructions to install CUDA on Debian here). CPU-only inference is also supported, and macOS systems use Apple’s Metal backend for GPU acceleration.

Step 1: Install Ollama

Download and install Ollama for Linux using:

curl -fsSL https://ollama.com/install.sh | shCode language: plaintext (plaintext)

Step 2: Download a Large Language Model

Download a specific large language model using the Ollama command:

ollama pull gemma2:2bCode language: plaintext (plaintext)

The command above downloads the Gemma2 model by Google DeepMind. You can find other models by visiting the Ollama Library.

(At the time of writing, downloading gemma2:2b retrieves a quantized variant such as gemma2:2b-instruct-q4_0, indicating that it retrieves a quantized version of the 2-billion-parameter model specifically optimized for instruction-following tasks like chatbots. This quantization process reduces the model’s numerical precision from floating-point representations such as FP16 or BF16 into lower-bit integer formats such as 4-bit quantization q4_0. This reduces memory usage and improves inference speed, at the cost of a modest reduction in model quality.)

Step 3: Chat with the model

Run the large language model:

ollama run gemma2:2bCode language: plaintext (plaintext)

This launches an interactive REPL where you can interact with the model.
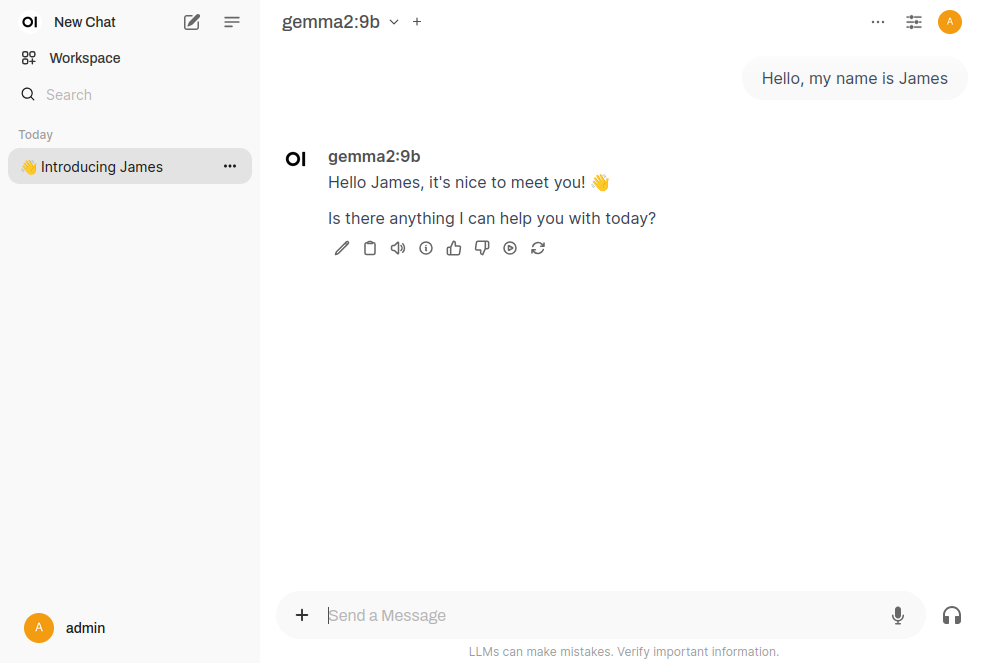
Step 4: Install Open WebUI (web interface)

Open WebUI offers a user-friendly interface for interacting with Large Language Models downloaded via Ollama. It enables users to run and customize models without requiring extensive programming knowledge.

It can be installed using pip within a Python virtual environment:

mkdir -p ~/.python-venv/open-webui
python -m venv ~/.python-venv/open-webui
source ~/.python-venv/open-webui/bin/activate
pip install open-webuiCode language: plaintext (plaintext)

NOTE: Alternatively, Open WebUI can also be installed using Docker.

Finally, execute the following command to start the Open WebUI server:

~/.python-venv/open-webui/bin/open-webui serveCode language: plaintext (plaintext)

You will also have to execute Ollama as a server simultaneously with Open WebUI:

ollama serve

NOTE: On Linux installations, Ollama is commonly started manually using ollama serve. On macOS and Windows desktop installations, the Ollama background service is typically started automatically.

After initiating both the Open WebUI and Ollama server processes, the web application binds to localhost. Open your web browser and navigate to http://localhost:8080 to access the interface. During your initial visit, the system will prompt you to register an administrator account. Once authenticated, you can select your downloaded models, such as gemma2:2b, from the workspace dropdown menu and initiate a chat session directly within your browser.

When starting a new conversation in Open WebUI, a “Model not selected” message may appear, preventing input. This behavior is expected because Open WebUI acts as a central hub for potentially dozens of different Large Language Models and requires an explicit model selection before starting a conversation. To resolve this, locate the dropdown menu at the top center of the chat interface, often labeled “Select a model.”

Frequently Asked Questions

Troubleshooting: Open WebUI: You are sending unauthenticated requests to the HF Hub. Please set a HF_TOKEN

While running Open WebUI or pulling certain models, you might see the following warning in your terminal:

Warning: You are sending unauthenticated requests to the HF Hub.
Please set a HF_TOKEN to enable higher rate limits and faster downloads.Code language: plaintext (plaintext)

This warning appears because the system is attempting to interact with the Hugging Face API anonymously, which falls under a lower rate limit tier. To fix this, you need to provide a Hugging Face access token via an environment variable.

Here is how to generate and apply the token:

  • Go to https://huggingface.co and log into your account.
  • Navigate to your account settings and click on “Access Tokens”.
  • Click “Create new token”, give it a descriptive name, select the “Read” role, and generate it.
  • Copy the newly created token string.
  • Export this token as an environment variable in your terminal session before starting your server.

You can apply the token directly in the terminal before running the web interface:

export HF_TOKEN='your_huggingface_token_here'
~/.python-venv/open-webui/bin/open-webui serveCode language: Bash (bash)

To make this change permanent, append the export HF_TOKEN='your_huggingface_token_here' line to your shell configuration file, such as ~/.bashrc, and reload your shell.

Troubleshooting: Open WebUI High GPU and/or CPU Usage and Follow-Up Auto-Generation

If you notice that your GPU and/or CPU is constantly pinned at 100%, even after the model has finished answering your prompt, it may be caused by Open WebUI running background tasks.

By default, Open WebUI often tries to anticipate your next move by automatically generating follow-up questions or summarizing your chat for the sidebar title. While helpful, these auto-generation features can place a significant, continuous strain on your system resources, especially if you are running models strictly on your CPU.

To alleviate this, you can:

  • Disable Background Tasks: Go to Settings -> General and toggle off Title Auto-Generation, Follow-Up Auto-Generation, Chat Tags Auto-Generation.
  • Force Single-Tasking: Prevent Ollama from splitting its focus by setting export OLLAMA_NUM_PARALLEL=1 as an environment variable. This ensures requests queue up rather than processing simultaneously and slowing down.
  • Limit Memory Usage: If you have low VRAM, set export OLLAMA_MAX_LOADED_MODELS=1. This prevents Ollama from trying to hold multiple models in your GPU memory at the same time.
  • Check for Ghost Requests: Run export OLLAMA_DEBUG=1 before starting ollama serve. Watch the terminal logs to see if Open WebUI is sending unexpected requests (like embeddings or pings) that are keeping the LLM active.
  • Manual Model Unloading: If GPU memory remains allocated after a chat completes, set export OLLAMA_KEEP_ALIVE=0 to force the model to unload immediately after each response. Note that this increases latency because the model must reload for every request.

The model cuts off mid-sentence or mid-thought

Increasing the token limit allows the model the logical breathing room required to complete its internal reasoning process and deliver a final, coherent answer.

When working with reasoning models, the model essentially writes two responses: a hidden thought chain and the visible answer. If the token limit is too low, the model consumes its entire budget on the thinking phase, leaving no room for the actual solution.

Option 1: Increase the Max Tokens (Permanent Fix)

  1. In Open WebUI, click the Control Sliders icon at the top right of your chat window.
  2. Click on Settings.
  3. Go to Advanced Parameters.
  4. Look for max_tokens.
  5. It is likely set to a default like 1024 or 2048. Increase this number significantly, such as to 4096 or 8192.
  6. Click Save and try your prompt again.

Option 2: The Continue Response Button (Quick Fix)
If a model ever cuts off mid-sentence or mid-thought in Open WebUI, you don’t necessarily have to start over. You can usually just click the Continue Response button at the bottom of the chat, and the model will pick up typing exactly where it left off, finishing its thought process and moving on to your answer.

Pro-Tip for Reasoning Models: If you are asking a complex coding or configuration question, reasoning models will go down massive rabbit holes. If you don’t want to wait 2 minutes for an answer, you can add “Keep your reasoning brief” to the end of your prompt!

Conclusion

With Ollama, you can quickly run Large Language Models (LLMs) locally and integrate them into your projects. Additionally, Open WebUI provides a user-friendly interface for interacting with these models, making it easier to customize and deploy them without extensive programming knowledge.

Links

Emulating Cherry MX Blue Mechanical Keyboard Sounds on Linux

License

For those nostalgic for the era of tactile and auditory feedback from typing on a physical keyboard, Cherrybuckle can be utilized on Linux as a Cherry MX Blue Mechanical Keyboard Simulator.

Cherrybuckle runs as a background process and plays back the sound of each key pressed and released on your keyboard.

Cherry MX Blue

To temporarily silence Cherrybuckle, for example, to enter secrets, press Scroll Lock twice (but be aware that those Scroll Lock events are delivered to the application); do the same to unmute. The keycode for muting can be changed with the ‘-m’ option. Use keycode 0 to disable the mute function.

Links

Building

GNU/Linux

Dependencies

Dependencies: libalure, libopenal, libx11, libxtst.

The dependencies can be installed on a Debian or Ubuntu system using the following commands:

$ sudo apt-get install build-essential git
$ sudo apt-get install libalure-dev libx11-dev libxtst-dev pkg-config
Building on GNU/Linux
Option 1: X11 (Recommended)

This is the preferred method for building it on GNU/Linux:

$ make
$ ./cherrybuckle

This only works with X11/Xorg and does not yet support Wayland.

Option 2: Libinput

The default Linux build relies on X11 for capturing events. If you intend to use it on the Linux console or Wayland display server, you can configure it to read events from the raw input devices located in /dev/input. Keep in mind that this will require special permissions to access the devices. To make it use libinput, build with the following command:

$ make libinput=1

MacOS

You can compile it on macOS using the following commands:

$ brew install alure pkg-config
$ git clone https://github.com/jamescherti/cherrybuckle
$ cd cherrybuckle
$ sed -i '' 's/-Wall -Werror/-Wall/' Makefile
$ make
$ ./cherrybuckle

Note that you need superuser privileges to create the event tap on Mac OS X. Also give your terminal Accessibility rights: system preferences -> security -> privacy -> accessibility.

If you want to use Cherrybuckle while doing normal work, add an & behind the command.

$ sudo ./cherrybuckle &

Windows

The Windows version of Cherrybuckle is currently broken. It appears that switching from FreeLut to Alure caused the issue. There seems to be an issue with ‘alureCreateBufferFromFile()’ being called from another thread in the key capture callback. Assistance would be greatly appreciated.

Usage

usage: ./cherrybuckle [options]

options:

  -b, --bucklespring        use Bucklespring sounds instead
  -d, --device=DEVICE       use OpenAL audio device DEVICE
  -f, --fallback-sound      use a fallback sound for unknown keys
  -g, --gain=GAIN           set playback gain [0..100]
  -m, --mute-keycode=CODE   use CODE as mute key (default 0x46 for scroll lock)
  -M, --mute                start the program muted
  -c, --no-click            don't play a sound on mouse click
  -k, --no-keyboard         don't play a sound on keyboard press
  -h, --help                show help
  -l, --list-devices        list available OpenAL audio devices
  -p, --audio-path=PATH     load .wav files from directory PATH
  -s, --stereo-width=WIDTH  set stereo width [0..100]
  -v, --verbose             increase verbosity / debugging

OpenAL notes

Cherrybuckle uses the OpenAL library for mixing samples and providing a realistic 3D audio playback. This section contains some tips and tricks for properly tuning OpenAL for Cherrybuckle.

The default OpenAL settings can cause a slight delay in playback. Edit or create the OpenAL configuration file ~/.alsoftrc and add the following options:

 period_size = 32
 periods = 4

If you are using headphones, enabling the head-related-transfer functions in OpenAL for a better 3D sound:

 hrtf = true

When starting an OpenAL application, the internal sound card is selected for output, and you might not be able to change the device using pavucontrol. The option to select an alternate device is present, but choosing the device has no effect. To solve this, add the following option to the OpenAL configuration file:

 allow-moves = true

Authors

  • Ico Doornekamp (Original author)
  • nofal (Cherry MX sounds)
  • James Cherti (The maintainer of cherrybuckle, which includes the version maintained by Ico Doornekamp and the pull request by nofal)
  • Egor
  • Ico Doornekamp
  • Jakub Wilk
  • Peter Hofmann
  • Marco Trevisan
  • Marco Trevisan
  • Member1221
  • mirabilos
  • Alex Bertram
  • Alexander Willner
  • Anjan Momi
  • Anton Karmanov
  • Clipsey
  • Dominik George
  • Emanuel Haupt
  • Jan Chren (rindeal)
  • Jan Chren
  • Jeroen Knoops
  • Jeroen Knoops
  • Nisker
  • Peter Tonoli
  • Sebastian Morr
  • Stephen Gelman
  • Vladislav Khvostov
  • jeromenerf
  • qu1gl3s
  • rabin-io
  • somini
  • tensorknower69
  • tnagorra

Creating and Restoring a Gzip Compressed Disk Image with dd on UNIX/Linux

Creating and restoring disk images are essential tasks for developers, system administrators, and users who want to safeguard their data or replicate systems efficiently. One useful tool for this purpose is dd, which allows for low-level copying of data. In this article, we will explore how to clone and restore a partition from a compressed disk image in a UNIX/Linux operating system.

IMPORTANT: There is a risk of data loss if a mistake is made. The dd command can be dangerous if not used carefully. Specifying the wrong input or output device can result in data loss. Users should exercise caution and double-check their commands before executing them.

Cloning a Partition into a Compressed Disk Image

To clone a partition into a compressed disk image, you can use the dd and gzip commands:

dd if=/dev/SOURCE conv=sync bs=64K | gzip --stdout > /path/to/file.gzCode language: plaintext (plaintext)

This command copies the content of the block device /dev/SOURCE to the compressed file /path/to/file.gz, 64 kilobytes at a time.

Restoring a Partition from a Compressed Disk Image

To restore a partition from a file containing a compressed disk image, use the following command:

gunzip --stdout /path/to/file.gz | dd of=/dev/DESTINATION bs=64K
Code language: plaintext (plaintext)

This command decompresses the content of the compressed file located at /path/to/file.gz and copies it to the block device /dev/DESTINATION, 64 kilobytes at a time.

More information about the dd command options

Here are additional details about the dd command options:

  • The status=progress option makes dd display transfer statistics progressively.
  • The conv=noerror option instructs dd to persist despite encountering errors. However, ignoring errors might result in data corruption in the copied image. The image could be incomplete or corrupted, especially if errors occur in critical parts of the data. This option can be added to the conv option as follows: conv=noerror
  • The conv=sync option makes dd wait for both the data and the metadata to be physically written to the storage media before proceeding to the next operation. In situations where data integrity is less critical, using conv=sync can help restore as much data as possible, even from a source with occasional errors.
  • Finally, the bs=64K option instructs dd to read or write up to the specified bytes at a time (in this case, 64 kilobytes). The default value is 512 bytes, which is relatively small. It is advisable to consider using 64K or even the larger 128K. However, it’s important to note that while a larger block size speeds up the transfer, a smaller block size enhances transfer reliability.

Ensuring Data Integrity

Although the dd command automatically verifies that the input and output block sizes match during each block copy operation, it is prudent to further confirm the integrity of the copied data after completing the dd operation.

To achieve this, follow these steps:

Generate the md5sum of the source block device:

dd if=/dev/SOURCE | md5sumCode language: plaintext (plaintext)

Next, generate the md5sum of the gzip-compressed file:

gunzip --stdout /path/to/file.gz | md5sumCode language: plaintext (plaintext)

Ensure that the two md5sum fingerprints are equal. This additional verification step adds an extra layer of assurance regarding the accuracy and integrity of the copied data.

Installing Debian onto a separate partition from an existing distribution, such as Arch Linux or Gentoo, without using the Debian installer

There are various scenarios in which one might need to install a Debian-based system (e.g., Debian, Ubuntu, etc.) from another distribution (e.g., Arch Linux, Gentoo, Debian/Ubuntu distributions, Fedora, etc.). One common reason is when a user wants to set up a Debian-based system alongside an existing distribution. This could be for the purpose of testing software compatibility, development, or simply to have a dual-boot.

A Debian-based distribution can be installed from any other distribution using debootstrap. The debootstrap command-line tool allows installing a Debian or Ubuntu base system within a subdirectory of an existing, installed system. Unlike traditional installation methods using a CD or a USB Key, debootstrap only requires access to a Debian repository.

There are several reasons why this approach is advantageous:

  • No need for a bootable USB/CD: Install Debian without external installation media.
  • Dual-boot without reinstalling the host OS: Easily add Debian alongside another Linux system.
  • Minimal and customizable installation: Install only essential packages for a lightweight system (the installer sometimes installs more than necessary).
  • Remote server installations: Install Debian on a remote machine without physical access.
  • System recovery: Reinstall or repair a broken Debian system from another Linux distribution.
  • Automated and scripted deployments: Useful for mass deployments in enterprise environments.
  • Maintaining a multi-distro workflow: Run both a stable Debian system and a rolling-release distribution.

Step 1: Create a new LVM partition, format it, and mount it

# Create the root LVM partition
lvcreate  -L 20G -n debian_root VOL_NAME

# Format the partition
mkfs.ext4 /dev/VOL_NAME/debian_root

# Mount the partition
mkdir /mnt/debian_root
mount /dev/VOL_NAME/debian_root /mnt/debian_rootCode language: plaintext (plaintext)

Step 2: Install the debootstrap command-line tool

On Arch Linux, debootstrap can be installed using:

pacman -Sy debian-archive-keyring debootstrapCode language: plaintext (plaintext)

On Gentoo, it can be installed using:

emerge -a dev-util/debootstrapCode language: plaintext (plaintext)

On Debian/Ubuntu based distributions:

apt-get install debootstrapCode language: JavaScript (javascript)

Step 3: Install the Debian base system

Use the debootstrap command to install Debian into the target directory:

debootstrap  --arch=amd64 stable /mnt/debian_root http://deb.debian.org/debianCode language: plaintext (plaintext)

You can replace stable with another Debian release like testing or unstable if desired. You can also add the flag --force-check-gpg to force checking Release file signatures.

In the above example, it will install the Debian-based system from the repository http://deb.debian.org/debian into the local directory /mnt/debian_root.

Step 4: Chroot into the Debian system

Since you are installing a Debian-based system inside another distribution (Arch Linux, Gentoo, etc.), you’ll need to ensure that the directory where the Debian system is mounted is ready. You can achieve this by mounting certain directories and chrooting into the Debian system:

sudo mount --bind /dev /mnt/debian_root/dev
sudo mount --bind /proc /mnt/debian_root/proc
sudo mount --bind /sys /mnt/debian_root/sys
sudo mount --bind /boot /mnt/debian_root/boot
sudo cp /etc/resolv.conf /mnt/debian_root/etc/resolv.conf
sudo cp /etc/fstab /mnt/debian_root/etc/fstab
sudo chroot /mnt/debian_root /bin/bash -lCode language: plaintext (plaintext)

The chroot command will open a new shell in the Debian environment.

Step 5: Configure the Debian-based system

Now that you’re inside the Debian-based system, you can configure it as desired. You can install packages, modify configurations, set up users, etc.

Here is an example:

apt-get update

# Install the Linux Kernel
apt-get install linux-image-amd64 firmware-linux-free firmware-misc-nonfree 

# Install cryptsetup if you are using a LUKS encrypted partition
apt-get install cryptsetup cryptsetup-initramfs

# Install misc packages
apt-get install console-setup vim lvm2 sudo

# Reconfigure locales
dpkg-reconfigure locales

# Configure the host name and the time zone
echo yourhostname > /etc/hostname
ln -sf /usr/share/zoneinfo/America/New_York /etc/localtime
Code language: plaintext (plaintext)

Do not forget to:

  • Modify /mnt/debian_root/etc/fstab (The mount point “/” has to point to the Debian system)
  • Modify /mnt/debian_root/etc/crypttab (If you are using a LUKS encrypted partition)

How to boot into the newly installed system?

You can, for example, configure GRUB to boot your newly configured operating system.

You can either use the new Debian-based system’s GRUB as the default (replace the existing one) or configure additional GRUB entries in an existing system. For instance, if your base system is Debian-based, you can add your entry using /etc/grub.d/40_custom:

#!/bin/sh
exec tail -n +3 $0
# This file provides an easy way to add custom menu entries.  Simply type the
# menu entries you want to add after this comment.  Be careful not to change
# the 'exec tail' line above.
menuentry 'Debian 2' --class debian --class gnu-linux --class gnu --class os $menuentry_id_option 'debian_fallback' {
        insmod part_gpt
        insmod fat
        search --no-floppy --fs-uuid --set=root 00000000-000a-00a0-a0a0-000000a0000a
        linux /backup/vmlinuz-6.12.12+bpo-amd64 root=/dev/MY_LVM_VOLUME/debian ro fsck.mode=auto fsck.repair=yes nowatchdog apparmor=1 acpi_backlight=native
        initrd /initrd.img-6.12.12+bpo-amd64Code language: plaintext (plaintext)

(Replace /dev/mapper/MY_LVM_VOLUME_debian with your root partition and 00000000-000a-00a0-a0a0-000000a0000a with your actual UUID that you can find using the command: lsblk -o +UUID)

In my case, I am using bootctl, which I installed using Gentoo. I simply added /boot/loader/entries/debian.conf with the following configuration:

title Debian
linux /vmlinuz-6.12.12+bpo-amd64
initrd /initrd.img-6.12.12+bpo-amd64
options rw root=/dev/volume1/debianCode language: plaintext (plaintext)

Congratulations! You have successfully installed a Debian-based system using debootstrap from another distribution such as Arch Linux, Gentoo, etc.

Gentoo: How to Speed Up emerge ‐‐sync

Synchronizing with the Gentoo Portage ebuild repository using emerge --sync can be slow when utilizing the rsync protocol. However, an effective solution exists that can greatly improve the synchronization speed: Configuring emerge --sync to synchronize using Git instead.

In this article, we will explore how to set up emerge to synchronize from the official Gentoo ebuild Git repository and save valuable time during the synchronizing process.

Step 1: Install Git using the following command:

sudo emerge -a dev-vcs/gitCode language: plaintext (plaintext)

Step 2: Remove any file from the directory /etc/portage/repos.conf/ that configures the emerge command to use rsync.

Step 3: Create the file /etc/portage/repos.conf/gentoo.conf containing:

[DEFAULT]
main-repo = gentoo

[gentoo]

# The sync-depth=1 option speeds up initial pull by fetching 
# only the latest Git commit and its immediate ancestors, 
# reducing the amount of downloaded Git history.
sync-depth = 1

sync-type = git
auto-sync = yes
location = /var/db/repos/gentoo
sync-git-verify-commit-signature = yes
sync-openpgp-key-path = /usr/share/openpgp-keys/gentoo-release.asc
sync-uri = https://github.com/gentoo-mirror/gentoo.gitCode language: plaintext (plaintext)

Step 4: Finally, run the following command to synchronize with the Gentoo ebuild repository using Git:

sudo emerge --sync

The initial download of the entire Git repository will cause the first emerge --sync command to take some time. However, subsequent synchronizations will be significantly quicker, taking only a few seconds.

Using Git can be a great way to speed up synchronization with the Gentoo ebuild repository. By following the steps outlined in this article, you can clone the Portage repository to your local machine and keep it up-to-date with the latest changes using Git. This can save you a lot of time when syncing your local repository.