13 Useful GNOME Shell Extensions for a Better Desktop Experience (Available in the official Debian repositories or on the GNOME Extensions website for other distributions)

GNOME Shell offers a clean and modern UI, but it often lacks functionality desired by power users and those coming from other desktop environments.
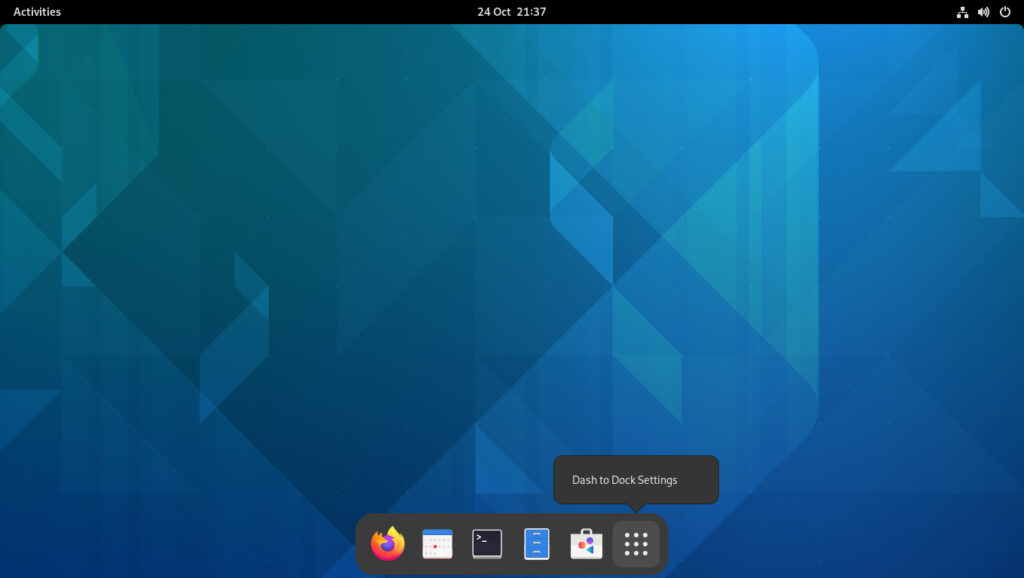
GNOME Shell extensions provide a way to restore or add features to your desktop. In this article, you’ll explore some of the most useful GNOME Shell extensions available directly from the official Debian repositories via apt (available in Debian Bookworm and newer).

For users running distributions other than Debian, this article provides a link to the GNOME Shell Extensions page for each extension, allowing installation on any supported distribution.

Extension Management

The GNOME Shell Extension Prefs tool offers a graphical interface for enabling, disabling, and configuring GNOME Shell extensions. It can be installed using the following command:

sudo apt install gnome-shell-extension-prefs
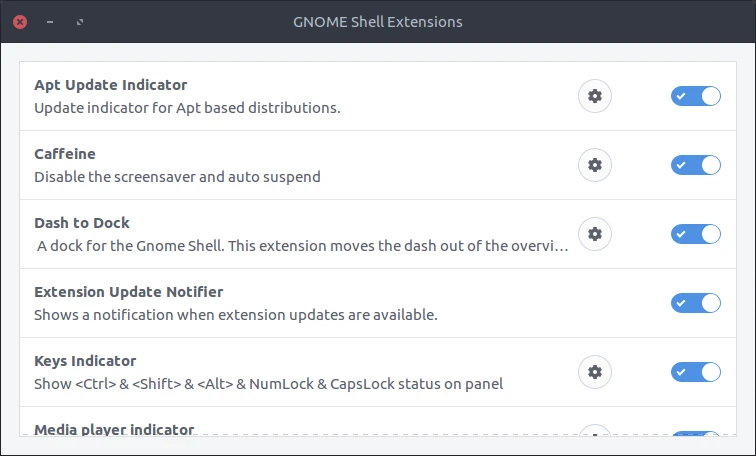
After installation, GNOME Shell extensions can be enabled and configured using the gnome-extensions-app command.

Productivity

gnome-shell-extension-caffeine

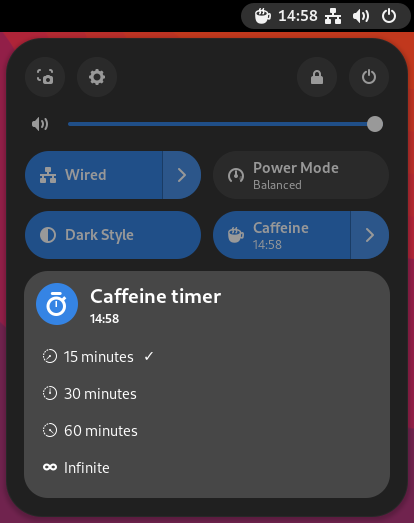
The Caffeine extension prevents the system from locking the screen or entering suspend mode while it is active or when an application switches to fullscreen mode. This extension is useful during presentations, video playback, or gaming sessions, where uninterrupted screen activity is required.
To install it on a Debian-based system, execute the following command:

sudo apt install gnome-shell-extension-caffeine

System Monitoring

gnome-shell-extension-system-monitor

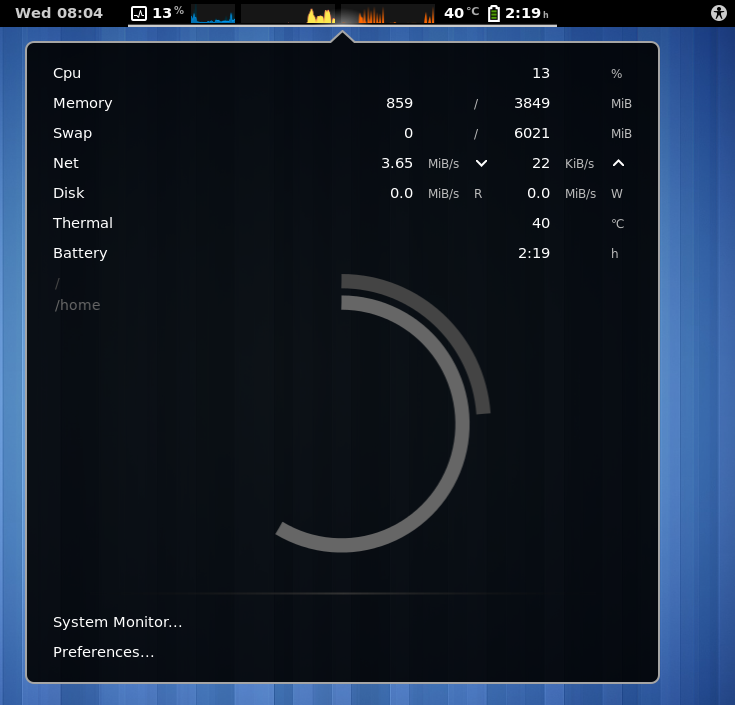
The system-monitor extension displays CPU, memory, network, and other metrics in real time on the top bar. Useful for developers, system administrators, and performance-conscious users.
To install it on a Debian-based system, execute the following command:

sudo apt install gnome-shell-extension-system-monitor

gnome-shell-extension-impatience

The Impatience extension decreases the duration of animations in GNOME Shell, resulting in a more responsive user interface.

To install it on a Debian-based system, execute the following command:

sudo apt install gnome-shell-extension-impatience

Panel and Dash Customization

gnome-shell-extension-dash-to-panel

The Dash To Panel extension integrates the top panel and dash into a unified taskbar, emulating the interface conventions commonly found in Windows and KDE environments.

To install it on a Debian-based system, execute the following command:

sudo apt install gnome-shell-extension-dash-to-panel

gnome-shell-extension-dashtodock

The Dash To Dock extension moves the dash out of the Activities view and docks it on the screen. Ideal for users preferring a macOS-style dock or persistent application launcher.

To install it on a Debian-based system, execute the following command:

sudo apt install gnome-shell-extension-dashtodock

gnome-shell-extension-hide-activities

The Hide Activities Button extension removes the “Activities” button from the top bar. It is useful for cleaner interfaces.

To install it on a Debian-based system, execute the following command:

sudo apt install gnome-shell-extension-hide-activities

gnome-shell-extension-top-icons-plus

The TopIcons Plus extension restores support for tray icons (i.e., systray) by displaying them in the top panel.

To install it on a Debian-based system, execute the following command:

sudo apt install gnome-shell-extension-top-icons-plus

UI Clean-Up and Space Saving

gnome-shell-extension-pixelsaver

The Pixelsaver extension integrates window title bars into the top panel for maximized windows, saving vertical space.

To install it on a Debian-based system, execute the following command:

sudo apt install gnome-shell-extension-pixelsaver

gnome-shell-extension-no-annoyance

The NoAnnoyance extension disables “Window is ready” notifications, which can be distracting and interrupt focus when multitasking across multiple applications.

To install it on a Debian-based system, execute the following command:

sudo apt install gnome-shell-extension-no-annoyance

gnome-shell-extension-autohidetopbar

The Hide Top Bar extension automatically hides the top bar, helping reduce visual clutter and maximize vertical screen space.

To install it on a Debian-based system, execute the following command:

sudo apt install gnome-shell-extension-autohidetopbar

Menus and Application Launching

gnome-shell-extension-arc-menu

The ArcMenu extension replaces the default application overview with a highly customizable start menu. Suitable for users preferring hierarchical or categorized navigation.
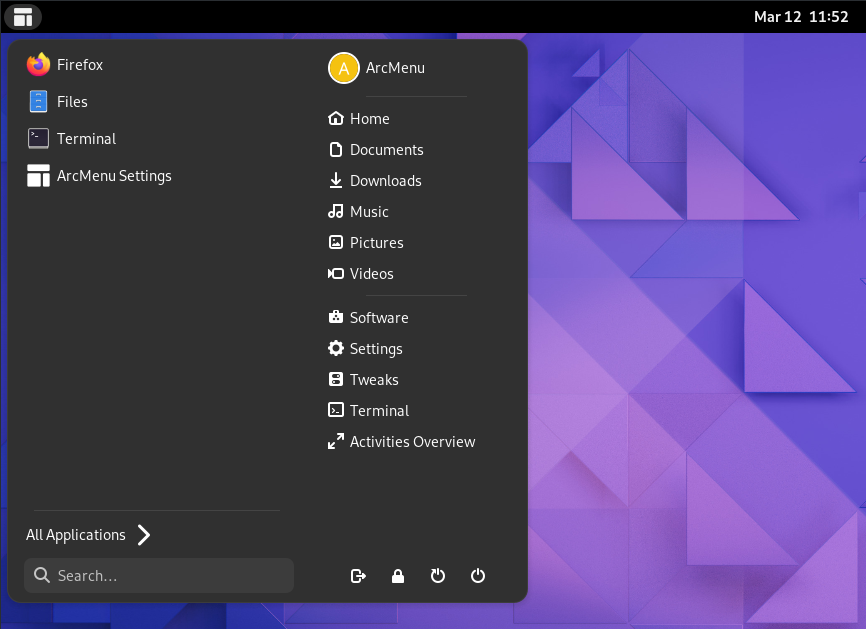
To install it on a Debian-based system, execute the following command:

sudo apt install gnome-shell-extension-arc-menu

Desktop Icon Support

gnome-shell-extension-desktop-icons-ng

The Desktop Icons NG extension restores desktop icon support (files, folders, and shortcuts), which was removed in newer GNOME versions. Supports drag-and-drop and right-click menus.

To install it on a Debian-based system, execute the following command:

sudo apt install gnome-shell-extension-desktop-icons-ng

Conclusion

These GNOME Shell extensions enable the transformation of GNOME into an efficient and personalized environment. All GNOME Shell extensions mentioned in this article are available through the official Debian repositories.

Additional GNOME Shell extensions, not included in the Debian repositories, can be found on the official GNOME Shell Extensions website.

Installing Arch Linux onto a separate partition from an existing Debian-based distribution (Ubuntu, Debian, Linux Mint…), without using the Arch Linux installation media

Installing Arch Linux typically begins with booting from official installation media. However, it is also possible to bootstrap an Arch Linux installation from within a running Debian-based system (Ubuntu, Debian, Linux Mint, etc.). This method is advantageous in environments where rebooting into live media is impractical or when remote installation is desired.

This article outlines a workflow for installing Arch Linux from a Debian-based system using pacman, pacstrap, arch-chroot, and pacman-key.

Prerequisites

Ensure your Debian system has the necessary tools to begin the installation process:

apt-get install arch-install-scripts pacman-package-manager archlinux-keyring makepkgCode language: plaintext (plaintext)

This command installs the Arch Linux bootstrap tools, makepkg, the pacman package manager, and required keyrings.

Configure the pacman keyring

Initialize the pacman keyring:

pacman-key --initCode language: plaintext (plaintext)

Install the latest Arch Linux keyring using pacman without resolving dependencies (to avoid conflicts with Debian packages):

pacman -S --nodeps archlinux-keyringCode language: plaintext (plaintext)

Replace the outdated Debian’s pacman keyrings with Arch’s:

cp /usr/share/pacman/keyrings/* /usr/share/keyrings/Code language: plaintext (plaintext)

Delete the archlinux-keyring pacman package:

pacman -Rsc archlinux-keyringCode language: plaintext (plaintext)

Populate the keyring again:

pacman-key --populate archlinuxCode language: plaintext (plaintext)

Configure pacman

Modify the /etc/pacman.d/mirrorlist file to include a valid Arch Linux mirror:

Server = http://mirror.csclub.uwaterloo.ca/archlinux/$repo/os/$archCode language: plaintext (plaintext)

Next, create the /etc/pacman.conf file with the following configuration:

[options]
HoldPkg = pacman glibc
Architecture = auto
CheckSpace
ParallelDownloads = 5
SigLevel = Required DatabaseOptional

[core]
Include = /etc/pacman.d/mirrorlist

[extra]
Include = /etc/pacman.d/mirrorlist

# [community]
# Include = /etc/pacman.d/mirrorlistCode language: plaintext (plaintext)

Prepare the installation target

Assuming you have an existing partition or logical volume prepared (e.g., /dev/vg1/arch), mount it:

mount /dev/vg1/arch arch

mkdir -p /mnt/arch/boot
mount -o bind /boot /mnt/arch/bootCode language: plaintext (plaintext)

Install the base system

Use pacstrap to install the base Arch system:

pacstrap /mnt/arch base sudo nanoCode language: plaintext (plaintext)

This command installs a minimal yet functional base system.

Chroot into the new environment

Finally, change root into the newly installed Arch system:

arch-chroot /mnt/archCode language: plaintext (plaintext)

From this point, you may proceed with system configuration as per a standard Arch Linux installation (e.g., locale, hostname, users, packages, bootloader, etc.).

Follow the official Arch Linux installation guide.

Conclusion

Bootstrapping Arch Linux from a Debian system is an efficient method to deploy Arch without the need for traditional installation media. This workflow is suited for advanced users managing systems remotely or automating deployments.

Related links

Configuring Linux on a ThinkPad T420s Laptop

ThinkPad T420s laptops, despite their age, remain reliable for web browsing, word processing, and various other tasks. Linux can breathe new life into such dated computers, allowing them to perform efficiently.

I configured one of these laptops for my son, and he is now able to do his homework using it. With proper configuration, ThinkPad laptops can achieve optimal performance and power management. This article provides a guide to configuring X11/Xorg, kernel parameters, firmware, fan control, and power management settings to optimize the ThinkPad t420s for modern use.

Some instructions in this article are specific to Debian/Ubuntu-based distributions, but they can easily be adapted to other distributions such as Red Hat, Fedora, Arch Linux, Gentoo, and others.

X11/Xorg

To ensure proper functionality of Intel graphics and avoid issues such as black screens after waking from sleep, use the Intel driver instead of modesetting.

Create the configuration file /etc/X11/xorg.conf.d/30-intel.conf:

Section "Device"
  Identifier "Intel Graphics"
  Driver "intel"

  Option "Backlight" "intel_backlight"
EndSectionCode language: plaintext (plaintext)

Ensure the intel driver is installed:

sudo apt-get install xserver-xorg-video-intelCode language: plaintext (plaintext)

IMPORTANT: Ensure that the integrated graphics are set as the default video card in the ThinkPad BIOS.

Kernel parameters

To ensure backlight control is working (increasing and decreasing brightness), add the following kernel parameter: acpi_backlight=native

On a Debian/Ubuntu based distribution, this can be appended to the kernel command line in the bootloader configuration, typically in /etc/default/grub (for GRUB users):

GRUB_CMDLINE_LINUX_DEFAULT="quiet splash acpi_backlight=native"Code language: plaintext (plaintext)

(If you experience suspend/resume issues, a black screen, or system freezes, try adding the noapic kernel parameter.)

After modifying this file, update GRUB with:

sudo update-grubCode language: plaintext (plaintext)

Fan control

Without software to control the fan, it may run at maximum speed. To enable fan control, create the file /etc/modprobe.d/thinkpad_acpi.conf:

options thinkpad_acpi fan_control=1Code language: plaintext (plaintext)

After that, install zcfan. On a Debian/Ubuntu based distribution:

sudo apt-get install lm-sensors zcfanCode language: plaintext (plaintext)

(An alternative to zcfan: thinkfan)

Packages

Ensure that the required firmware for Atheros and Realtek network devices is installed, along with the tp-smapi-dkms package to enable access to ThinkPad-specific hardware features via the TP-SMAPI kernel modules. On Debian- and Ubuntu-based distributions, install the following packages:

sudo apt install firmware-atheros firmware-realtek tp-smapi-dkmsCode language: plaintext (plaintext)

It is also recommended to install essential packages for hardware encoding and decoding, including intel-microcode for the latest processor updates, which improve system stability and performance:

sudo apt-get install intel-microcode intel-media-va-driver-non-free i965-va-driverCode language: plaintext (plaintext)

TLP

TLP is a power management tool that optimizes battery life. Install and configure it as follows:

sudo apt install tlpCode language: plaintext (plaintext)

Create the configuration file /etc/tlp.d/00-base.conf:

DEVICES_TO_DISABLE_ON_BAT="bluetooth wwan"
DEVICES_TO_ENABLE_ON_STARTUP="wifi"
DEVICES_TO_DISABLE_ON_LAN_CONNECT="wifi wwan"

TLP_DEFAULT_MODE=BAT

CPU_SCALING_GOVERNOR_ON_AC=performance
CPU_SCALING_GOVERNOR_ON_BAT=schedutil

# PCIe Active State Power Management (ASPM):
PCIE_ASPM_ON_AC=performance

# Set Intel CPU performance: 0..100 (%). Limit the
# max/min to control the power dissipation of the CPU.
# Values are stated as a percentage of the available
# performance.
CPU_MIN_PERF_ON_AC=70
CPU_MAX_PERF_ON_AC=100

# [default] performance powersave powersupersave. on=disable
RUNTIME_PM_ON_AC=on
RUNTIME_PM_ON_BAT=powersupersaveCode language: Python (python)

Conclusion

The ThinkPad T420s, though older models, remain reliable machines for everyday tasks. With the right configuration, these laptops can be revitalized, making them well-suited for modern use.

Ansible: Installing and configuring Gitolite using Ansible for secure Git repository management

EDIT: The latest version of the code is available in the repository:
jamescherti/ansible-role-gitolite

Gitolite provides a way to manage Git repositories, control access to those repositories, and maintain a central configuration using simple configuration files and SSH keys.

Automating Gitolite Installation with Ansible

The Ansible tasks outlined in this article are designed to simplify the installation and configuration of Gitolite on your server. These tasks can automatically handle the entire setup process, including prerequisites like installing necessary packages and configuring system users and groups.

This automation significantly reduces the risk of human error and ensures a consistent setup across different environments.

The Ansible tasks:

---
# Automating Gitolite Installation with Ansible
# License: MIT
# Author: James Cherti
# URL: https://www.jamescherti.com/ansible-install-gitolite-linux/

- name: Install Gitolite
  block:
    - name: Check if the Operating System is supported
      fail:
        msg: "Operating System family is not supported: {{ ansible_os_family }}"
      when: ansible_os_family not in ["Debian", "RedHat"]

    - name: Install Gitolite on Debian-based Systems
      apt:
        name: gitolite3
      when: ansible_os_family == "Debian"

    - name: Install Gitolite on RedHat-based Systems
      yum: name=gitolite3
      when: ansible_os_family == "RedHat"

    - name: Create Gitolite system group
      group:
        name: "{{ gitolite_group }}"
        system: true

    - name: Create Gitolite system user
      user:
        name: "{{ gitolite_user }}"
        group: "{{ gitolite_group }}"
        home: "{{ gitolite_home }}"
        shell: "{{ gitolite_shell }}"
        create_home: true
        system: true

    - name: Ensure Gitolite home directory exists with proper permissions
      file:
        state: directory
        path: "{{ gitolite_home }}"
        owner: "{{ gitolite_user }}"
        group: "{{ gitolite_group }}"
        mode: 0700

- name: Configure Gitolite SSH key
  block:
    - name: Generate Gitolite SSH key pair if it does not exist
      become: true
      become_user: "{{ gitolite_user }}"
      command: ssh-keygen -t rsa -b 4096 -f {{ gitolite_ssh_key_path | quote }} -N ""
      args:
        creates: "{{ gitolite_ssh_key_path }}"

    - name: Set permissions for the Gitolite .ssh directory
      file:
        path: "{{ gitolite_ssh_directory }}"
        owner: "{{ gitolite_user }}"
        group: "{{ gitolite_user }}"
        mode: 0700

    - name: Set permissions for the SSH public key
      file:
        path: "{{ gitolite_ssh_key_path }}.pub"
        owner: "{{ gitolite_user }}"
        group: "{{ gitolite_user }}"
        mode: 0644

    - name: Set permissions for the SSH private key
      file:
        path: "{{ gitolite_ssh_key_path }}"
        owner: "{{ gitolite_user }}"
        group: "{{ gitolite_user }}"
        mode: 0600

- name: Setup Gitolite
  block:
    - name: Initialize Gitolite with the admin public key
      become: true
      become_user: "{{ gitolite_user }}"
      command:
        argv:
          - "gitolite"
          - "setup"
          - "-pk"
          - "{{ gitolite_ssh_public_key_path }}"
      args:
        creates: /var/lib/gitolite/repositories/gitolite-admin.gitCode language: YAML (yaml)

The required Ansible variables:

---
# Automating Gitolite Installation with Ansible
# License: MIT
# Author: James Cherti
# URL: https://www.jamescherti.com/ansible-install-gitolite-linux/

gitolite_user: gitolite
gitolite_group: gitolite
gitolite_shell: /bin/bash
gitolite_home: "/var/lib/{{ gitolite_user }}"
gitolite_ssh_directory: "{{ gitolite_home }}/.ssh"
gitolite_ssh_key_path: "{{ gitolite_ssh_directory }}/id_rsa"
gitolite_ssh_public_key_path: "{{ gitolite_ssh_directory }}/id_rsa.pub"Code language: YAML (yaml)

Related links

Installing Debian onto a separate partition from an existing distribution, such as Arch Linux or Gentoo, without using the Debian installer

There are various scenarios in which one might need to install a Debian-based system (e.g., Debian, Ubuntu, etc.) from another distribution (e.g., Arch Linux, Gentoo, Debian/Ubuntu distributions, Fedora, etc.). One common reason is when a user wants to set up a Debian-based system alongside an existing distribution. This could be for the purpose of testing software compatibility, development, or simply to have a dual-boot.

A Debian-based distribution can be installed from any other distribution using debootstrap. The debootstrap command-line tool allows installing a Debian or Ubuntu base system within a subdirectory of an existing, installed system. Unlike traditional installation methods using a CD or a USB Key, debootstrap only requires access to a Debian repository.

There are several reasons why this approach is advantageous:

  • No need for a bootable USB/CD: Install Debian without external installation media.
  • Dual-boot without reinstalling the host OS: Easily add Debian alongside another Linux system.
  • Minimal and customizable installation: Install only essential packages for a lightweight system (the installer sometimes installs more than necessary).
  • Remote server installations: Install Debian on a remote machine without physical access.
  • System recovery: Reinstall or repair a broken Debian system from another Linux distribution.
  • Automated and scripted deployments: Useful for mass deployments in enterprise environments.
  • Maintaining a multi-distro workflow: Run both a stable Debian system and a rolling-release distribution.

Step 1: Create a new LVM partition, format it, and mount it

# Create the root LVM partition
lvcreate  -L 20G -n debian_root VOL_NAME

# Format the partition
mkfs.ext4 /dev/VOL_NAME/debian_root

# Mount the partition
mkdir /mnt/debian_root
mount /dev/VOL_NAME/debian_root /mnt/debian_rootCode language: plaintext (plaintext)

Step 2: Install the debootstrap command-line tool

On Arch Linux, debootstrap can be installed using:

pacman -Sy debian-archive-keyring debootstrapCode language: plaintext (plaintext)

On Gentoo, it can be installed using:

emerge -a dev-util/debootstrapCode language: plaintext (plaintext)

On Debian/Ubuntu based distributions:

apt-get install debootstrapCode language: JavaScript (javascript)

Step 3: Install the Debian base system

Use the debootstrap command to install Debian into the target directory:

debootstrap  --arch=amd64 stable /mnt/debian_root http://deb.debian.org/debianCode language: plaintext (plaintext)

You can replace stable with another Debian release like testing or unstable if desired. You can also add the flag --force-check-gpg to force checking Release file signatures.

In the above example, it will install the Debian-based system from the repository http://deb.debian.org/debian into the local directory /mnt/debian_root.

Step 4: Chroot into the Debian system

Since you are installing a Debian-based system inside another distribution (Arch Linux, Gentoo, etc.), you’ll need to ensure that the directory where the Debian system is mounted is ready. You can achieve this by mounting certain directories and chrooting into the Debian system:

sudo mount --bind /dev /mnt/debian_root/dev
sudo mount --bind /proc /mnt/debian_root/proc
sudo mount --bind /sys /mnt/debian_root/sys
sudo mount --bind /boot /mnt/debian_root/boot
sudo cp /etc/resolv.conf /mnt/debian_root/etc/resolv.conf
sudo cp /etc/fstab /mnt/debian_root/etc/fstab
sudo chroot /mnt/debian_root /bin/bash -lCode language: plaintext (plaintext)

The chroot command will open a new shell in the Debian environment.

Step 5: Configure the Debian-based system

Now that you’re inside the Debian-based system, you can configure it as desired. You can install packages, modify configurations, set up users, etc.

Here is an example:

apt-get update

# Install the Linux Kernel
apt-get install linux-image-amd64 firmware-linux-free firmware-misc-nonfree 

# Install cryptsetup if you are using a LUKS encrypted partition
apt-get install cryptsetup cryptsetup-initramfs

# Install misc packages
apt-get install console-setup vim lvm2 sudo

# Reconfigure locales
dpkg-reconfigure locales

# Configure the host name and the time zone
echo yourhostname > /etc/hostname
ln -sf /usr/share/zoneinfo/America/New_York /etc/localtime
Code language: plaintext (plaintext)

Do not forget to:

  • Modify /mnt/debian_root/etc/fstab (The mount point “/” has to point to the Debian system)
  • Modify /mnt/debian_root/etc/crypttab (If you are using a LUKS encrypted partition)

How to boot into the newly installed system?

You can, for example, configure GRUB to boot your newly configured operating system.

You can either use the new Debian-based system’s GRUB as the default (replace the existing one) or configure additional GRUB entries in an existing system. For instance, if your base system is Debian-based, you can add your entry using /etc/grub.d/40_custom:

#!/bin/sh
exec tail -n +3 $0
# This file provides an easy way to add custom menu entries.  Simply type the
# menu entries you want to add after this comment.  Be careful not to change
# the 'exec tail' line above.
menuentry 'Debian 2' --class debian --class gnu-linux --class gnu --class os $menuentry_id_option 'debian_fallback' {
        insmod part_gpt
        insmod fat
        search --no-floppy --fs-uuid --set=root 00000000-000a-00a0-a0a0-000000a0000a
        linux /backup/vmlinuz-6.12.12+bpo-amd64 root=/dev/MY_LVM_VOLUME/debian ro fsck.mode=auto fsck.repair=yes nowatchdog apparmor=1 acpi_backlight=native
        initrd /initrd.img-6.12.12+bpo-amd64Code language: plaintext (plaintext)

(Replace /dev/mapper/MY_LVM_VOLUME_debian with your root partition and 00000000-000a-00a0-a0a0-000000a0000a with your actual UUID that you can find using the command: lsblk -o +UUID)

In my case, I am using bootctl, which I installed using Gentoo. I simply added /boot/loader/entries/debian.conf with the following configuration:

title Debian
linux /vmlinuz-6.12.12+bpo-amd64
initrd /initrd.img-6.12.12+bpo-amd64
options rw root=/dev/volume1/debianCode language: plaintext (plaintext)

Congratulations! You have successfully installed a Debian-based system using debootstrap from another distribution such as Arch Linux, Gentoo, etc.