13 Useful GNOME Shell Extensions for a Better Desktop Experience (Available in the official Debian repositories or on the GNOME Extensions website for other distributions)

GNOME Shell offers a clean and modern UI, but it often lacks functionality desired by power users and those coming from other desktop environments.
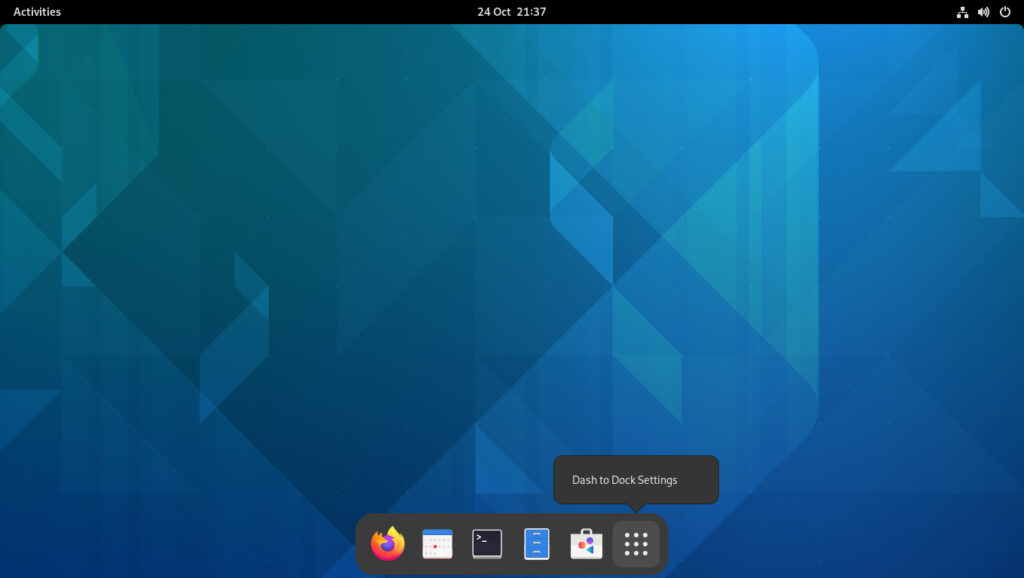
GNOME Shell extensions provide a way to restore or add features to your desktop. In this article, you’ll explore some of the most useful GNOME Shell extensions available directly from the official Debian repositories via apt (available in Debian Bookworm and newer).

For users running distributions other than Debian, this article provides a link to the GNOME Shell Extensions page for each extension, allowing installation on any supported distribution.

Extension Management

The GNOME Shell Extension Prefs tool offers a graphical interface for enabling, disabling, and configuring GNOME Shell extensions. It can be installed using the following command:

sudo apt install gnome-shell-extension-prefs
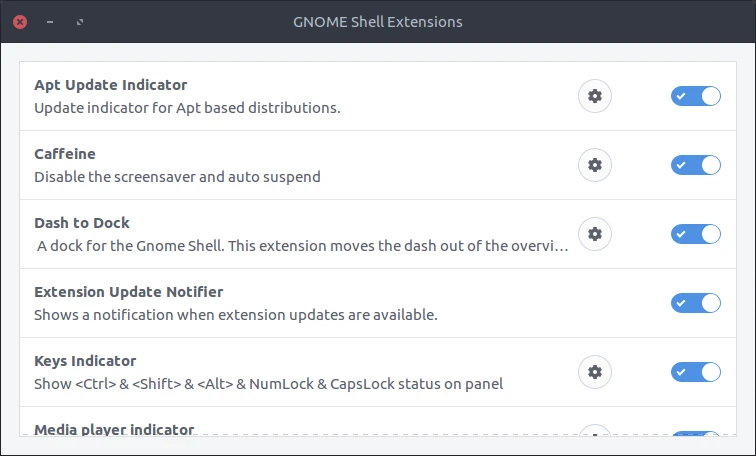
After installation, GNOME Shell extensions can be enabled and configured using the gnome-extensions-app command.

Productivity

gnome-shell-extension-caffeine

The Caffeine extension prevents the system from locking the screen or entering suspend mode while it is active or when an application switches to fullscreen mode. This extension is useful during presentations, video playback, or gaming sessions, where uninterrupted screen activity is required.
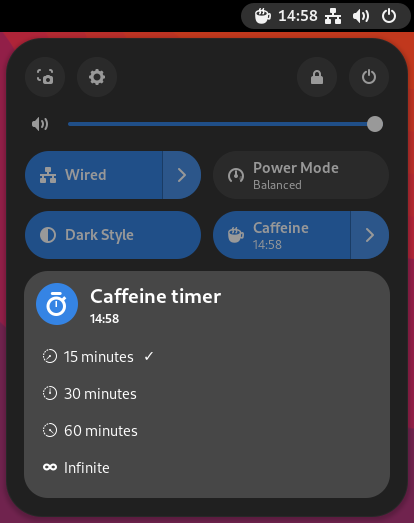
To install it on a Debian-based system, execute the following command:

sudo apt install gnome-shell-extension-caffeine

System Monitoring

gnome-shell-extension-system-monitor

The system-monitor extension displays CPU, memory, network, and other metrics in real time on the top bar. Useful for developers, system administrators, and performance-conscious users.
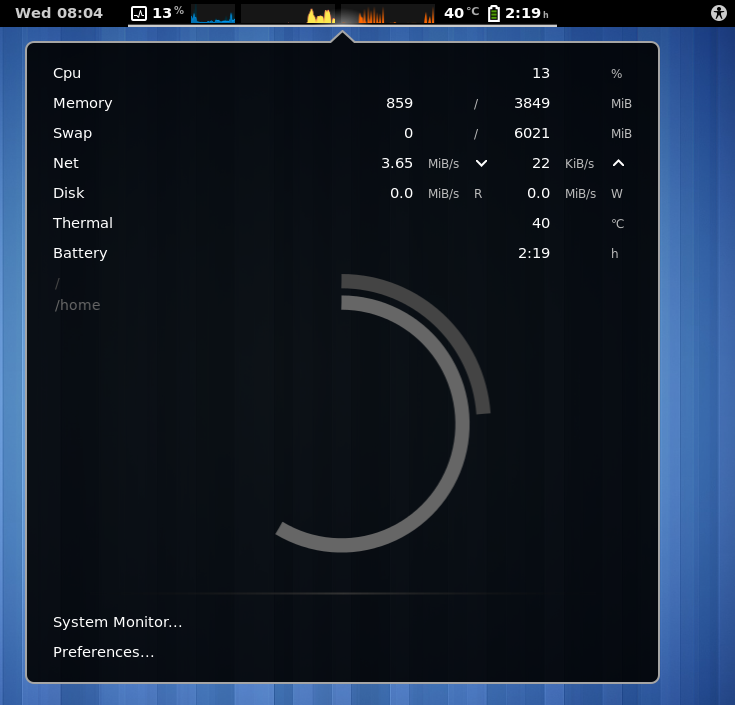
To install it on a Debian-based system, execute the following command:

sudo apt install gnome-shell-extension-system-monitor

gnome-shell-extension-impatience

The Impatience extension decreases the duration of animations in GNOME Shell, resulting in a more responsive user interface.

To install it on a Debian-based system, execute the following command:

sudo apt install gnome-shell-extension-impatience

Panel and Dash Customization

gnome-shell-extension-dash-to-panel

The Dash To Panel extension integrates the top panel and dash into a unified taskbar, emulating the interface conventions commonly found in Windows and KDE environments.

To install it on a Debian-based system, execute the following command:

sudo apt install gnome-shell-extension-dash-to-panel

gnome-shell-extension-dashtodock

The Dash To Dock extension moves the dash out of the Activities view and docks it on the screen. Ideal for users preferring a macOS-style dock or persistent application launcher.

To install it on a Debian-based system, execute the following command:

sudo apt install gnome-shell-extension-dashtodock

gnome-shell-extension-hide-activities

The Hide Activities Button extension removes the “Activities” button from the top bar. It is useful for cleaner interfaces.

To install it on a Debian-based system, execute the following command:

sudo apt install gnome-shell-extension-hide-activities

gnome-shell-extension-top-icons-plus

The TopIcons Plus extension restores support for tray icons (i.e., systray) by displaying them in the top panel.

To install it on a Debian-based system, execute the following command:

sudo apt install gnome-shell-extension-top-icons-plus

UI Clean-Up and Space Saving

gnome-shell-extension-pixelsaver

The Pixelsaver extension integrates window title bars into the top panel for maximized windows, saving vertical space.

To install it on a Debian-based system, execute the following command:

sudo apt install gnome-shell-extension-pixelsaver

gnome-shell-extension-no-annoyance

The NoAnnoyance extension disables “Window is ready” notifications, which can be distracting and interrupt focus when multitasking across multiple applications.

To install it on a Debian-based system, execute the following command:

sudo apt install gnome-shell-extension-no-annoyance

gnome-shell-extension-autohidetopbar

The Hide Top Bar extension automatically hides the top bar, helping reduce visual clutter and maximize vertical screen space.

To install it on a Debian-based system, execute the following command:

sudo apt install gnome-shell-extension-autohidetopbar

Menus and Application Launching

gnome-shell-extension-arc-menu

The ArcMenu extension replaces the default application overview with a highly customizable start menu. Suitable for users preferring hierarchical or categorized navigation.
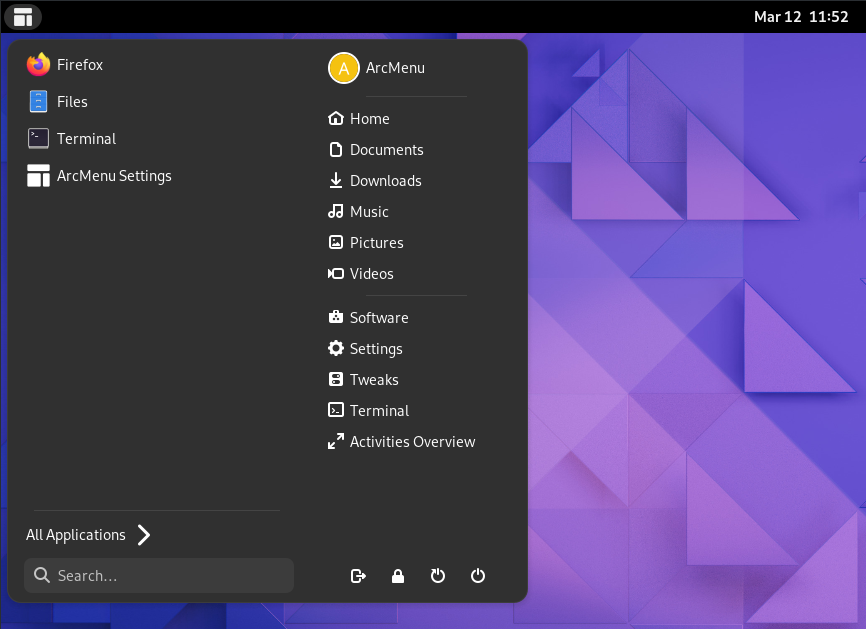
To install it on a Debian-based system, execute the following command:

sudo apt install gnome-shell-extension-arc-menu

Desktop Icon Support

gnome-shell-extension-desktop-icons-ng

The Desktop Icons NG extension restores desktop icon support (files, folders, and shortcuts), which was removed in newer GNOME versions. Supports drag-and-drop and right-click menus.

To install it on a Debian-based system, execute the following command:

sudo apt install gnome-shell-extension-desktop-icons-ng

Conclusion

These GNOME Shell extensions enable the transformation of GNOME into an efficient and personalized environment. All GNOME Shell extensions mentioned in this article are available through the official Debian repositories.

Additional GNOME Shell extensions, not included in the Debian repositories, can be found on the official GNOME Shell Extensions website.
Installing Arch Linux onto a separate partition from an existing Debian-based distribution (Ubuntu, Debian, Linux Mint…), without using the Arch Linux installation media

Installing Arch Linux typically begins with booting from official installation media. However, it is also possible to bootstrap an Arch Linux installation from within a running Debian-based system (Ubuntu, Debian, Linux Mint, etc.). This method is advantageous in environments where rebooting into live media is impractical or when remote installation is desired.

This article outlines a workflow for installing Arch Linux from a Debian-based system using pacman, pacstrap, arch-chroot, and pacman-key.

Prerequisites

Ensure your Debian system has the necessary tools to begin the installation process:

apt-get install arch-install-scripts pacman-package-manager archlinux-keyring makepkgCode language: plaintext (plaintext)

This command installs the Arch Linux bootstrap tools, makepkg, the pacman package manager, and required keyrings.

Configure the pacman keyring

Initialize the pacman keyring:

pacman-key --initCode language: plaintext (plaintext)

Install the latest Arch Linux keyring using pacman without resolving dependencies (to avoid conflicts with Debian packages):

pacman -S --nodeps archlinux-keyringCode language: plaintext (plaintext)

Replace the outdated Debian’s pacman keyrings with Arch’s:

cp /usr/share/pacman/keyrings/* /usr/share/keyrings/Code language: plaintext (plaintext)

Delete the archlinux-keyring pacman package:

pacman -Rsc archlinux-keyringCode language: plaintext (plaintext)

Populate the keyring again:

pacman-key --populate archlinuxCode language: plaintext (plaintext)

Configure pacman

Modify the /etc/pacman.d/mirrorlist file to include a valid Arch Linux mirror:

Server = http://mirror.csclub.uwaterloo.ca/archlinux/$repo/os/$archCode language: plaintext (plaintext)

Next, create the /etc/pacman.conf file with the following configuration:

[options]
HoldPkg = pacman glibc
Architecture = auto
CheckSpace
ParallelDownloads = 5
SigLevel = Required DatabaseOptional

[core]
Include = /etc/pacman.d/mirrorlist

[extra]
Include = /etc/pacman.d/mirrorlist

# [community]
# Include = /etc/pacman.d/mirrorlistCode language: plaintext (plaintext)

Prepare the installation target

Assuming you have an existing partition or logical volume prepared (e.g., /dev/vg1/arch), mount it:

mount /dev/vg1/arch arch

mkdir -p /mnt/arch/boot
mount -o bind /boot /mnt/arch/bootCode language: plaintext (plaintext)

Install the base system

Use pacstrap to install the base Arch system:

pacstrap /mnt/arch base sudo nanoCode language: plaintext (plaintext)

This command installs a minimal yet functional base system.

Chroot into the new environment

Finally, change root into the newly installed Arch system:

arch-chroot /mnt/archCode language: plaintext (plaintext)

From this point, you may proceed with system configuration as per a standard Arch Linux installation (e.g., locale, hostname, users, packages, bootloader, etc.).

Follow the official Arch Linux installation guide.

Conclusion

Bootstrapping Arch Linux from a Debian system is an efficient method to deploy Arch without the need for traditional installation media. This workflow is suited for advanced users managing systems remotely or automating deployments.

Related links

How I Designed an Ergonomic Workstation for IT Specialists to Enhance Focus, Comfort, and Efficiency

In modern software development and system administration, where prolonged computer use is routine, an optimized workstation is not a luxury but a necessity. The workspace I designed balances ergonomics, efficiency, and versatility. I’m sharing it here because I believe it’s always valuable to see how other IT specialists configure their setups, gain inspiration, and exchange ideas. Feel free to share your own workstation with me in the comments.

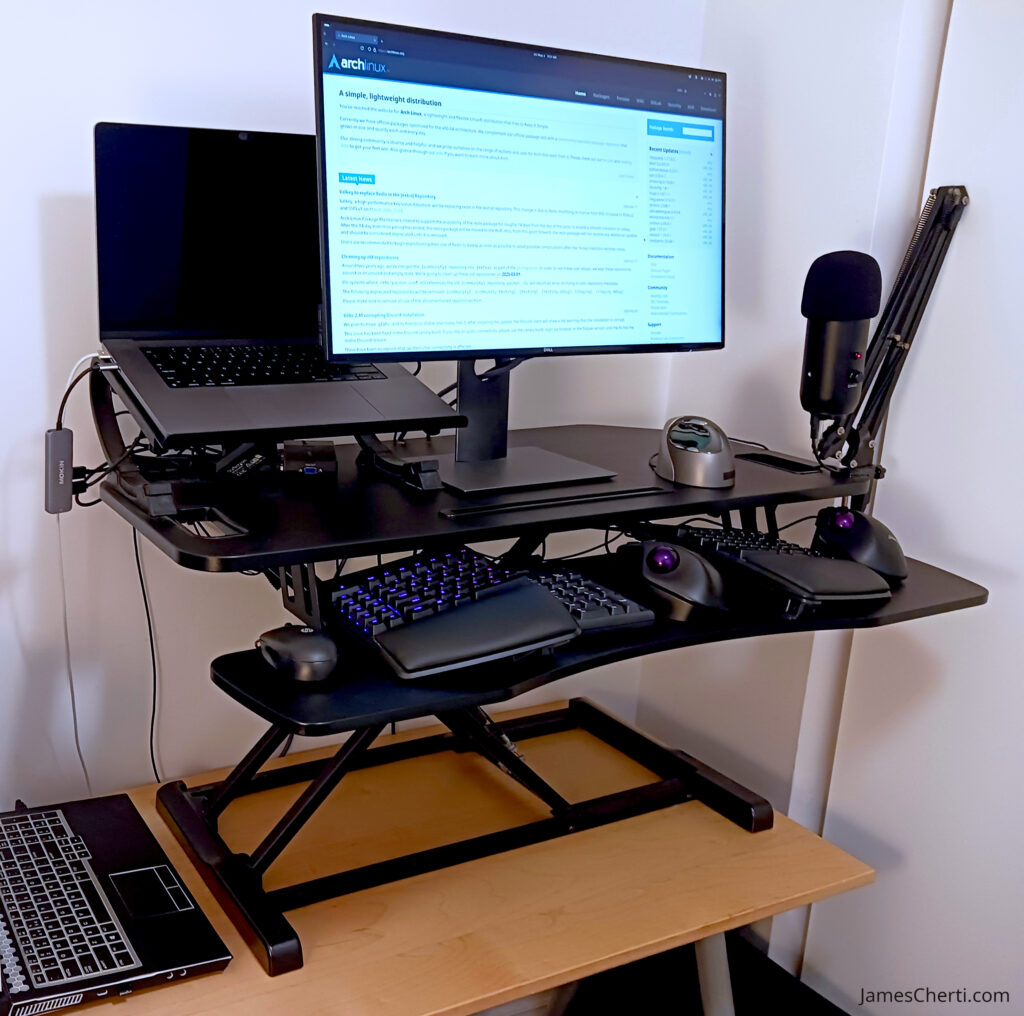
This is the ergonomic and productive workstation I designed to support sustained focus, comfort, and efficiency:

Sit-stand desk converter

The central element of the setup is the sit-stand desk converter. This adjustable mechanism allows transitions between sitting and standing positions. Alternating posture mitigates the risks associated with prolonged sedentary behavior, such as musculoskeletal discomfort and reduced metabolic health. Additionally, standing intermittently enhances alertness and cognitive engagement, factors I find critical during intensive coding or system monitoring tasks.

Split ergonomic keyboard

I rely on a split ergonomic keyboard to minimize ulnar deviation and allow my wrists to maintain a neutral alignment. This configuration alleviates strain on the median nerve, which is associated with repetitive strain injuries such as carpal tunnel syndrome. The tented design, coupled with wrist rests, promotes a relaxed forearm posture, reducing muscular fatigue during extended typing sessions.

I place the mouse and keypad in the middle, as it provides easier access than positioning them on the right side, ensuring my hands remain in a more neutral, less strained position.

The split keyboard is a mechanical model with Cherry MX Blue switches, providing tactile feedback optimal for intensive typing sessions.

Vertical and trackball mice

I use four distinct mice to accommodate diverse workflows and to mitigate repetitive strain.

I make deliberate use of both a vertical mouse and a trackball mouse to diversify input modalities. The vertical mouse maintains the forearm in a handshake position, minimizing pronation stress on the forearm muscles. Conversely, the trackball mouse eliminates the need for extensive wrist and arm movement, relying instead on finger manipulation. Alternating between these devices distributes musculoskeletal load, which I have found effective in mitigating repetitive strain risks.

External microphone with boom arm

An external cardioid microphone mounted on a boom arm optimizes voice clarity during virtual meetings or recordings I occasionally produce. The boom arm’s adjustability ensures optimal microphone placement without encroaching on desk real estate, and the microphone’s position at mouth level enhances audio quality while minimizing ambient noise capture.

Two computers

My workspace includes two computers: one for professional responsibilities, focused on secure infrastructure management and corporate development, and another for personal projects, supporting exploratory programming, open-source contributions, and experimental configurations.

Second curved monitor

A second curved monitor is positioned to the left, though it is not visible in the picture. I dedicate it primarily to multimedia tasks. By isolating these activities on a separate screen, I keep my primary workspace uncluttered and maintain an uninterrupted focus on development and system administration tasks. The curved design of the second monitor enhances immersion and reduces eye strain when glancing between displays, contributing to a more comfortable and efficient multitasking environment.

Conclusion

The workstation I maintain embodies a deliberate synthesis of ergonomic principles and productivity. Each component, from input devices to display configurations, is selected to minimize physical strain while maximizing functional efficiency. For a professional engaged in cognitively demanding, prolonged computing tasks, this setup harmonizes comfort with operational efficacy in a way that continually supports both focus and well-being.

minimal-vim-config – The Efficient Minimal Vim/Neovim Configuration

The minimal-vim-config project is a Vim configuration that is intended to serve as a solid foundation for a Vim configuration.

The author began developing this configuration upon first adopting Vim and has continuously refined it over 25 years of research and testing to identify the most effective parameters and optimizations for a Vim configuration file.

This Vim configuration does not install any plugins. It lets you choose exactly which plugins to use, giving you the freedom to build a setup suited to your specific needs without unnecessary dependencies or bloat.

Installation

Clone the repository into ~/.minimal-vim-config:

git clone https://github.com/jamescherti/minimal-vim-config ~/.minimal-vim-configCode language: plaintext (plaintext)

Create symbolic links for Vim:

ln -sf ~/.minimal-vim-config/minimal-vim-config.vim ~/.vimrcCode language: plaintext (plaintext)

Create symbolic links for Neovim:

mkdir -p ~/.config/nvim
ln -sf ~/.minimal-vim-config/minimal-vim-config.vim ~/.config/nvim/init.vimCode language: plaintext (plaintext)

Update

To update minimal-vim-config with the latest changes from the repository, execute the following command:

git -C ~/.minimal-vim-config pullCode language: plaintext (plaintext)

Features

This vimrc enhances defaults that improve the editing experience with Vim, based on extensive research and testing.

Miscellaneous enhancements:

  • Automatically remove unnecessary whitespace before saving files.
  • Disables compatibility with Vi and uses Vim-specific settings.
  • Prevents loading the configuration multiple times.

Encoding and File Handling:

  • Sets global encoding, file encodings, and script encoding to UTF-8.
  • Allows loading an optional pre-configuration script (~/.vim/before.vim).
  • Allows loading an optional post-configuration script (~/.vim/after.vim).

Font Settings:

  • Configures default font and size (DejaVu Sans Mono at size 14).
  • Offers a method to scale the GUI font size within a defined range (6-30).

Session Management:

  • Defines options for Vim sessions and view settings (e.g., folds, current directory, cursor position).
  • Restore the cursor position when editing a file, except for Git commit files such as COMMIT_EDITMSG.

GUI and Console Configuration:

  • Customizes GUI-specific settings, including window size, font rendering, cursor behavior, and disabling unnecessary UI elements.
  • Improves color handling and terminal display with 256-color support and true color.

Syntax, Indentation, and Formatting:

  • Enables syntax highlighting and filetype-based indentation plugins.
  • Configures indentation style (spaces instead of tabs, 4 spaces per indentation level).
  • Automatically wraps comments and disables smart indenting features for better manual control.

Status Line:

  • Customizes the status line to show relevant information such as paste mode, wrap status, filename, line/column number, and current Git branch.

Window and Layout Settings:

  • Sets split window behavior (e.g., splits right and below).
  • Configures window size and scrolling behavior.

Backup and Undo Settings:

  • Disables backup files and sets undo options (e.g., persistent undo with undo files).

Key Mappings and Shortcuts:

  • Assigns useful key mappings (e.g., tabs, grep, for writing files, changing directories, adjusting font size).
  • Custom leader key (,), allowing for personalized shortcuts.

Search Settings:

  • Configures incremental search, case-sensitive search (smartcase), and disables search wrapping.

Language and Spell Check:

  • Configures spell checking and defines custom dictionary and thesaurus files.

Clipboard Integration:

  • Supports clipboard integration (copy/paste between Vim and external applications) when available.

File Type Specific Settings:

  • Defines custom settings for specific file types (e.g., Dockerfile, YAML, Python, Shell, Vim).

Autocommands:

  • Uses autocommands to automate behaviors like adjusting settings when a file type is detected or resizing windows on Vim resize events.

Mouse Configuration:

  • Configures mouse support in various modes, including the ability to drag and select text within Vim without switching to visual mode.

Optimization Settings:

  • Includes optimizations for smooth scrolling and fast terminal connections, including reducing screen redraw times.

Smart Write Function:

  • Defines a function (smart_write) to save files intelligently, ensuring proper handling of modified and non-modified files.

Better tabline:

  • Enhance the visual clarity of the tabline by displaying solely the filename and removing unnecessary information.

Useful functions:

  • Select pasted text
  • Search the current selection using //, *, or #.

Links

Enhancing Git Diff for Emacs Lisp: Better Git Diff of Elisp function or macro definitions

By default, the git diff algorithm compares changes in Elisp files line by line without understanding the structural semantics of Emacs Lisp files. This means that when modifications are made within functions, the diff output does not convey how those changes relate to higher-level code constructs such as functions or macros.

As a result, reviewers are presented with fragmented and often verbose diffs where the context of a change, such as which function it belongs to, is not always readily apparent. This lack of structural awareness can make it difficult to assess the purpose and impact of changes efficiently.

Git can be configured to recognize function or macro definitions explicitly, ensuring that diffs are presented at the function or macro level rather than as arbitrary line changes. Here are the steps:

Step 1 – The Git configuration for Emacs Lisp diffs

Add the following elisp Git driver to your ~/.gitconfig file:

[diff "elisp"]
xfuncname = ^\\([^[:space:]]*def[^[:space:]]+[[:space:]]+([^()[:space:]]+)
Code language: plaintext (plaintext)

The regular expression above matches lines that begin with typical Emacs Lisp definition forms, such as defun, defmacro, and other def* constructs. It detects the symbol being defined, allowing Git to handle changes at the function or definition level intelligently. This configuration can also be found in the autogen.sh file, which is part of the Emacs source code.

Step 2 – Associating the Git Diff Driver with *.el files

Once the custom diff driver is defined, it needs to be associated with Elisp files. This is accomplished by adding the following line to the ~/.gitattributes file:

*.el diff=elisp
Code language: plaintext (plaintext)

With this setup, Git will apply the elisp diff driver to all files with the .el extension, using the custom pattern to identify function boundaries.

Conclusion

This configuration generates diffs that focus on changes within the scope of individual function and macro definitions, rather than arbitrary lines. As a result, reviews of Emacs Lisp code become more precise and contextually relevant. Reviewers can easily identify which functions were modified, without being distracted by unrelated or excessive diffs.

Related links

Python: How to Clear Stdin Before Using the input() Function

In Python, the input() function is commonly used to capture input from the user. However, issues may arise when unwanted or unexpected data is present in the stdin, leading to incorrect or incomplete results when calling input().

A reliable approach to address this issue is to clear the stdin buffer before invoking input(). This article discusses why discarding the stdin buffer is necessary and how to implement it correctly to ensure accurate and clean input handling on both POSIX systems (such as Unix, Linux, and macOS) and Windows.

Why does stdin need to be cleared?

When working with user input, especially in interactive command-line programs, it is important to ensure that the data in stdin is fresh and relevant. Several scenarios can lead to unwanted data lingering in stdin, such as:

  1. Stale Input from Previous Operations: If the user has previously entered data, but the program did not consume it fully (for instance, if the user presses “Enter” before the program reads the input), it remains in the stdin buffer. This can cause the next call to input() to read this leftover data instead of waiting for new input.
  2. Automated or Unexpected Input: In automated or scripted environments, programs may send data to stdin, which could interfere with interactive user input. Similarly, input that wasn’t expected may get in the way of user interaction.

Clearing stdin before invoking input() ensures that any previous data in the stdin buffer is discarded, giving the command-line Python program a clean slate to properly receive and process the user’s input.

How to Clear stdin Properly in Python

On Unix-like systems (such as Linux and macOS), one effective method to discard the input buffer is by using the termios module. The termios.tcflush() function discards any unread data from the input buffer.

On Windows, the msvcrt module can be used to achieve a similar effect by reading and discarding characters from the buffer until it is empty.

The following code snippet demonstrates how to clear stdin before calling input() to ensure only fresh input is received, for both Unix-like systems and Windows:

# Author: James Cherti
# License: MIT
# URL: https://www.jamescherti.com/python-flushing-stdin-before-using-input-function/

import os
import sys

def clear_stdin():
    """Clear any pending input from the standard input buffer.

    This function ensures that no stale or unintended data remains in stdin
    before reading user input interactively. On Windows, it uses the msvcrt
    module to discard characters from the input buffer. On POSIX-compliant
    systems (e.g., Linux, macOS...), it uses select to check for available
    input without blocking and either discards the data by reading or flushes
    it using termios.tcflush if stdin is a terminal.
    """
    try:
        if os.name == "nt":
            import msvcrt  # pylint: disable=import-outside-toplevel

            # For Windows systems, Check if there is any pending input in the
            # buffer Discard characters one at a time until the buffer is empty.
            while msvcrt.kbhit():
                msvcrt.getch()
        elif os.name == "posix":
            import select  # pylint: disable=import-outside-toplevel

            # For Unix-like systems, check if there's any pending input in
            # stdin without blocking.
            stdin, _, _ = select.select([sys.stdin], [], [], 0)
            if stdin:
                if sys.stdin.isatty():
                    # pylint: disable=import-outside-toplevel
                    from termios import TCIFLUSH, tcflush

                    # Flush the input buffer
                    tcflush(sys.stdin.fileno(), TCIFLUSH)
                else:
                    # Read and discard input (in chunks).
                    while sys.stdin.read(1024):
                        pass
    except ImportError:
        passCode language: Python (python)

Conclusion

Clearing stdin before calling input() helps ensure that a Python program processes only the intended user input. This can be useful in interactive command-line applications, where residual data in the input buffer may otherwise lead to unexpected behavior.

Bash shell: Interactive Menu to Insert any String from the Tmux Scrollback Buffer Into the Shell Prompt

Imagine you’re working in a tmux session, navigating logs, editing config files, or running commands, and you suddenly need to reuse a path, a variable name, or a keyword that appeared earlier on the tmux scrollback buffer. Instead of scrolling back or retyping it manually, you press Ctrl-n, type a few fuzzy letters, press enter, and the desired string from the tmux scrollback is instantly inserted at your cursor.

The tmux scrollback buffer is the internal history of terminal output that tmux maintains for each pane. It consists of the lines that have scrolled off the visible screen but are still accessible for review or processing.

This article presents a Bash function that scans the tmux scrollback buffer, lets you interactively select strings using fzf, and inserts the chosen string directly into the command line prompt. It offers a fast, context-aware mechanism for inline string insertion, allowing you to work efficiently without breaking your flow.

Requirements

Implementation using Bash functions and readline

Add the following code snippet to your ~/.bashrc to bind Ctrl-n for selecting strings from the tmux scrollback buffer using fzf, and inserting the selected string directly into the shell prompt:

#!/usr/bin/env bash
# Author: James Cherti
# License: MIT
# URL: https://www.jamescherti.com/tmux-autocomplete-fzf-fuzzy-insertion-scrollback/

__tmux_fzf_autocomplete__() {
  # Capture the last 100,000 lines from the tmux scrollback buffer, reverse
  # order, and extract strings
  tmux capture-pane -pS -100000 \
    |
    # Split input on spaces and newlines, remove duplicates while preserving
    # order, and keep only strings longer than 4 characters
    awk 'BEGIN { RS = "[ \t\n]" } length($0) > 4 && !seen[$0]++' \
    |
    # Invoke fzf for case-insensitive exact fuzzy matching, with results shown
    # in reverse order
    fzf --no-sort --exact +i --tac
}

__tmux_fzf_autocomplete_inline__() {
  local selected
  selected="$(__tmux_fzf_autocomplete__)"

  local before
  before="${READLINE_LINE:0:$READLINE_POINT}"

  local after
  after="${READLINE_LINE:$READLINE_POINT}"
  
  READLINE_LINE="${before}${selected}${after}"
  READLINE_POINT=$((READLINE_POINT + ${#selected}))
}

# Pressing Ctrl-n autocompletes from the Tmux scrollback buffer
bind -x '"\C-n": "__tmux_fzf_autocomplete_inline__"'Code language: Bash (bash)

Key components:

  • tmux capture-pane: Retrieves the scrollback content from the active tmux pane.
  • awk: Processes tokens, removes duplicates, and filters out strings shorter than 5 characters to produce a concise list.
  • fzf: Offers an interactive fuzzy interface for filtering and selecting the desired token. The --tac flag reverses the line order, prioritizing the most recent content.
  • bind: Inserts the selected token inline at the Bash prompt using a readline binding, activated by Ctrl-n. This binding does not interfere with typical command-line editing, preserves the existing prompt content, and updates the cursor position correctly.

Conclusion

The code snippet in this article enhances the Bash shell by turning the tmux scrollback buffer into a live source of contextual string insertion. Within tmux workflows, it removes the need to scroll through output, improving both speed and accuracy during command-line tasks.

Related Links

  • This function is included in the author’s .bashrc, which is available in the jc-dotfiles repository.

Linux: Setting the default GDM login monitor in a multi-monitor setup using GNOME display settings

If you’re using a multi-monitor setup with GDM (GNOME Display Manager) and the login screen consistently appears on the wrong monitor, this article presents a tested solution that can be applied either manually or automated, ensuring that the GDM monitor configuration matches that of your primary user setup.

The issue

Consider the following scenario: You have two monitors connected to an Nvidia graphics card, and despite setting the primary monitor correctly in GNOME, the GDM login screen still appears on the secondary monitor. Even if the secondary monitor is turned off, GDM continues to display the login prompt there, as it defaults to the wrong monitor. Additionally, the screen resolution and refresh rate are not configured as desired. For instance, if you have a 144Hz display and GDM uses a different refresh rate, you may experience annoying black flickering when logging in, as the refresh rate changes mid-session.

The solution

The login screen configuration for GDM can be influenced by copying the monitor layout from your GNOME user session.

This is done by copying the ~/.config/monitors.xml file from your user configuration to GDM’s configuration directory.

Step 1: Configure your display using GNOME

First, configure your display layout as desired using GNOME’s display settings:

gnome-control-center displayCode language: plaintext (plaintext)

Step 2: Copy the resulting monitor configuration to GDM’s configuration directory

Copy the resulting monitor configuration ~/.config/monitors.xml to GDM’s configuration directory:

sudo install -o root -m 644 ~/.config/monitors.xml ~gdm/.config/Code language: plaintext (plaintext)

(the shell will automatically interpret ~gdm as the home directory of the gdm user)

Step 3: Restart GDM

Restart GDM with the following command:

sudo systemctl restart gdmCode language: plaintext (plaintext)

How to automatically copy monitors.xml to the GDM configuration directory?

The copying of the monitors.xml file can be automated by defining a systemd service override for the GDM service.

First, create the following directory using:

sudo mkdir -p /etc/systemd/system/gdm.service.d/Code language: plaintext (plaintext)

Then, create the file /etc/systemd/system/gdm.service.d/override.conf with the following contents:

[Service]
ExecStartPre=/bin/sh -c 'install -o root -m 644 /home/YOUR_USER/.config/monitors.xml ~gdm/.config/monitors.xml || true'Code language: plaintext (plaintext)

Ensure to:

  • Replace YOUR_USER with your actual desktop user name.

Conclusion

Copying the GNOME display settings to the GDM configuration directory ensures that GDM adopts the same monitor layout as your GNOME session, causing the login screen to appear on your preferred monitor.

Git: Suppressing Irrelevant Git Diff Output for Specific Files (e.g., binary files, encrypted files…)

Sometimes, it is useful to suppress certain files from git diff output, especially when the files are large, machine-generated, or not intended for human reading. Typical examples include encrypted files such as *.gpg and *.asc, as well as binary assets like images, audio files, and similar media. These files are usually represented as opaque binary data in diffs, providing no useful information and adding extraneous clutter to git diff output.

Git offers a solution for this through adding YOUR-FILE-PATTERN -diff -text to the .gitattributes file.

Solution: A .gitattributes file that is local to the repository

The .gitattributes file can be defined locally within each individual repository.

For example, to prevent git diff from displaying diffs for files with the .asc and .gpg extensions, include the following lines in the .gitattributes file at the root of your Git repository:

*.asc -diff -text
*.gpg -diff -textCode language: plaintext (plaintext)

Using -diff -text in .gitattributes is beneficial for binary or non-human-readable files because it ensures Git neither attempts to generate textual diffs (-diff) nor applies any text-related processing like end-of-line normalization (-text).

This combination prevents irrelevant or misleading changes from appearing in diffs, avoids potential corruption from automatic text conversions, and keeps version control output clean and focused on meaningful, human-readable changes.

Alternative solution: A global .gitattributes_global file

Rather than adding these rules to every repository individually, you can define them once in a global ~/.gitattributes_global file. This file applies to all Git repositories for your user account unless overridden by a repository-specific .gitattributes.

To set up a global .gitattributes_global file:

Configure Git to use it:

git config --global core.attributesfile ~/.gitattributes_globalCode language: plaintext (plaintext)

Add global rules to the ~/.gitattributes_global file. For example:

*.asc -diff -text -diff
*.gpg -diff -text -diffCode language: plaintext (plaintext)

This setup ensures consistent handling of non-human-readable files across all repositories without the need for redundant configuration.

Conclusion

Suppressing diffs for non-human-readable files with .gitattributes, whether configured locally or globally, reduces noise in version control workflows. This keeps Git diff output focused on meaningful textual modifications, prevents clutter from binary content, and safeguards against unwanted transformations.

Related links

Emacs: stripspace.el – Automatically Remove Trailing Whitespace Before Saving a Buffer, with an Option to Preserve the Cursor Column

The stripspace Emacs package provides stripspace-local-mode, which automatically removes trailing whitespace and blank lines at the end of the buffer when saving.

(Trailing whitespace refers to any spaces or tabs that appear at the end of a line, beyond the last non-whitespace character. These characters serve no purpose in the content of the file and can cause issues with version control, formatting, or code consistency. Removing trailing whitespace helps maintain clean, readable files.)

It also includes an optional feature (stripspace-only-if-initially-clean, disabled by default), which, when enabled, ensures that trailing whitespace is removed only if the buffer was initially clean. This prevents unintended modifications to buffers that already contain changes, making it useful for preserving intentional whitespace or avoiding unnecessary edits in files managed by version control.

Installation from MELPA

MELPA
  1. If you haven’t already done so, add MELPA repository to your Emacs configuration.
  2. Add the following code to your Emacs init file to install stripspace from MELPA:
(use-package stripspace
  :ensure t
  :commands stripspace-local-mode

  ;; Enable for prog-mode-hook, text-mode-hook, prog-mode-hook
  :hook ((prog-mode . stripspace-local-mode)
         (text-mode . stripspace-local-mode)
         (conf-mode . stripspace-local-mode))

  :custom
  ;; The `stripspace-only-if-initially-clean' option:
  ;; - nil to always delete trailing whitespace.
  ;; - Non-nil to only delete whitespace when the buffer is clean initially.
  ;; (The initial cleanliness check is performed when `stripspace-local-mode'
  ;; is enabled.)
  (stripspace-only-if-initially-clean nil)

  ;; Enabling `stripspace-restore-column' preserves the cursor's column position
  ;; even after stripping spaces. This is useful in scenarios where you add
  ;; extra spaces and then save the file. Although the spaces are removed in the
  ;; saved file, the cursor remains in the same position, ensuring a consistent
  ;; editing experience without affecting cursor placement.
  (stripspace-restore-column t))Code language: PHP (php)

Features

Here are the features of (stripspace-local-mode):

  • Before saving buffer: Automatically removes all trailing whitespace.
  • After saving buffer: Restores the cursor’s column position on the current line, including any spaces before the cursor. This ensures a consistent editing experience and prevents unintended cursor movement when saving a buffer and removing trailing whitespace. This behavior can be controller by the stripspace-restore-column variable (default: t).
  • Even if the buffer is narrowed, stripspace removes trailing whitespace from the entire buffer. This behavior, controlled by the stripspace-ignore-restrictions variable (default: t).
  • An optional feature stripspace-only-if-initially-clean (default: nil), which, when set to non-nil, instructs stripspace to only delete whitespace when the buffer is clean initially. The check for a clean buffer is optimized using a single regex search for trailing whitespace and another for blank lines.
  • The stripspace-verbose variable, when non-nil, shows in the minibuffer whether trailing whitespaces have been removed or, if not, provides the reason for their retention.
  • The functions for deleting whitespace are customizable, allowing the user to specify a custom function for removing trailing whitespace from the current buffer.
  • The stripspace-clean-function variable allows specifying a function for removing trailing whitespace from the current buffer. This function is called to eliminate any extraneous spaces or tabs at the end of lines. (For example, this can be set to a built-in function such as delete-trailing-whitespace (default) or whitespace-cleanup.)

Links

Emacs package: bufferfile – Delete or rename buffer file names with their associated buffers

The bufferfile Emacs package provides helper functions to delete and rename buffer files:

  • bufferwizard-rename-file: Renames the file that the current buffer is visiting. This command renames the file name on disk, adjusts the buffer name, and updates any indirect buffers or other buffers associated with the old file.
  • bufferwizard-delete-file: Delete the file associated with a buffer and kill all buffers visiting the file, including indirect buffers.

Installation with straight (Emacs version < 30)

To install bufferfile with straight.el:

  1. It if hasn’t already been done, add the straight.el bootstrap code to your init file.
  2. Add the following code to the Emacs init file:
(use-package bufferfile
  :ensure t
  :straight (bufferfile
             :type git
             :host github
             :repo "jamescherti/bufferfile.el"))Code language: Lisp (lisp)

Alternative installation: Installation with use-package and :vc (Built-in feature in Emacs version >= 30)

To install bufferfile with use-package and :vc (Emacs >= 30):

(use-package bufferfile
  :ensure t
  :vc (:url "https://github.com/jamescherti/bufferfile.el"
       :rev :newest))Code language: Lisp (lisp)

Customization: Making bufferwizard use version control (VC), such as Git, when renaming or deleting files?

To make bufferwizard use version control (VC) when renaming or deleting files, you can set the variable bufferfile-use-vc to t. This ensures that file operations within bufferwizard interact with the version control system, preserving history and tracking changes properly.

(setq bufferfile-use-vc t)Code language: plaintext (plaintext)

Links

Emacs: persist-text-scale.el – Persist and Restore the Text Scale for All Buffers

The persist-text-scale Emacs package provides persist-text-scale-mode, which ensures that all adjustments made with text-scale-increase and text-scale-decrease are persisted and restored across sessions. As a result, the text size in each buffer remains consistent, even after restarting Emacs.

(By default, persist-text-scale-mode saves the text scale individually for each file-visiting buffer and applies a custom text scale for each special buffer. This behavior can be further customized by assigning a function to the persist-text-scale-buffer-category-function variable. The function determines how buffers are categorized by returning a category identifier based on the buffer’s context. Buffers within the same category will share the same text scale.)

Features

  • Automatically persists and restores the text scale for all buffers.
  • Periodically autosaves at intervals defined by persist-text-scale-autosave-interval (can be set to nil to disable or specified in seconds to enable).
  • Supports unified text scaling across buffer categories.
  • Offers fully customizable logic for categorizing buffers based on text scale.
  • Lightweight and efficient, requiring minimal configuration.
  • Enables custom buffer categorization by specifying a function for the persist-text-scale-buffer-category-function variable, ensuring that groups of buffers share the same persisted and restored text scale.

Installation: Emacs: Install with straight (Emacs version < 30)

To install persist-text-scale with straight.el:

  1. It if hasn’t already been done, add the straight.el bootstrap code to your init file.
  2. Add the following code to the Emacs init file:
(use-package persist-text-scale
  :ensure t
  :straight (persist-text-scale
             :type git
             :host github
             :repo "jamescherti/persist-text-scale.el")
  :custom
  (persist-text-scale-autosave-interval (* 7 60))
  :config
  (persist-text-scale-mode))Code language: JavaScript (javascript)

Alternative installation 1: Emacs: Installing with use-package and :vc (Built-in feature in Emacs version >= 30)

To install persist-text-scale with use-package and :vc (Emacs >= 30):

(use-package persist-text-scale
  :ensure t
  :vc (:url "https://github.com/jamescherti/persist-text-scale.el"
       :rev :newest)
  :custom
  (persist-text-scale-autosave-interval (* 7 60))
  :config
  (persist-text-scale-mode))Code language: JavaScript (javascript)

Alternative installation 2: Doom Emacs

Here is how to install persist-text-scale on Doom Emacs:

  1. Add to the ~/.doom.d/packages.el file:
(package! persist-text-scale
 :recipe
 (:host github :repo "jamescherti/persist-text-scale.el"))Code language: JavaScript (javascript)
  1. Add to ~/.doom.d/config.el:
;; TODO: Load the mode here
(after! persist-text-scale
  (setq persist-text-scale-autosave-interval (* 7 60))
  (persist-text-scale-mode))
  1. Run the doom sync command:
doom sync

Links

Configuring Linux on a ThinkPad T420s Laptop

ThinkPad T420s laptops, despite their age, remain reliable for web browsing, word processing, and various other tasks. Linux can breathe new life into such dated computers, allowing them to perform efficiently.

I configured one of these laptops for my son, and he is now able to do his homework using it. With proper configuration, ThinkPad laptops can achieve optimal performance and power management. This article provides a guide to configuring X11/Xorg, kernel parameters, firmware, fan control, and power management settings to optimize the ThinkPad t420s for modern use.

Some instructions in this article are specific to Debian/Ubuntu-based distributions, but they can easily be adapted to other distributions such as Red Hat, Fedora, Arch Linux, Gentoo, and others.

X11/Xorg

To ensure proper functionality of Intel graphics and avoid issues such as black screens after waking from sleep, use the Intel driver instead of modesetting.

Create the configuration file /etc/X11/xorg.conf.d/30-intel.conf:

Section "Device"
  Identifier "Intel Graphics"
  Driver "intel"

  Option "Backlight" "intel_backlight"
EndSectionCode language: plaintext (plaintext)

Ensure the intel driver is installed:

sudo apt-get install xserver-xorg-video-intelCode language: plaintext (plaintext)

IMPORTANT: Ensure that the integrated graphics are set as the default video card in the ThinkPad BIOS.

Kernel parameters

To ensure backlight control is working (increasing and decreasing brightness), add the following kernel parameter: acpi_backlight=native

On a Debian/Ubuntu based distribution, this can be appended to the kernel command line in the bootloader configuration, typically in /etc/default/grub (for GRUB users):

GRUB_CMDLINE_LINUX_DEFAULT="quiet splash acpi_backlight=native"Code language: plaintext (plaintext)

(If you experience suspend/resume issues, a black screen, or system freezes, try adding the noapic kernel parameter.)

After modifying this file, update GRUB with:

sudo update-grubCode language: plaintext (plaintext)

Fan control

Without software to control the fan, it may run at maximum speed. To enable fan control, create the file /etc/modprobe.d/thinkpad_acpi.conf:

options thinkpad_acpi fan_control=1Code language: plaintext (plaintext)

After that, install zcfan. On a Debian/Ubuntu based distribution:

sudo apt-get install lm-sensors zcfanCode language: plaintext (plaintext)

(An alternative to zcfan: thinkfan)

Packages

Ensure that the required firmware for Atheros and Realtek network devices is installed, along with the tp-smapi-dkms package to enable access to ThinkPad-specific hardware features via the TP-SMAPI kernel modules. On Debian- and Ubuntu-based distributions, install the following packages:

sudo apt install firmware-atheros firmware-realtek tp-smapi-dkmsCode language: plaintext (plaintext)

It is also recommended to install essential packages for hardware encoding and decoding, including intel-microcode for the latest processor updates, which improve system stability and performance:

sudo apt-get install intel-microcode intel-media-va-driver-non-free i965-va-driverCode language: plaintext (plaintext)

TLP

TLP is a power management tool that optimizes battery life. Install and configure it as follows:

sudo apt install tlpCode language: plaintext (plaintext)

Create the configuration file /etc/tlp.d/00-base.conf:

DEVICES_TO_DISABLE_ON_BAT="bluetooth wwan"
DEVICES_TO_ENABLE_ON_STARTUP="wifi"
DEVICES_TO_DISABLE_ON_LAN_CONNECT="wifi wwan"

TLP_DEFAULT_MODE=BAT

CPU_SCALING_GOVERNOR_ON_AC=performance
CPU_SCALING_GOVERNOR_ON_BAT=schedutil

# PCIe Active State Power Management (ASPM):
PCIE_ASPM_ON_AC=performance

# Set Intel CPU performance: 0..100 (%). Limit the
# max/min to control the power dissipation of the CPU.
# Values are stated as a percentage of the available
# performance.
CPU_MIN_PERF_ON_AC=70
CPU_MAX_PERF_ON_AC=100

# [default] performance powersave powersupersave. on=disable
RUNTIME_PM_ON_AC=on
RUNTIME_PM_ON_BAT=powersupersaveCode language: Python (python)

Conclusion

The ThinkPad T420s, though older models, remain reliable machines for everyday tasks. With the right configuration, these laptops can be revitalized, making them well-suited for modern use.

jc-dotfiles – A collection of configuration files for UNIX/Linux systems

The jamescherti/jc-dotfiles repository is a collection of configuration files. You can either install them directly or use them as inspiration your own dotfiles. These dotfiles provide configurations for various tools, enhancing productivity and usability. This article will explore the contents of the jc-dotfiles repository, highlight the main configurations, and guide you through the installation process.

In addition to the jc-dotfiles repository, the author also recommends the following repositories:

  • jamescherti/jc-firefox-settings: Provides the user.js file, which holds settings to customize the Firefox web browser to enhance the user experience and security.
  • jamescherti/jc-xfce-settings: A script that can customize the XFCE desktop environment programmatically, including window management, notifications, keyboard settings, and more, to enhance the user experience.
  • jamescherti/jc-gnome-settings: A script that can customize the GNOME desktop environment programmatically, including window management, notifications, and more.
  • jamescherti/bash-stdops: A collection of Bash helper shell scripts.
  • jamescherti/jc-gentoo-portage: Provides configuration files for customizing Gentoo Linux Portage, including package management, USE flags, and system-wide settings.
  • jamescherti/minimal-emacs.d: A lightweight and optimized Emacs base (init.el and early-init.el) that gives you full control over your configuration. It provides better defaults, an optimized startup, and a clean foundation for building your own vanilla Emacs setup.
  • jamescherti/jc-vimrc: The jc-vimrc project is a customizable Vim base that provides better Vim defaults, intended to serve as a solid foundation for a Vim configuration.

The jc-dotfiles Repository Overview

The repository includes configurations for several components of a UNIX/Linux system, ranging from shell settings to terminal multiplexer and input customizations. Here’s a breakdown of the key configurations included:

1. Shell Configuration (.bashrc, .profile, .bash_profile)

The shell configuration files are optimized for efficient Bash shell settings:

  • Efficient Command Execution: Predefined aliases, functions, and environment variables to speed up common tasks.
  • Interactive Sessions: Custom prompt configurations and other interactive settings that improve the overall shell experience.

2. Terminal Multiplexer Configuration (.tmux.conf)

Tmux is a tool for managing multiple terminal sessions, and this configuration enhances your Tmux setup. It includes:

  • Session Management: Custom keybindings and layout configurations for improved session switching.
  • Productivity Boosters: Enhanced usability and efficiency for handling multiple tasks within terminal windows.

3. Readline Configuration (.inputrc)

The Readline configuration improves interactive shell input by allowing additional keybindings:

  • Custom Keybindings: Use Alt-h, Alt-j, Alt-k, and Alt-l for cursor movement, enabling Vim-style HJKL navigation within the terminal.

4. Other Configurations

The repository also includes a variety of other configuration files and scripts:

  • .gitconfig: Custom Git settings to improve version control workflow. (Here is an article about .gitconfig: Optimized Git configuration ~/.gitconfig for performance and usability)
  • ranger: File manager configuration for enhanced navigation and file handling.
  • .fdignore: Ignore rules for fd, the fast search tool, to filter out unwanted files during searches.
  • .wcalcrc: Configuration for wcal, a command-line calculator.
  • mpv: Media player settings for a better viewing experience.
  • picom: Window compositor configuration for optimized display and transparency effects.
  • feh: Image viewer configuration with useful options and custom keybindings.

Conclusion

The jamescherti/jc-dotfiles configuration scripts can enhance your workflow. Whether you install them directly or use them as inspiration for your own dotfiles, you’ll gain access to optimized settings for your shell, terminal, Git, and various other tools, all aimed at boosting productivity and efficiency.

bash-stdops – A collection of useful Bash Shell Scripts

The jamescherti/bash-stdops project is a collection of helpful Bash scripts that simplify various operations, including file searching, text replacement, and content modification.

I use these scripts in conjunction with text editors like Emacs and Vim to automate tasks, including managing Tmux sessions, replacing text across a Git repository, securely copying and pasting from the clipboard by prompting the user before executing commands in Tmux, fix permissions, among other operations.

The bash-stdops Script Collection Overview

Files, Paths, and Strings

  • walk: Recursively lists files from the specified directory.
  • walk-run: Executes a command on all files.
  • sre: Replaces occurrences of a specified string or regular expression pattern, with support for case-insensitive matching and regular expressions.
  • git-sre: Executes sre at the root of a Git repository to replace text within files.
  • path-tr, path-uppercase, path-lowercase: Processes a file path to convert the filename to uppercase or lowercase.
  • autoperm: Sets appropriate permissions for files or directories (e.g., 755 for directories).
  • path-is: Prints the path and exits with status 0 if the file is binary or text.

Git

  • git-dcommit: Automates the process of adding, reviewing, and committing changes in Git.
  • git-squash: Squashes new Git commits between the current branch and a specified branch.

SSH

  • esa: Manages the SSH agent, including starting, stopping, adding keys, and executing commands.
  • sshwait: Waits for an SSH server to become available on a specified host.

Tmux

  • tmux-cbpaste: Pastes clipboard content into the current tmux window with user confirmation.
  • tmux-run: Executes a command in a new tmux window. If inside tmux, it adds a new window to the current session; otherwise, it creates a window in the first available tmux session.
  • tmux-session: Attaches to an existing tmux session or creates a new one if it doesn’t exist.

X11/Wayland

  • xocrshot: Captures a screenshot, performs OCR on it, displays the extracted text, and copies it to the clipboard.

Misc

  • haide: Uses AIDE to monitor the file integrity of the user’s home directory.
  • cbcopy, cbpaste, cbwatch: Manages clipboard content by copying, pasting, or monitoring for changes.
  • outonerror: Redirects the command output to stderr only if the command fails.
  • over: Displays a notification once a command completes execution.
  • largs: Executes a command for each line of input from stdin, replacing {} with the line.

Conclusion

The jamescherti/bash-stdops scripts provide a variety of tasks, including file manipulation, Git management, and SSH automation, improving efficiency and usability.